People & Culture (HR admin)¶
Who this is for: People & Culture staff who manage employees, invitations, and app access. Time: ~10 minutes. You'll need: the People & Culture module (the 👥 icon in the left nav).
P&C is where a person's whole lifecycle lives: adding them, inviting them to the app, granting module access, mapping them to Time Doctor, and offboarding.
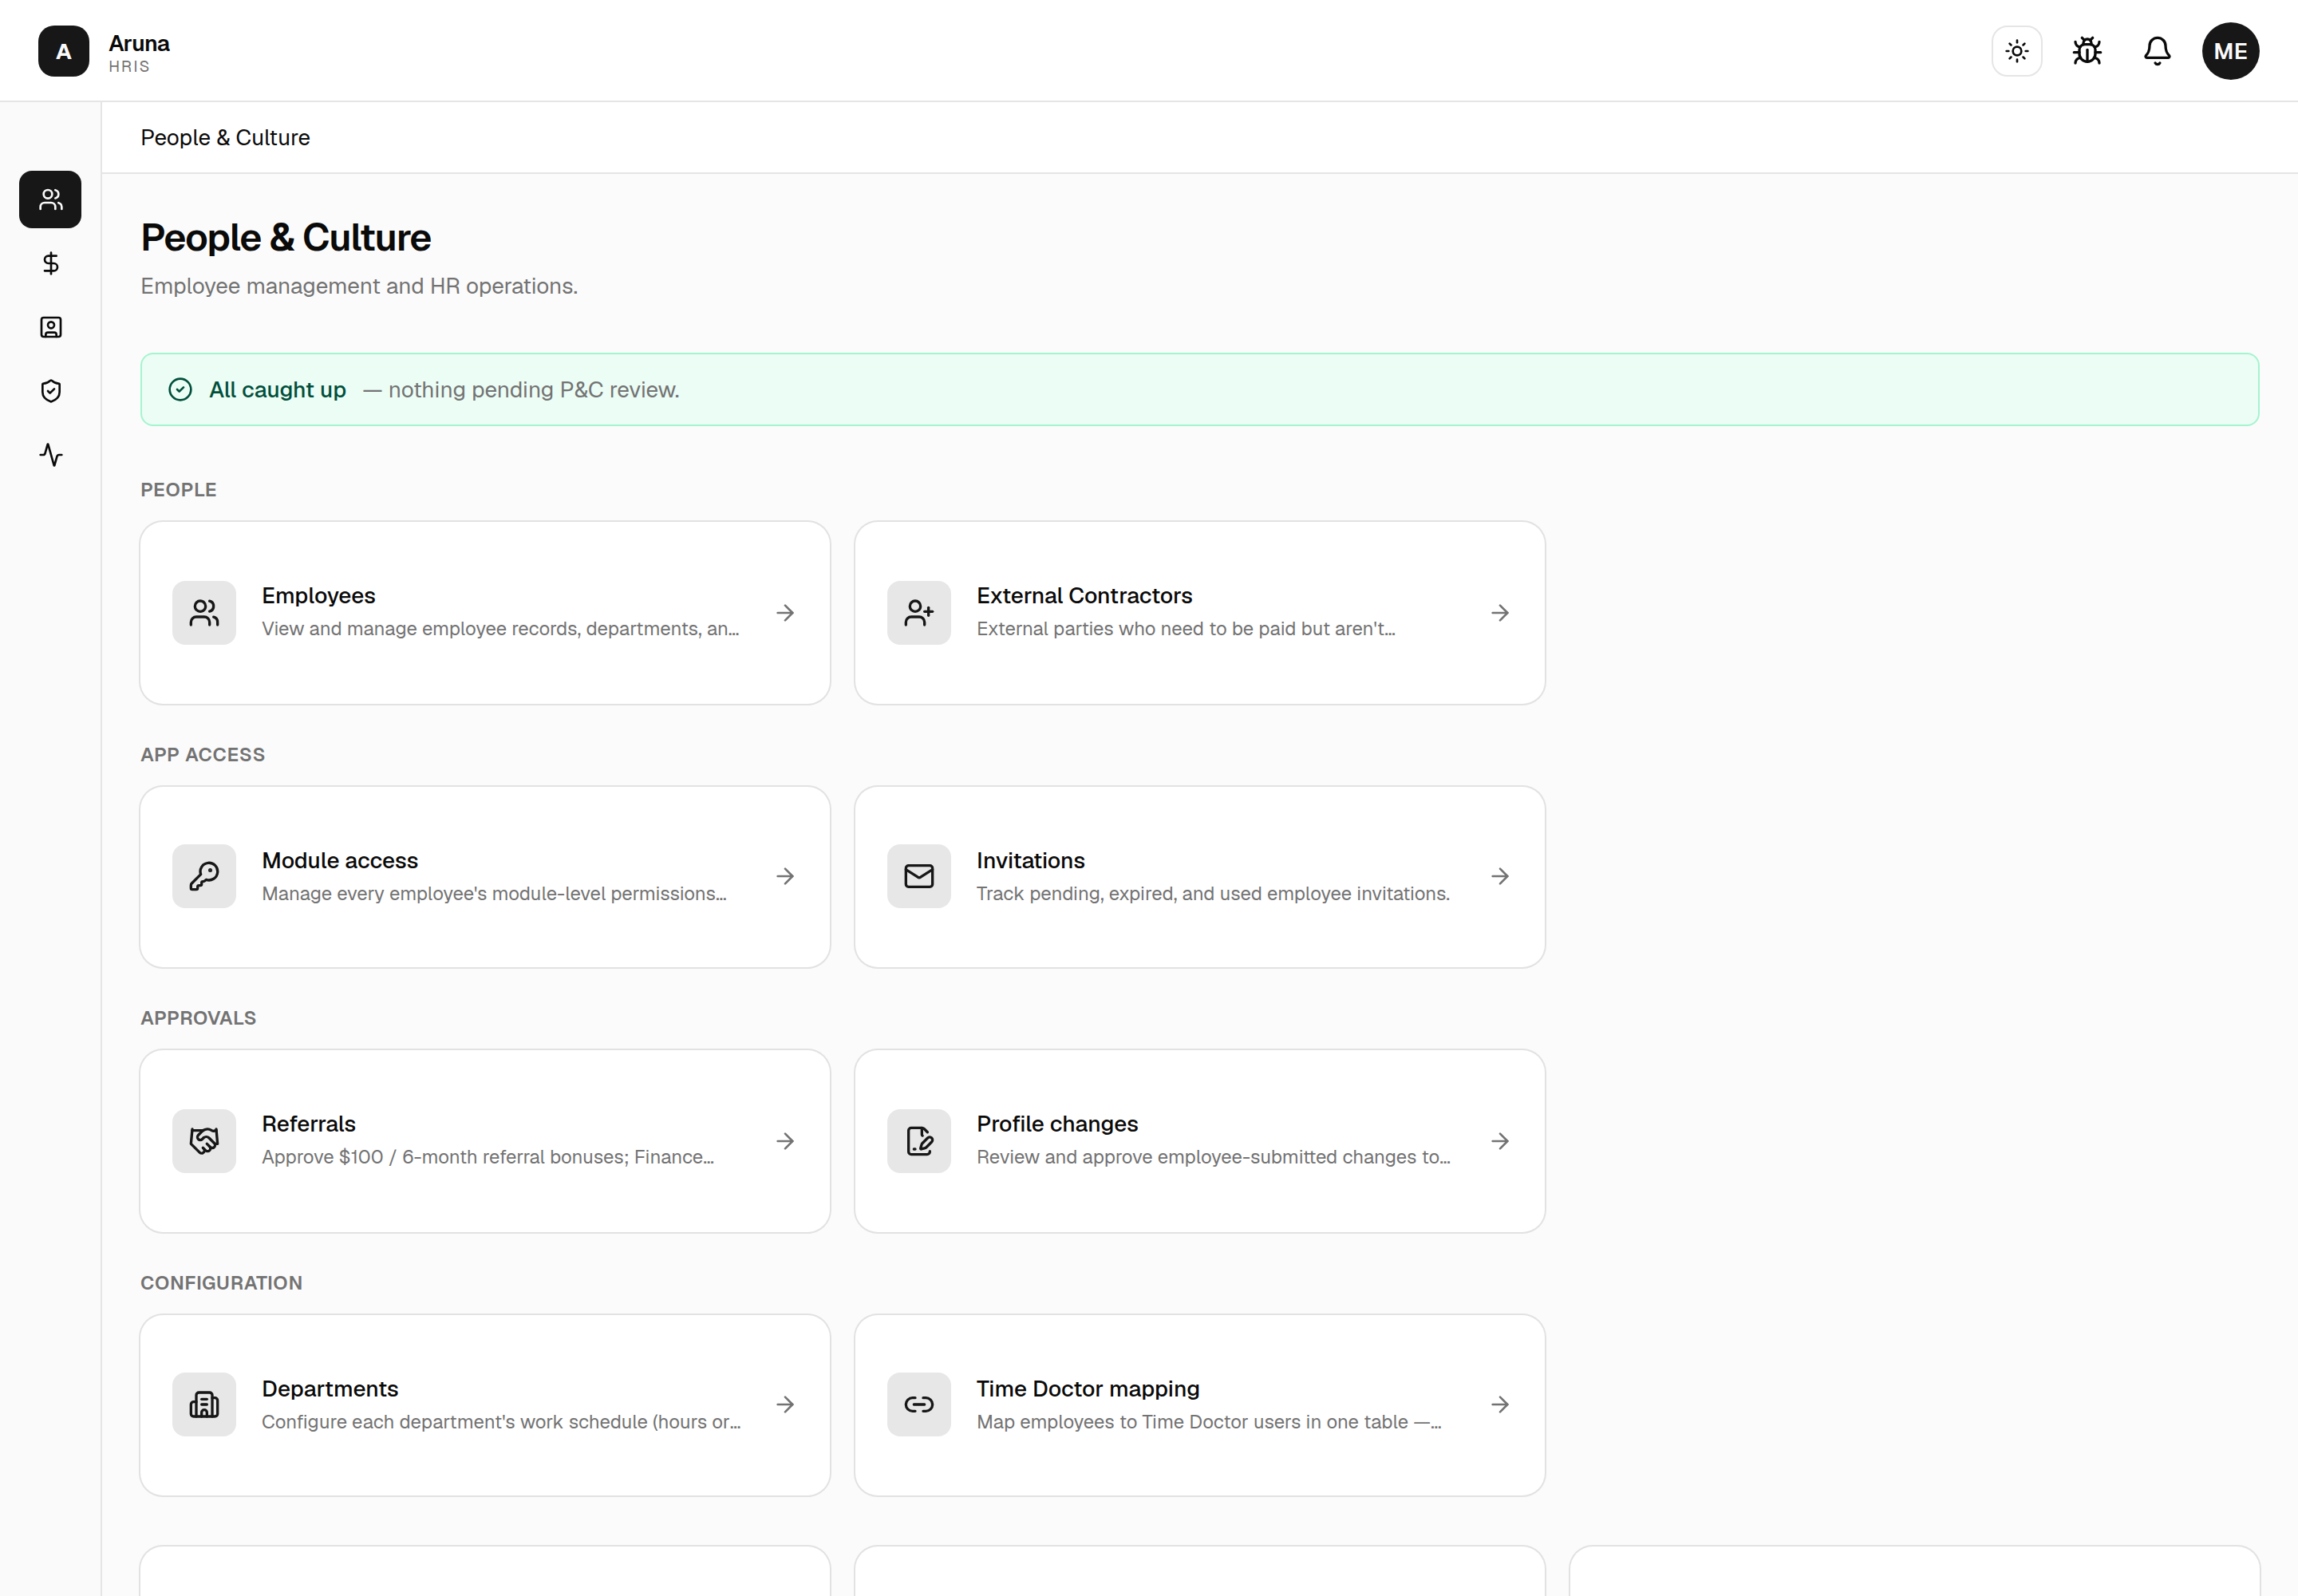
The dashboard groups every P&C destination into a few labelled menus — People, App access, Approvals, and Configuration — above a banner that flags anything waiting on your review.
1. The employee roster¶
Open People & Culture → Employees.
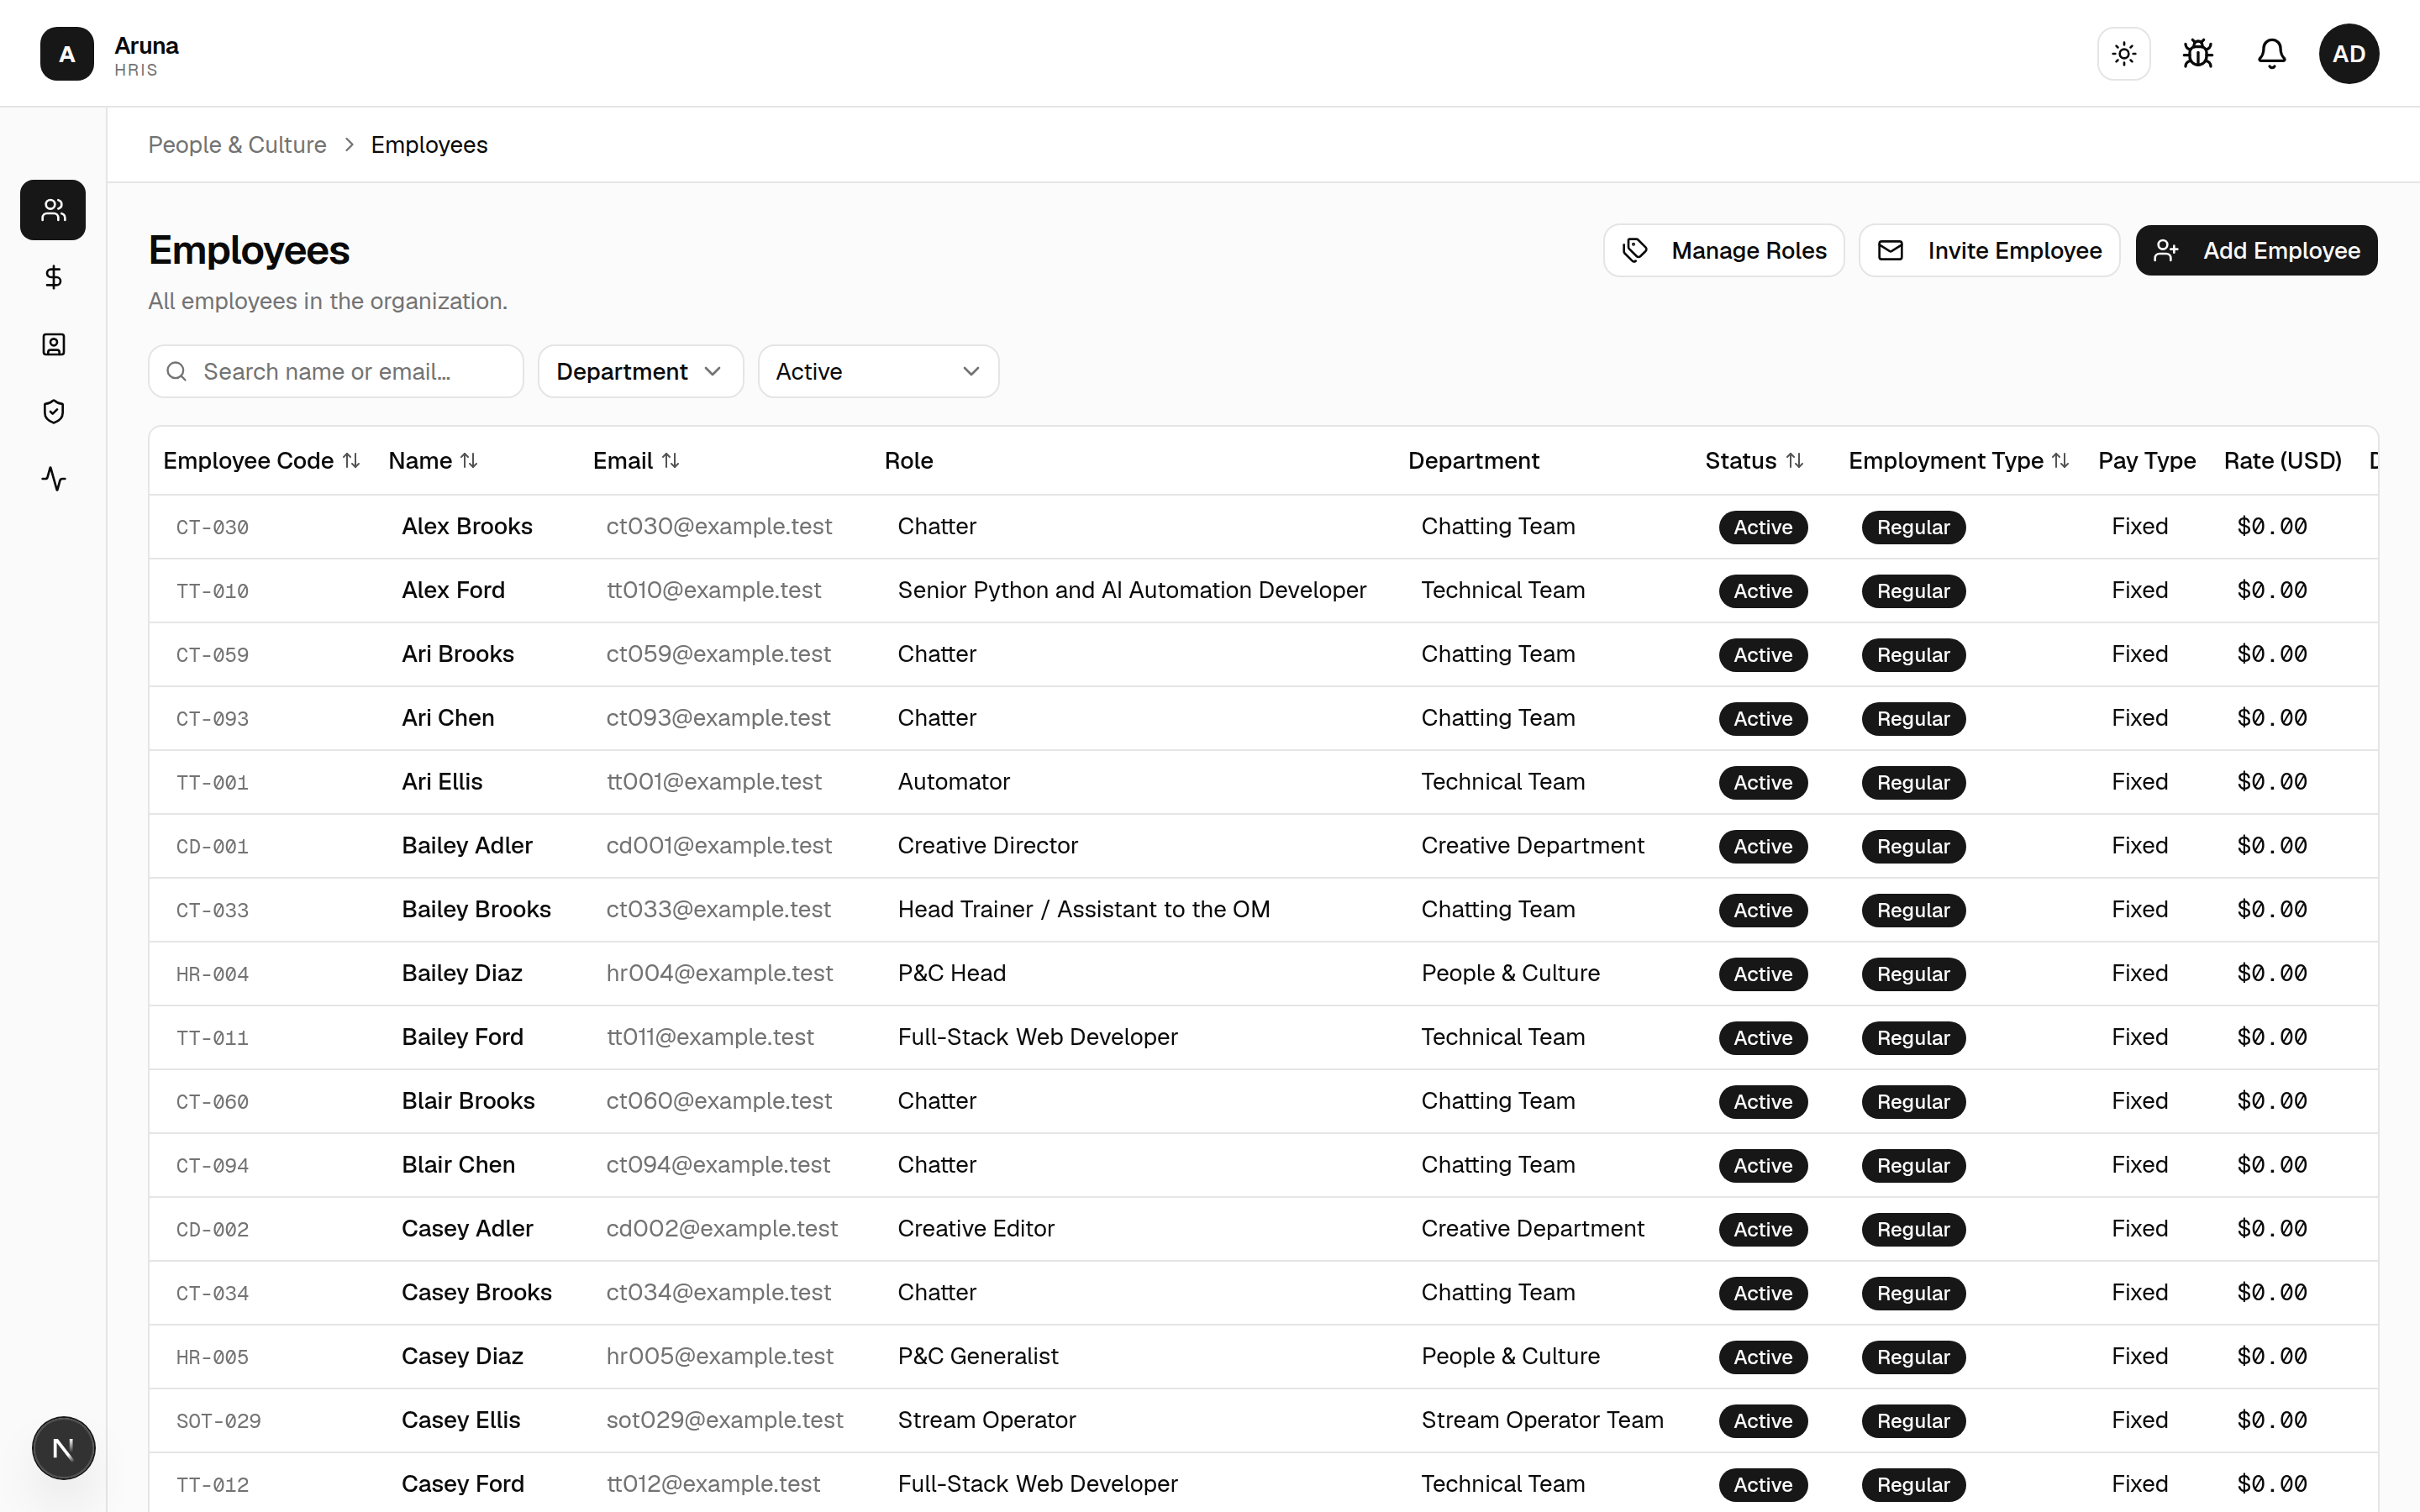
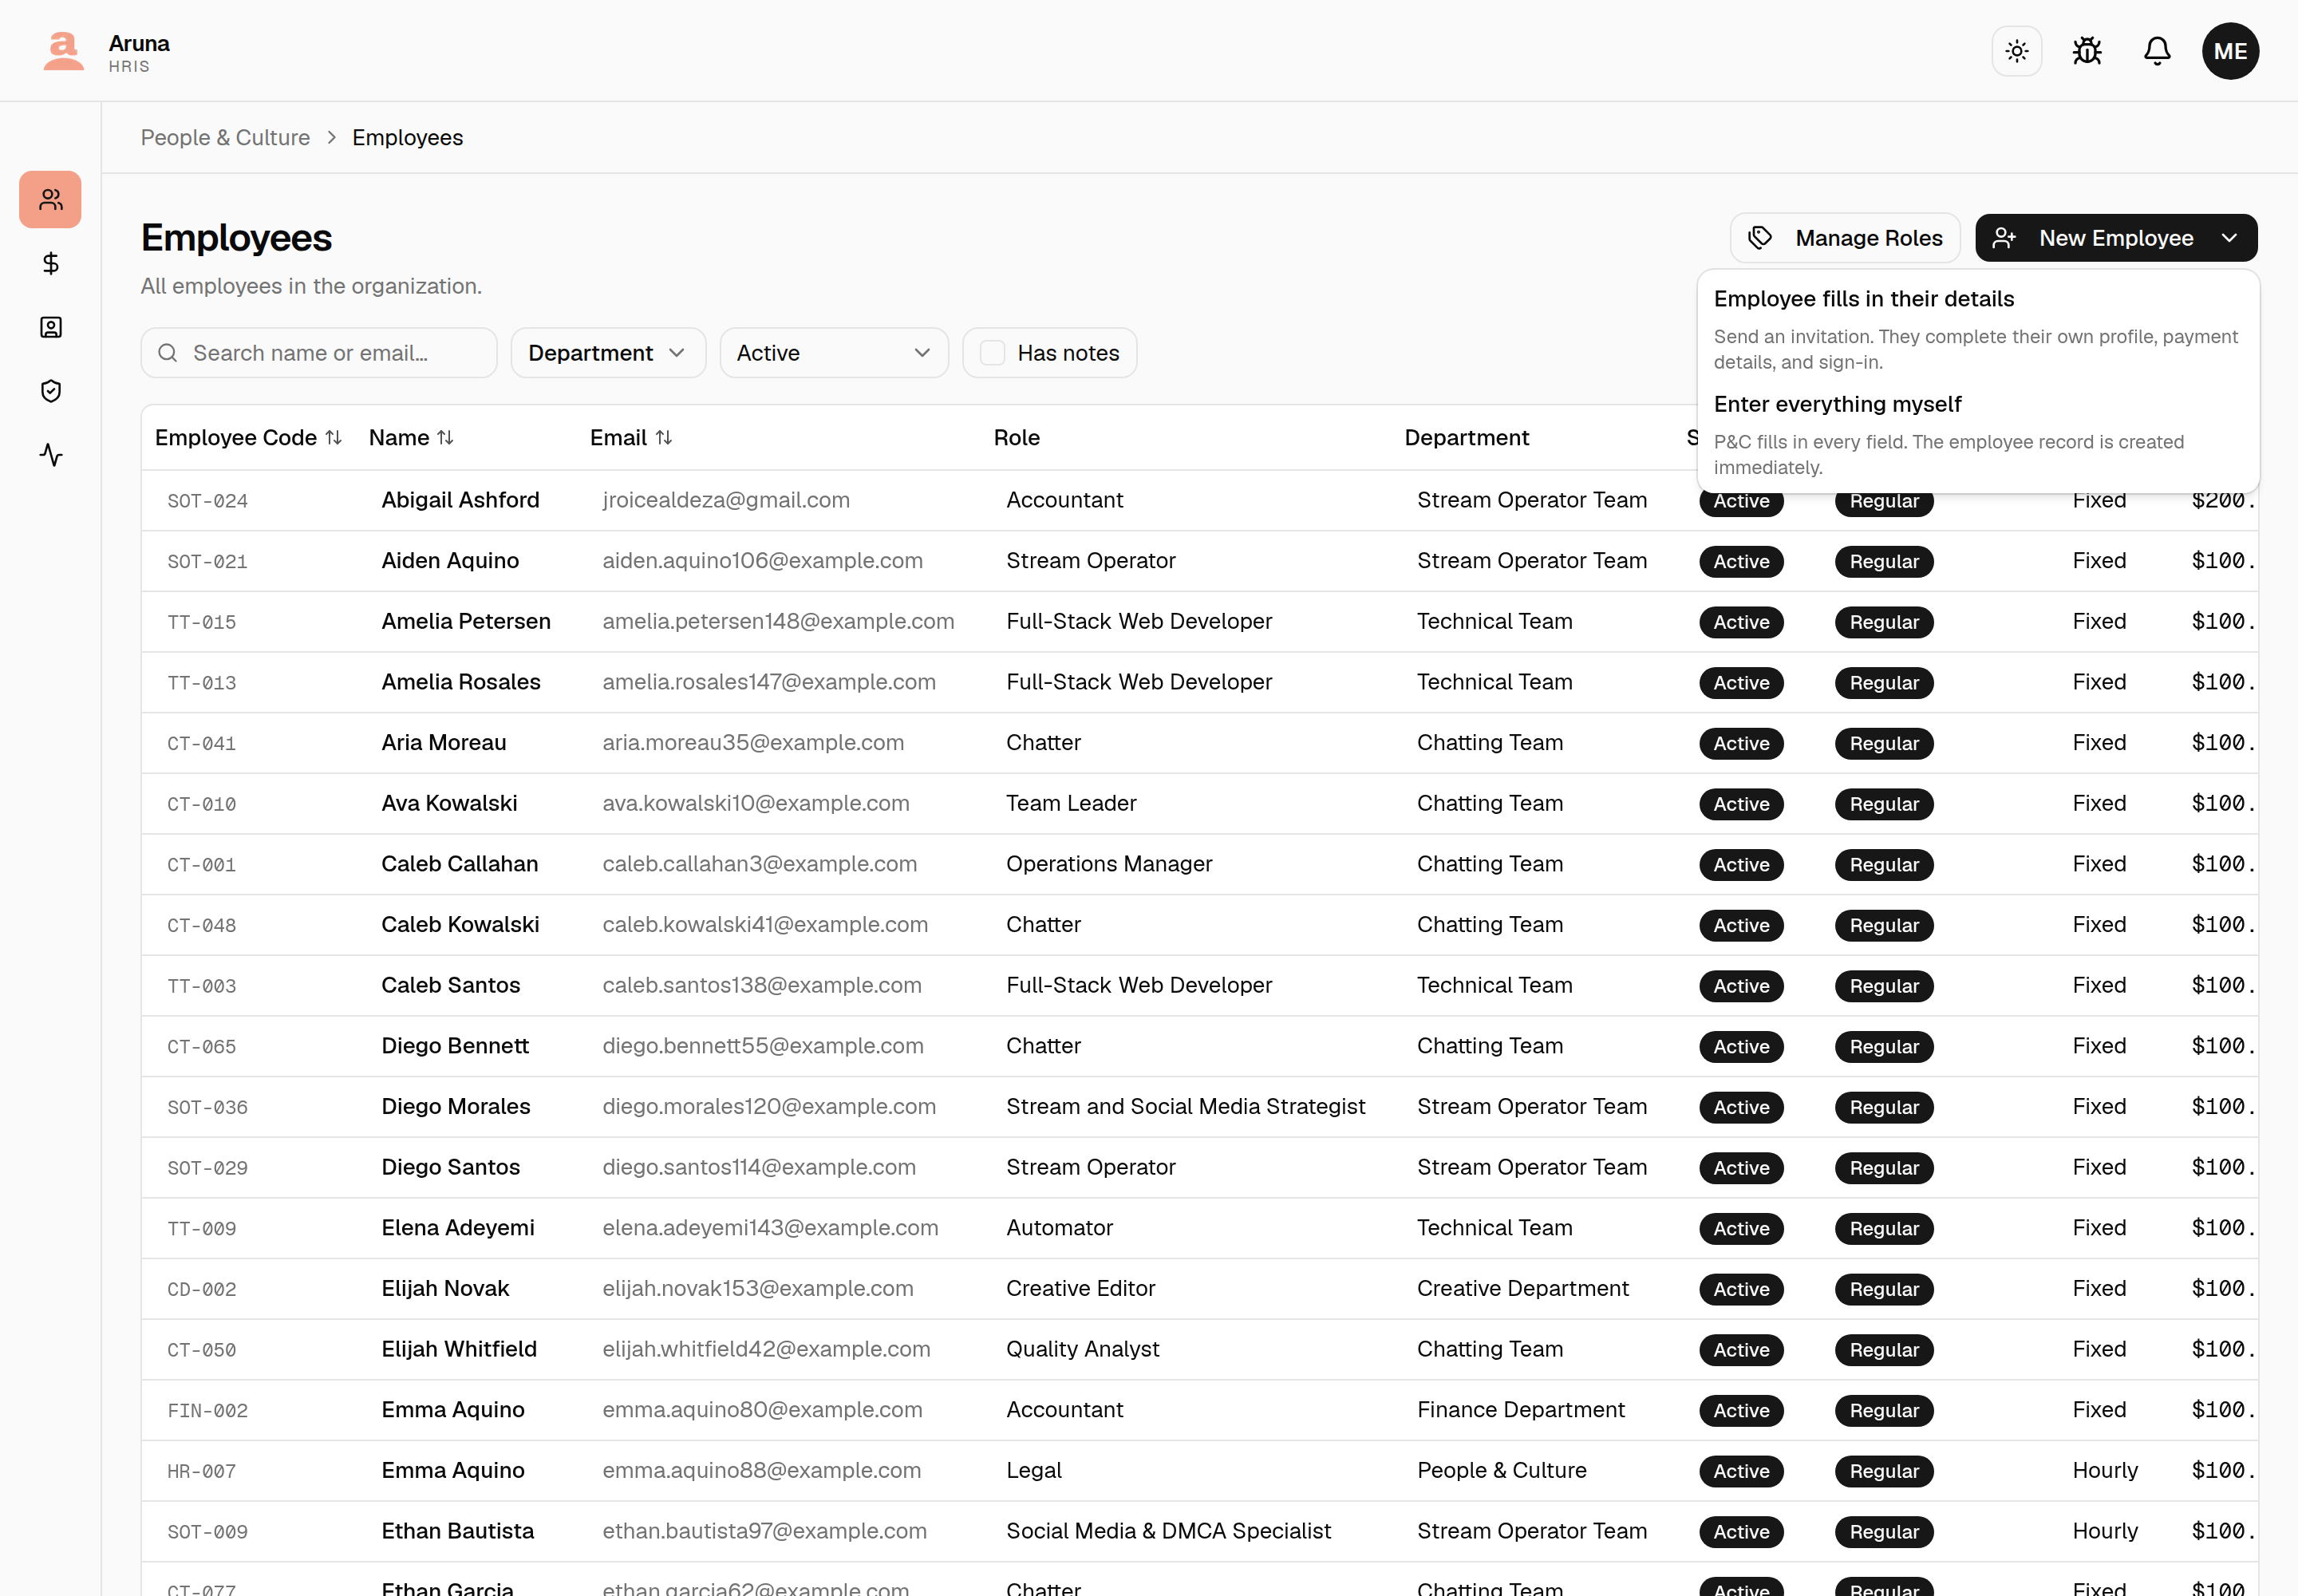
- Search by name or email; filter by Department, status (Active / others), and Has notes (only employees with internal P&C notes).
- A row with a small note icon next to the name has internal P&C notes on file — see Notes (internal) below.
- Top-right actions: Manage Roles and New Employee.
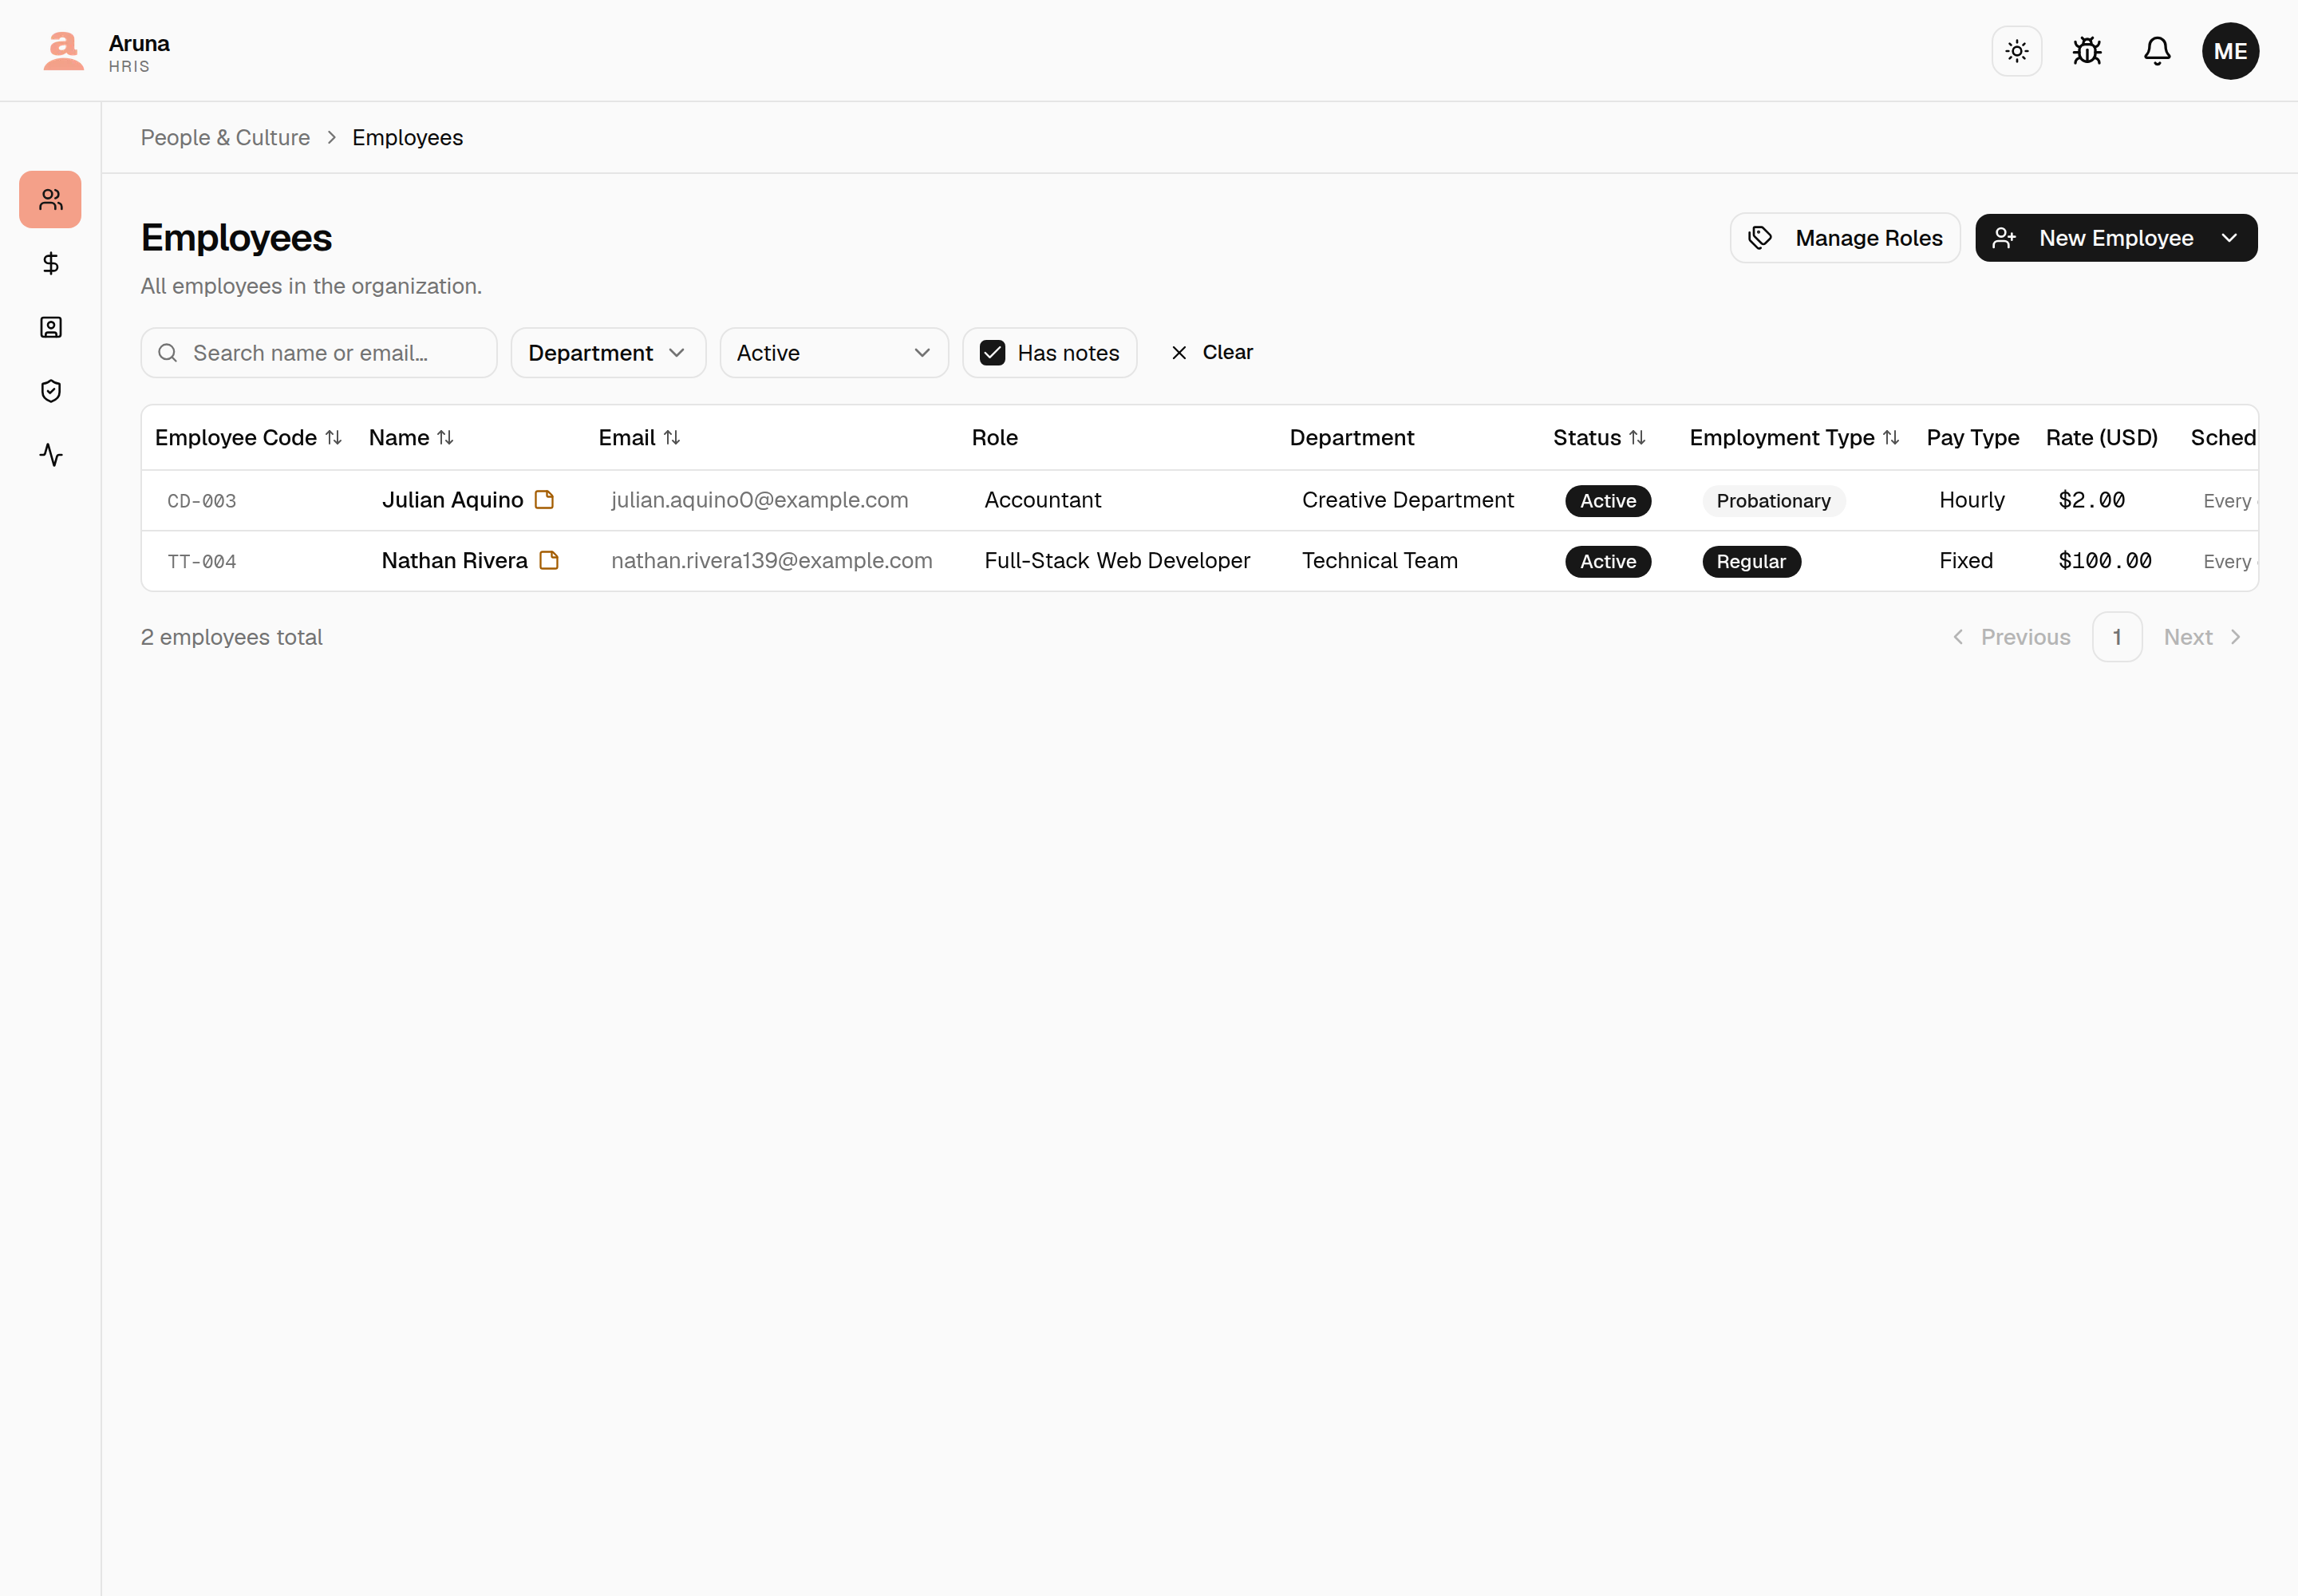
New Employee is a dropdown with the two ways to put someone on file:
- Employee fills in their details — send an invitation and let them complete their own profile, payment details, and sign-in. Reach for this by default; it saves P&C transcribing a bank account out of a chat message, and the employee is the authority on their own details.
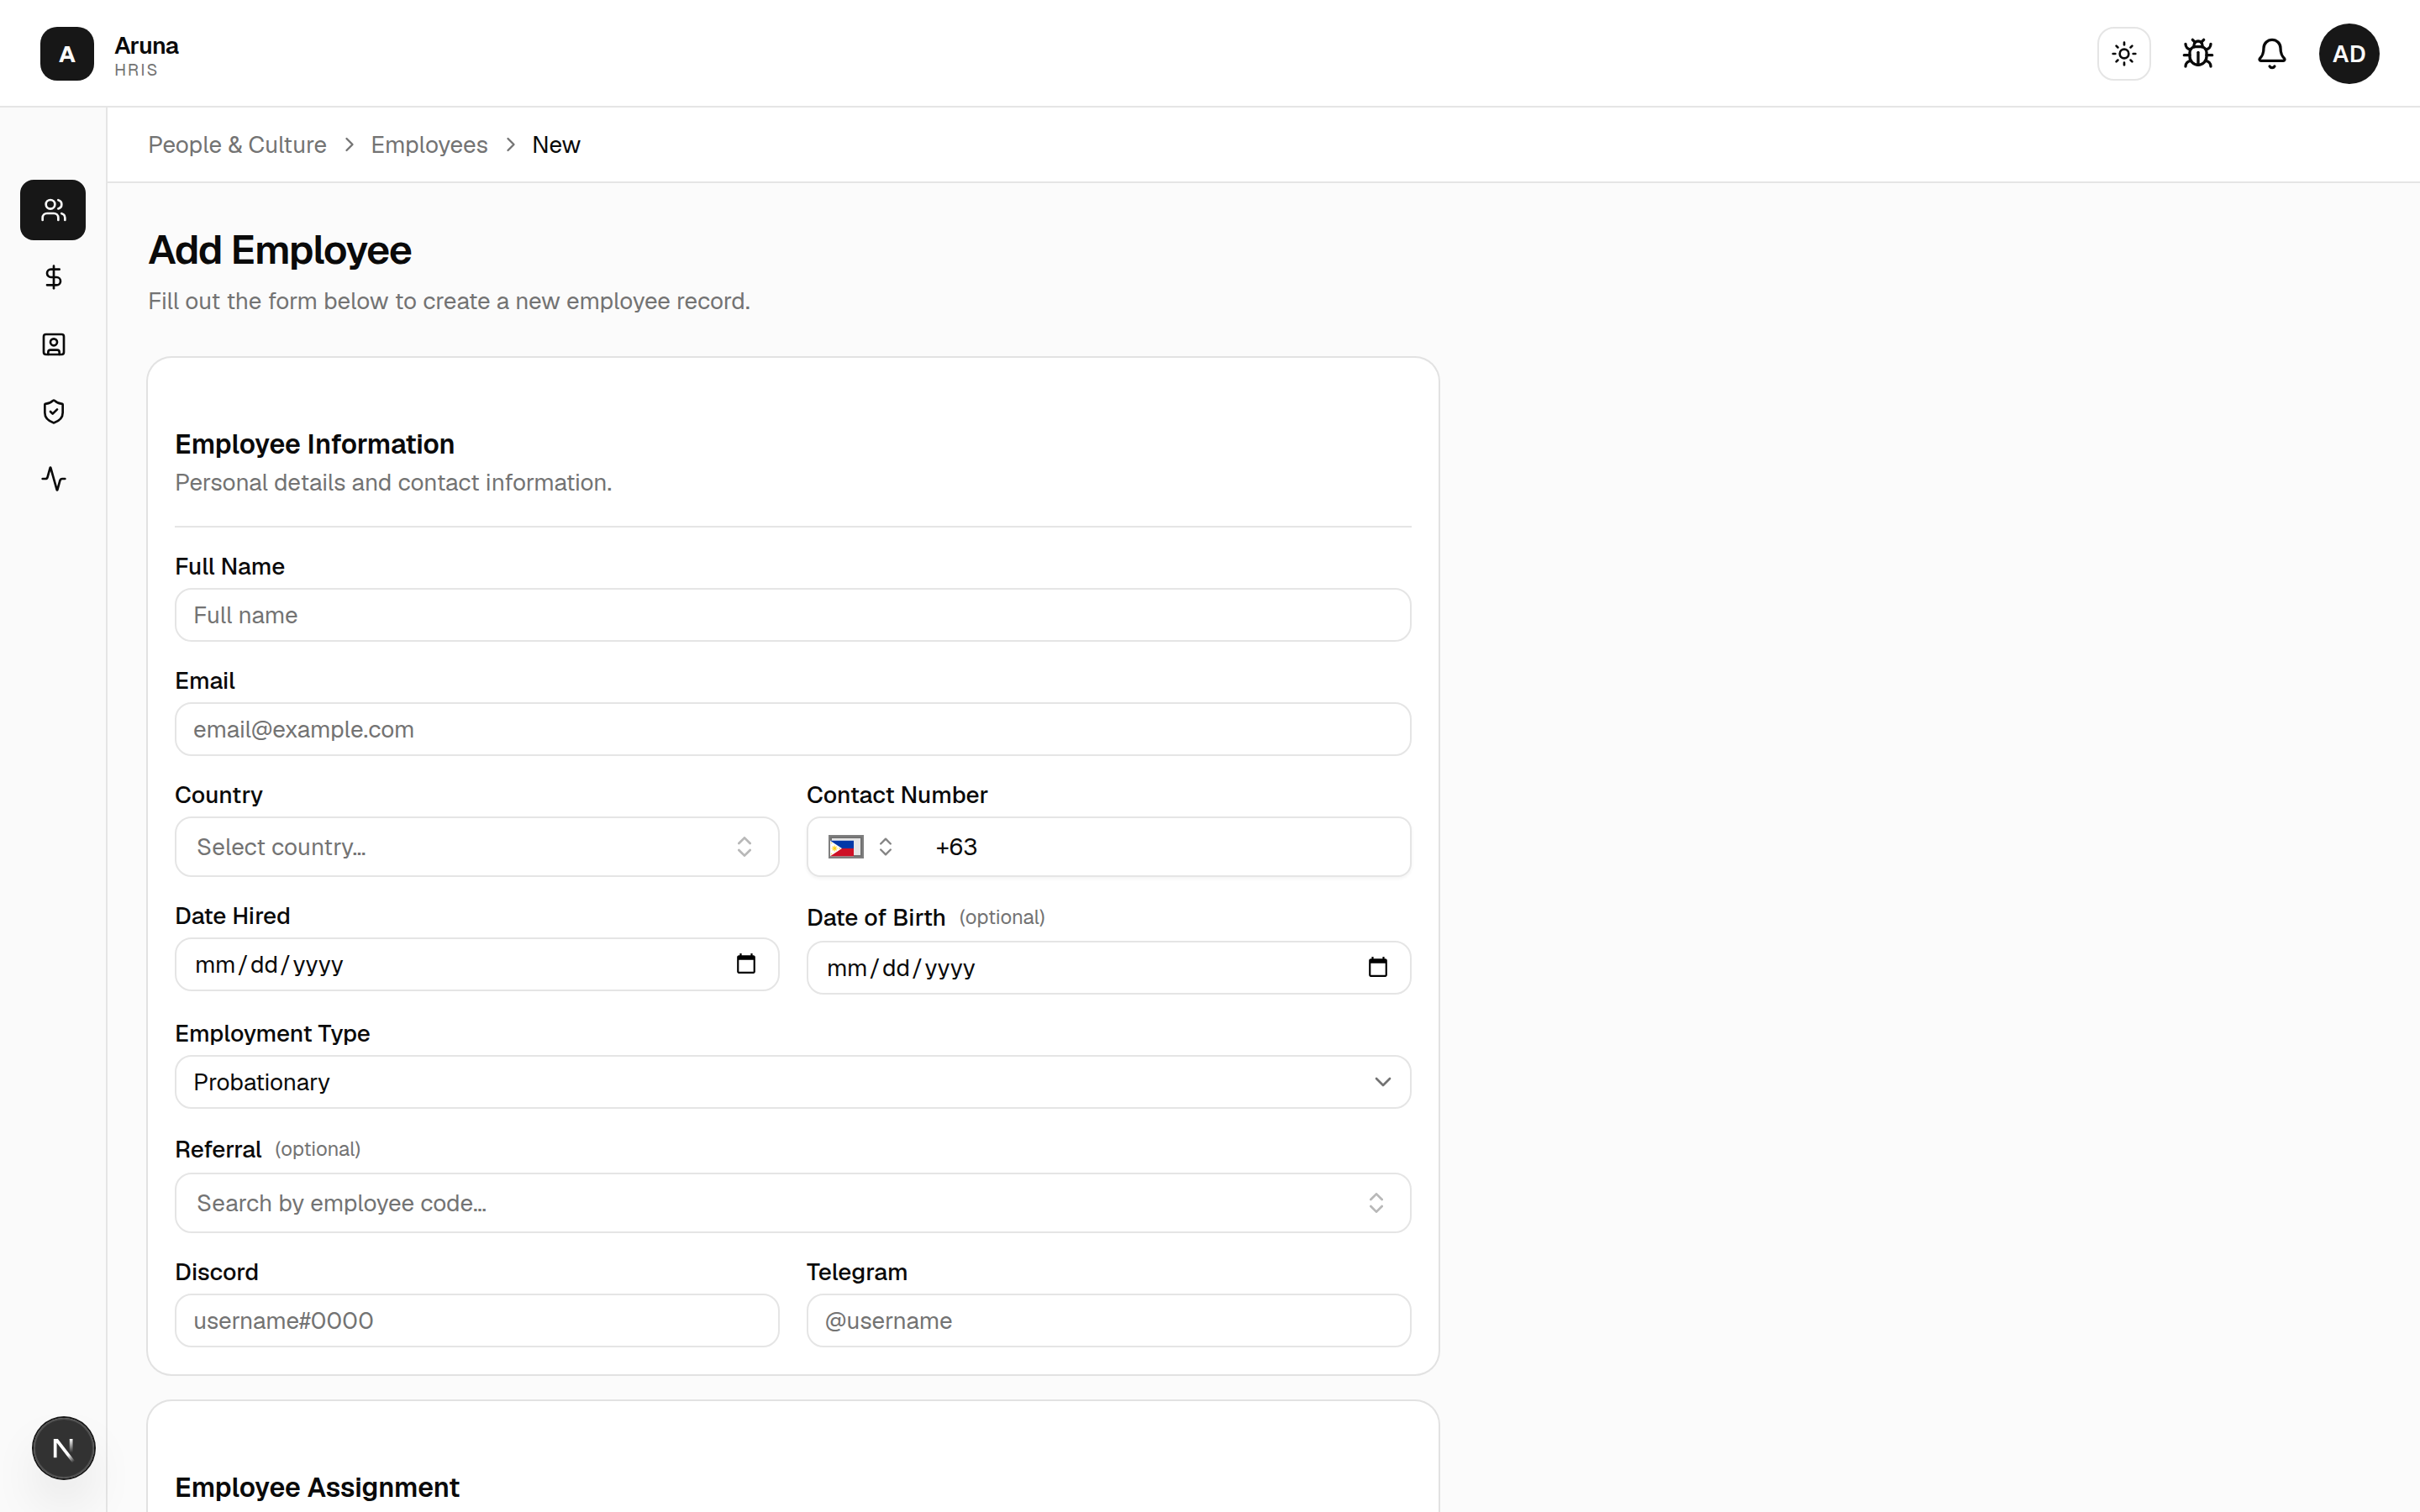
- Enter everything myself — P&C fills in every field and the employee record is created immediately. For when there's nobody to ask yet.
"Enter everything myself" opens the full form — personal details, assignment, and compensation:
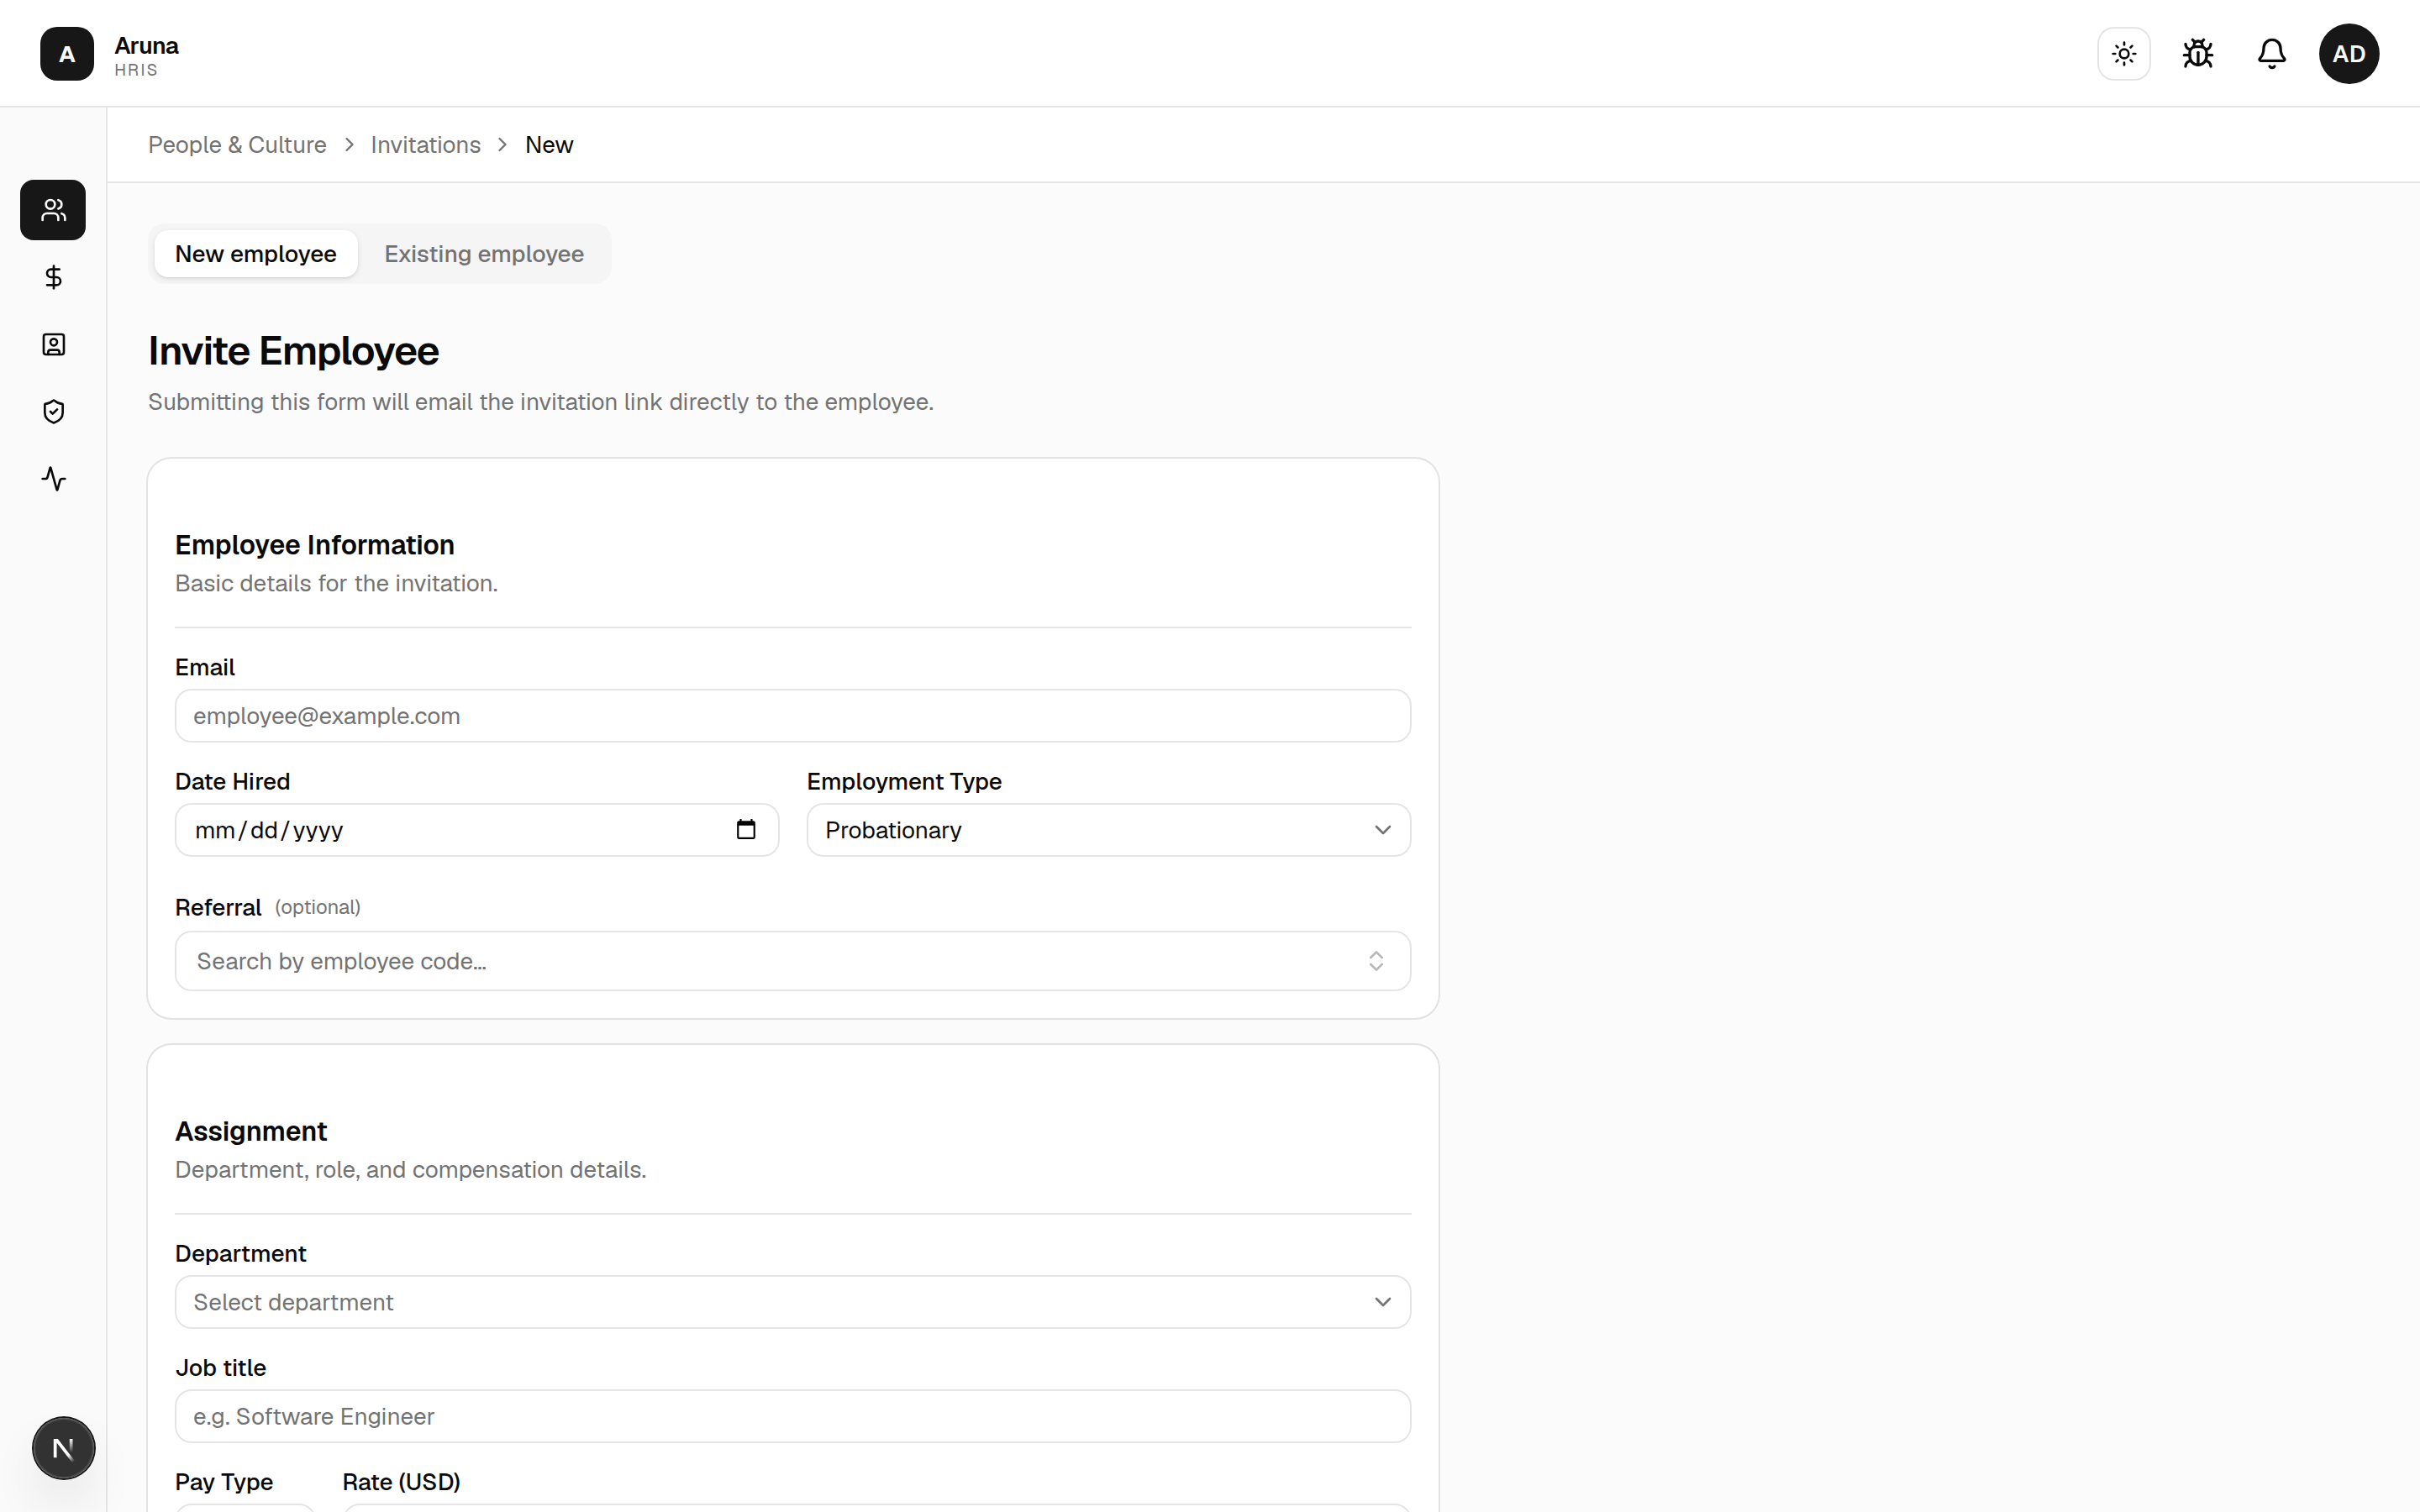
The invitation route has its own New employee / Existing employee toggle at the top — the existing-employee variant just gathers sign-in details for someone already on the roster:
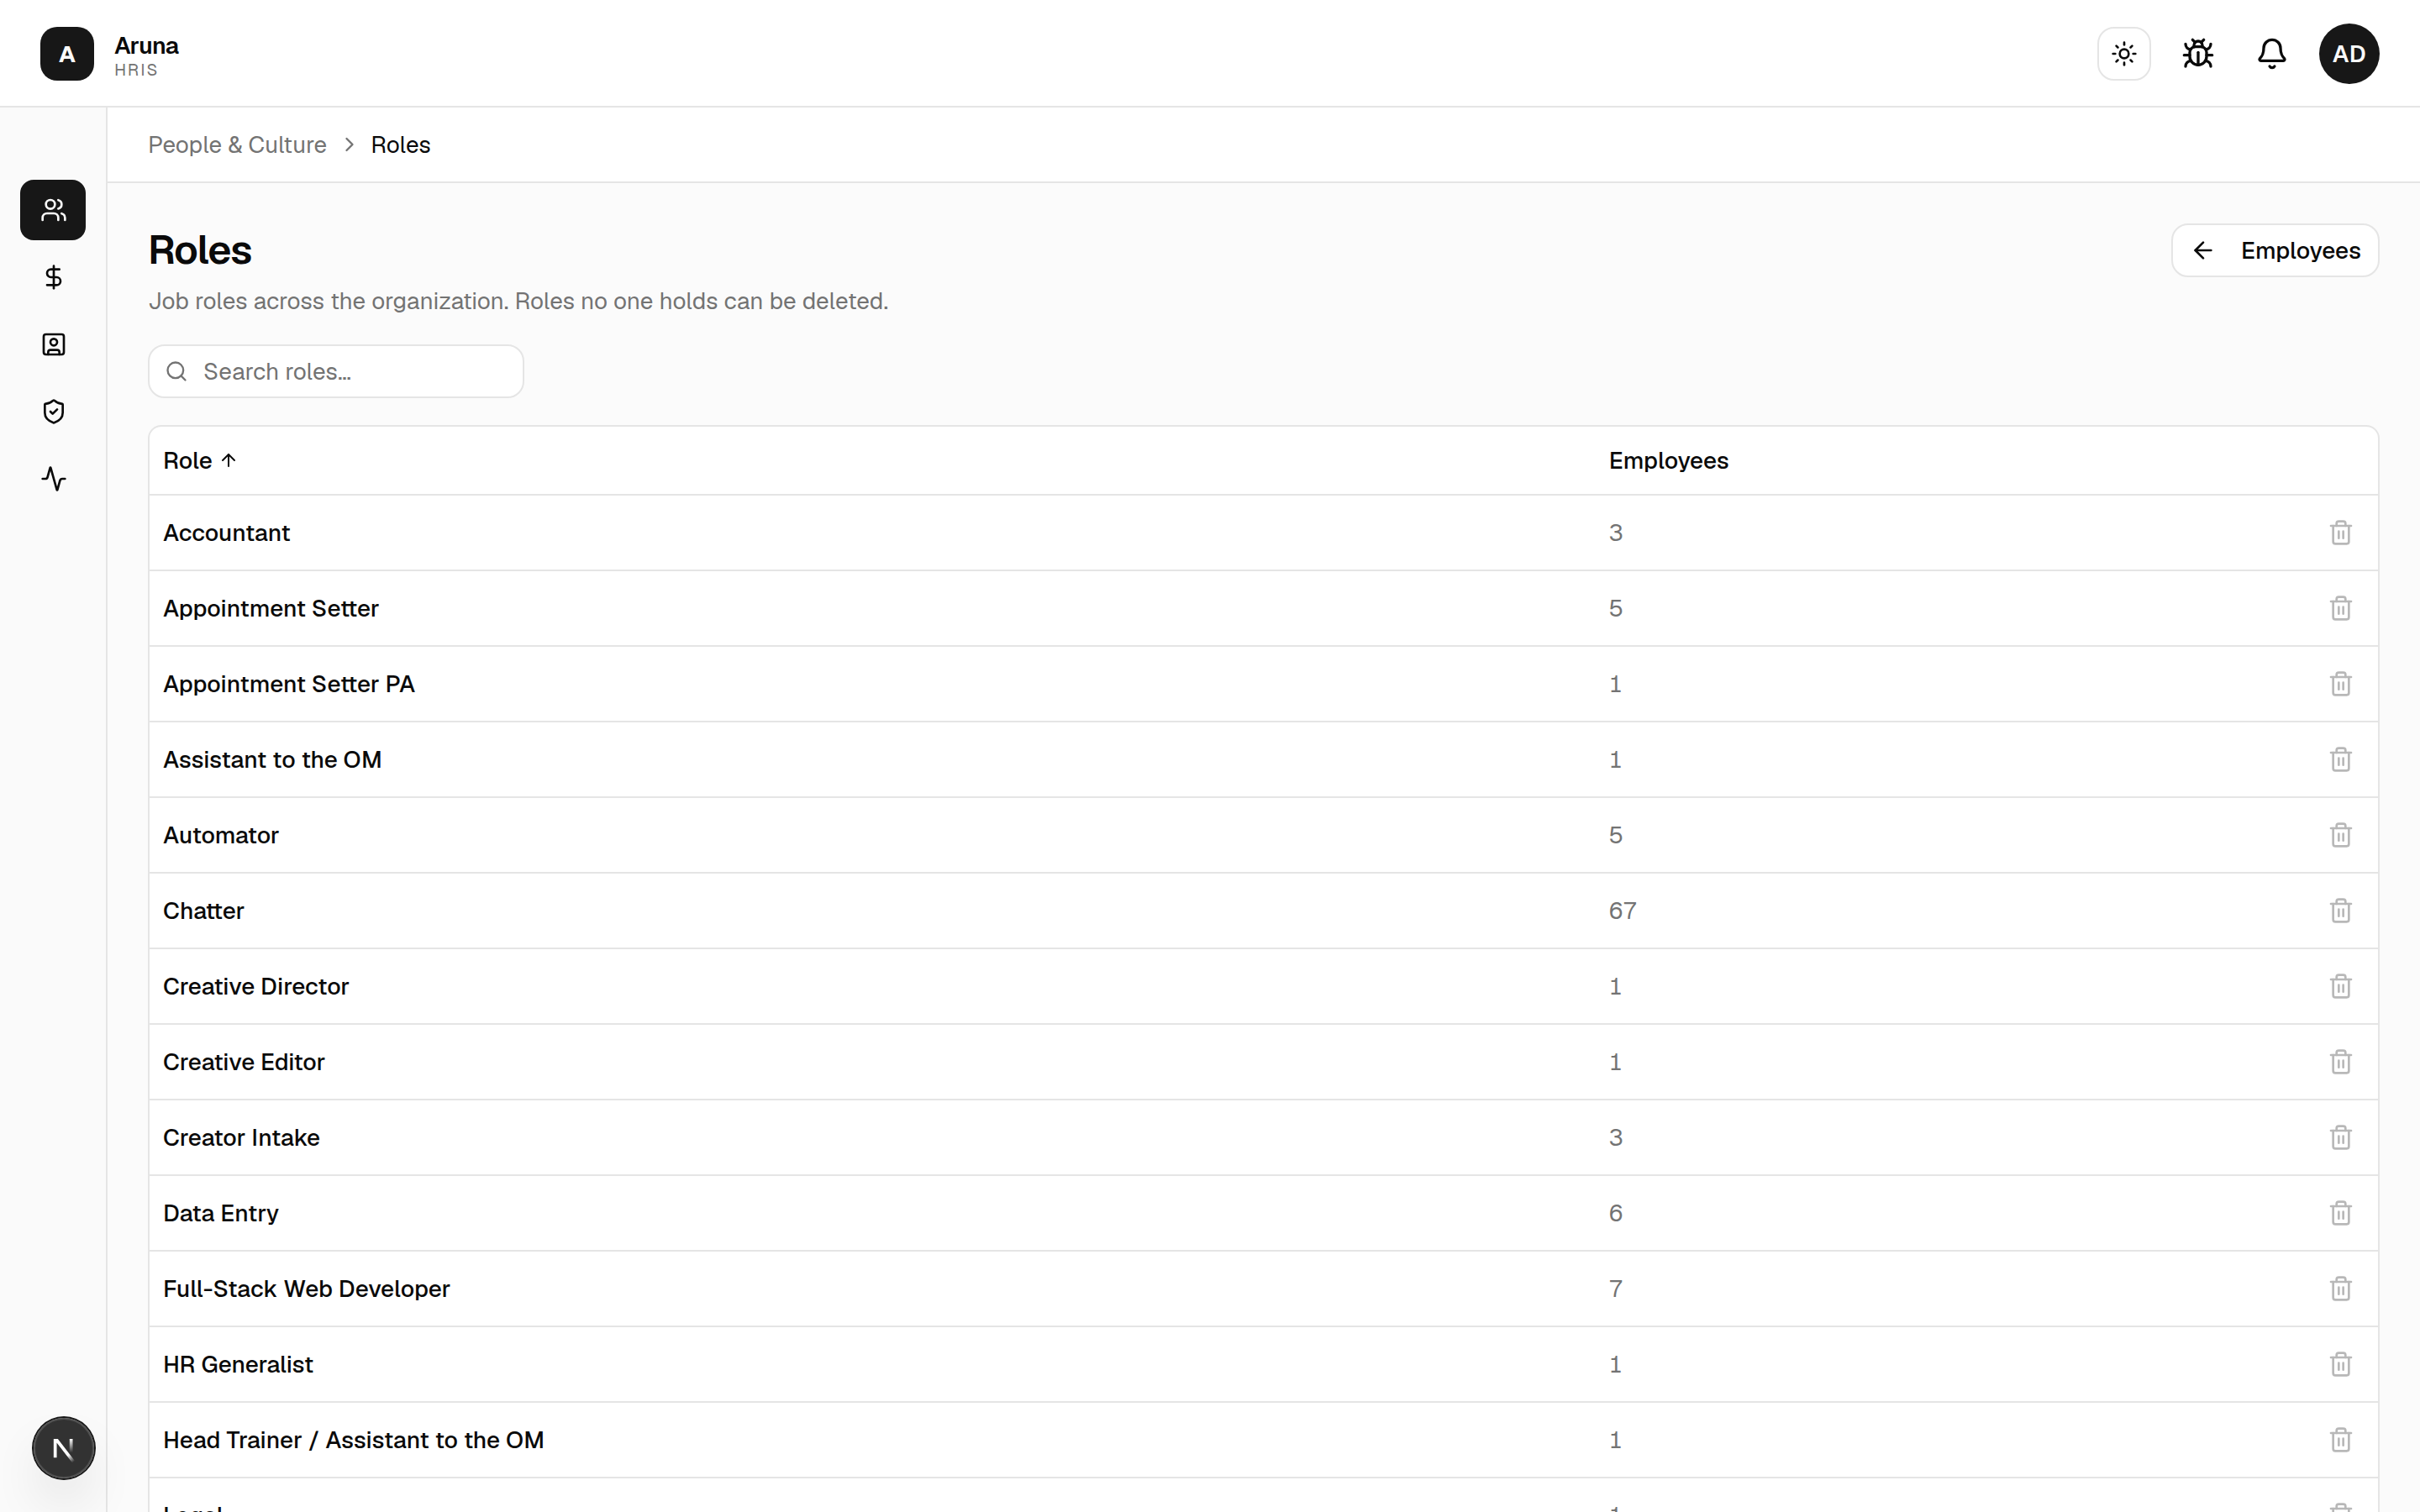
Manage Roles opens the org-wide job-role list with the headcount per role. Roles no one holds can be deleted.
Every path — either New Employee mode, Invite to app, standalone invitation — creates an EmployeeInvitation. The employee always picks their own username and password on the public form. HR never sets a username.
2. The employee detail page & its actions¶
Click any employee row to open their detail page — the single place to view and change everything about that person. The header shows their name, employee code, an Active / Offboarded badge, and their current role.
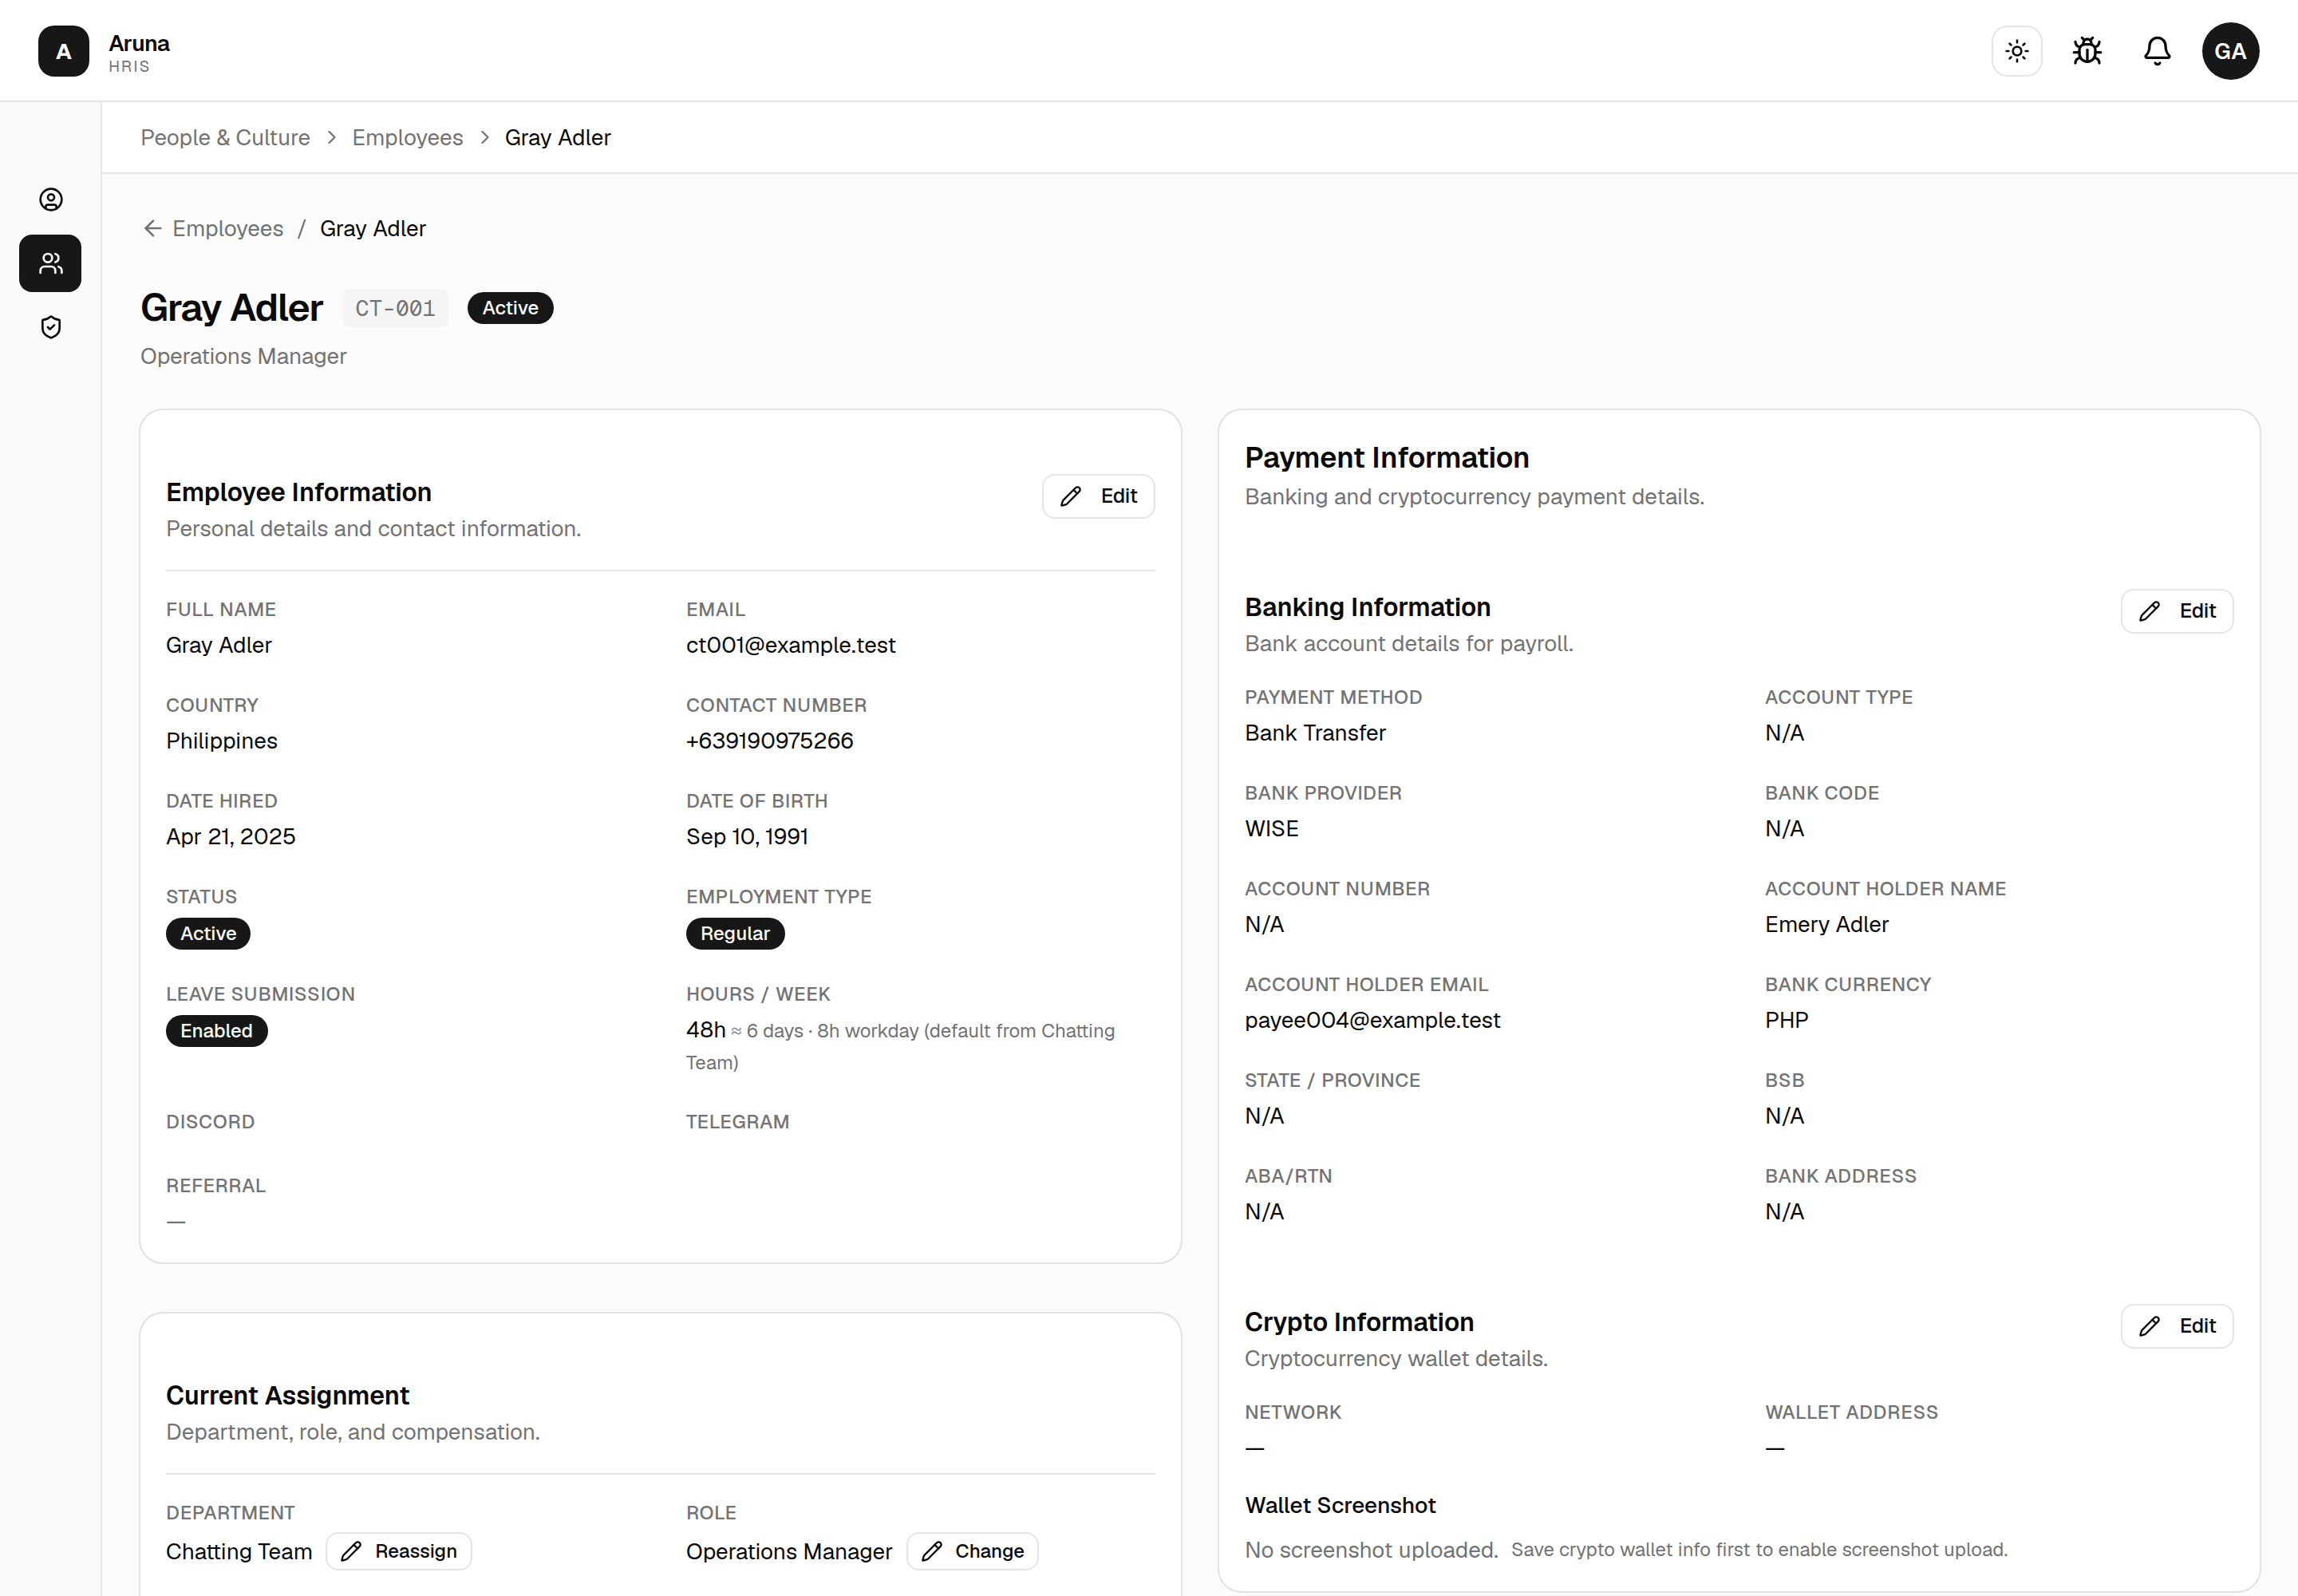
The page is organised into cards, each with its own edit controls:
Employee Information¶
Personal details: full name, email, country, contact number, date hired, date of birth, employment type, and the Leave submission / Hours-per-week the department implies. Click Edit to change them inline, then Save.
- Offboard here. The Edit form has a Last working day field. Leaving it blank keeps the person active; setting a date offboards them — it prorates their final cutoff and revokes their app access (sessions are killed). This is the offboarding switch.
Current Assignment¶
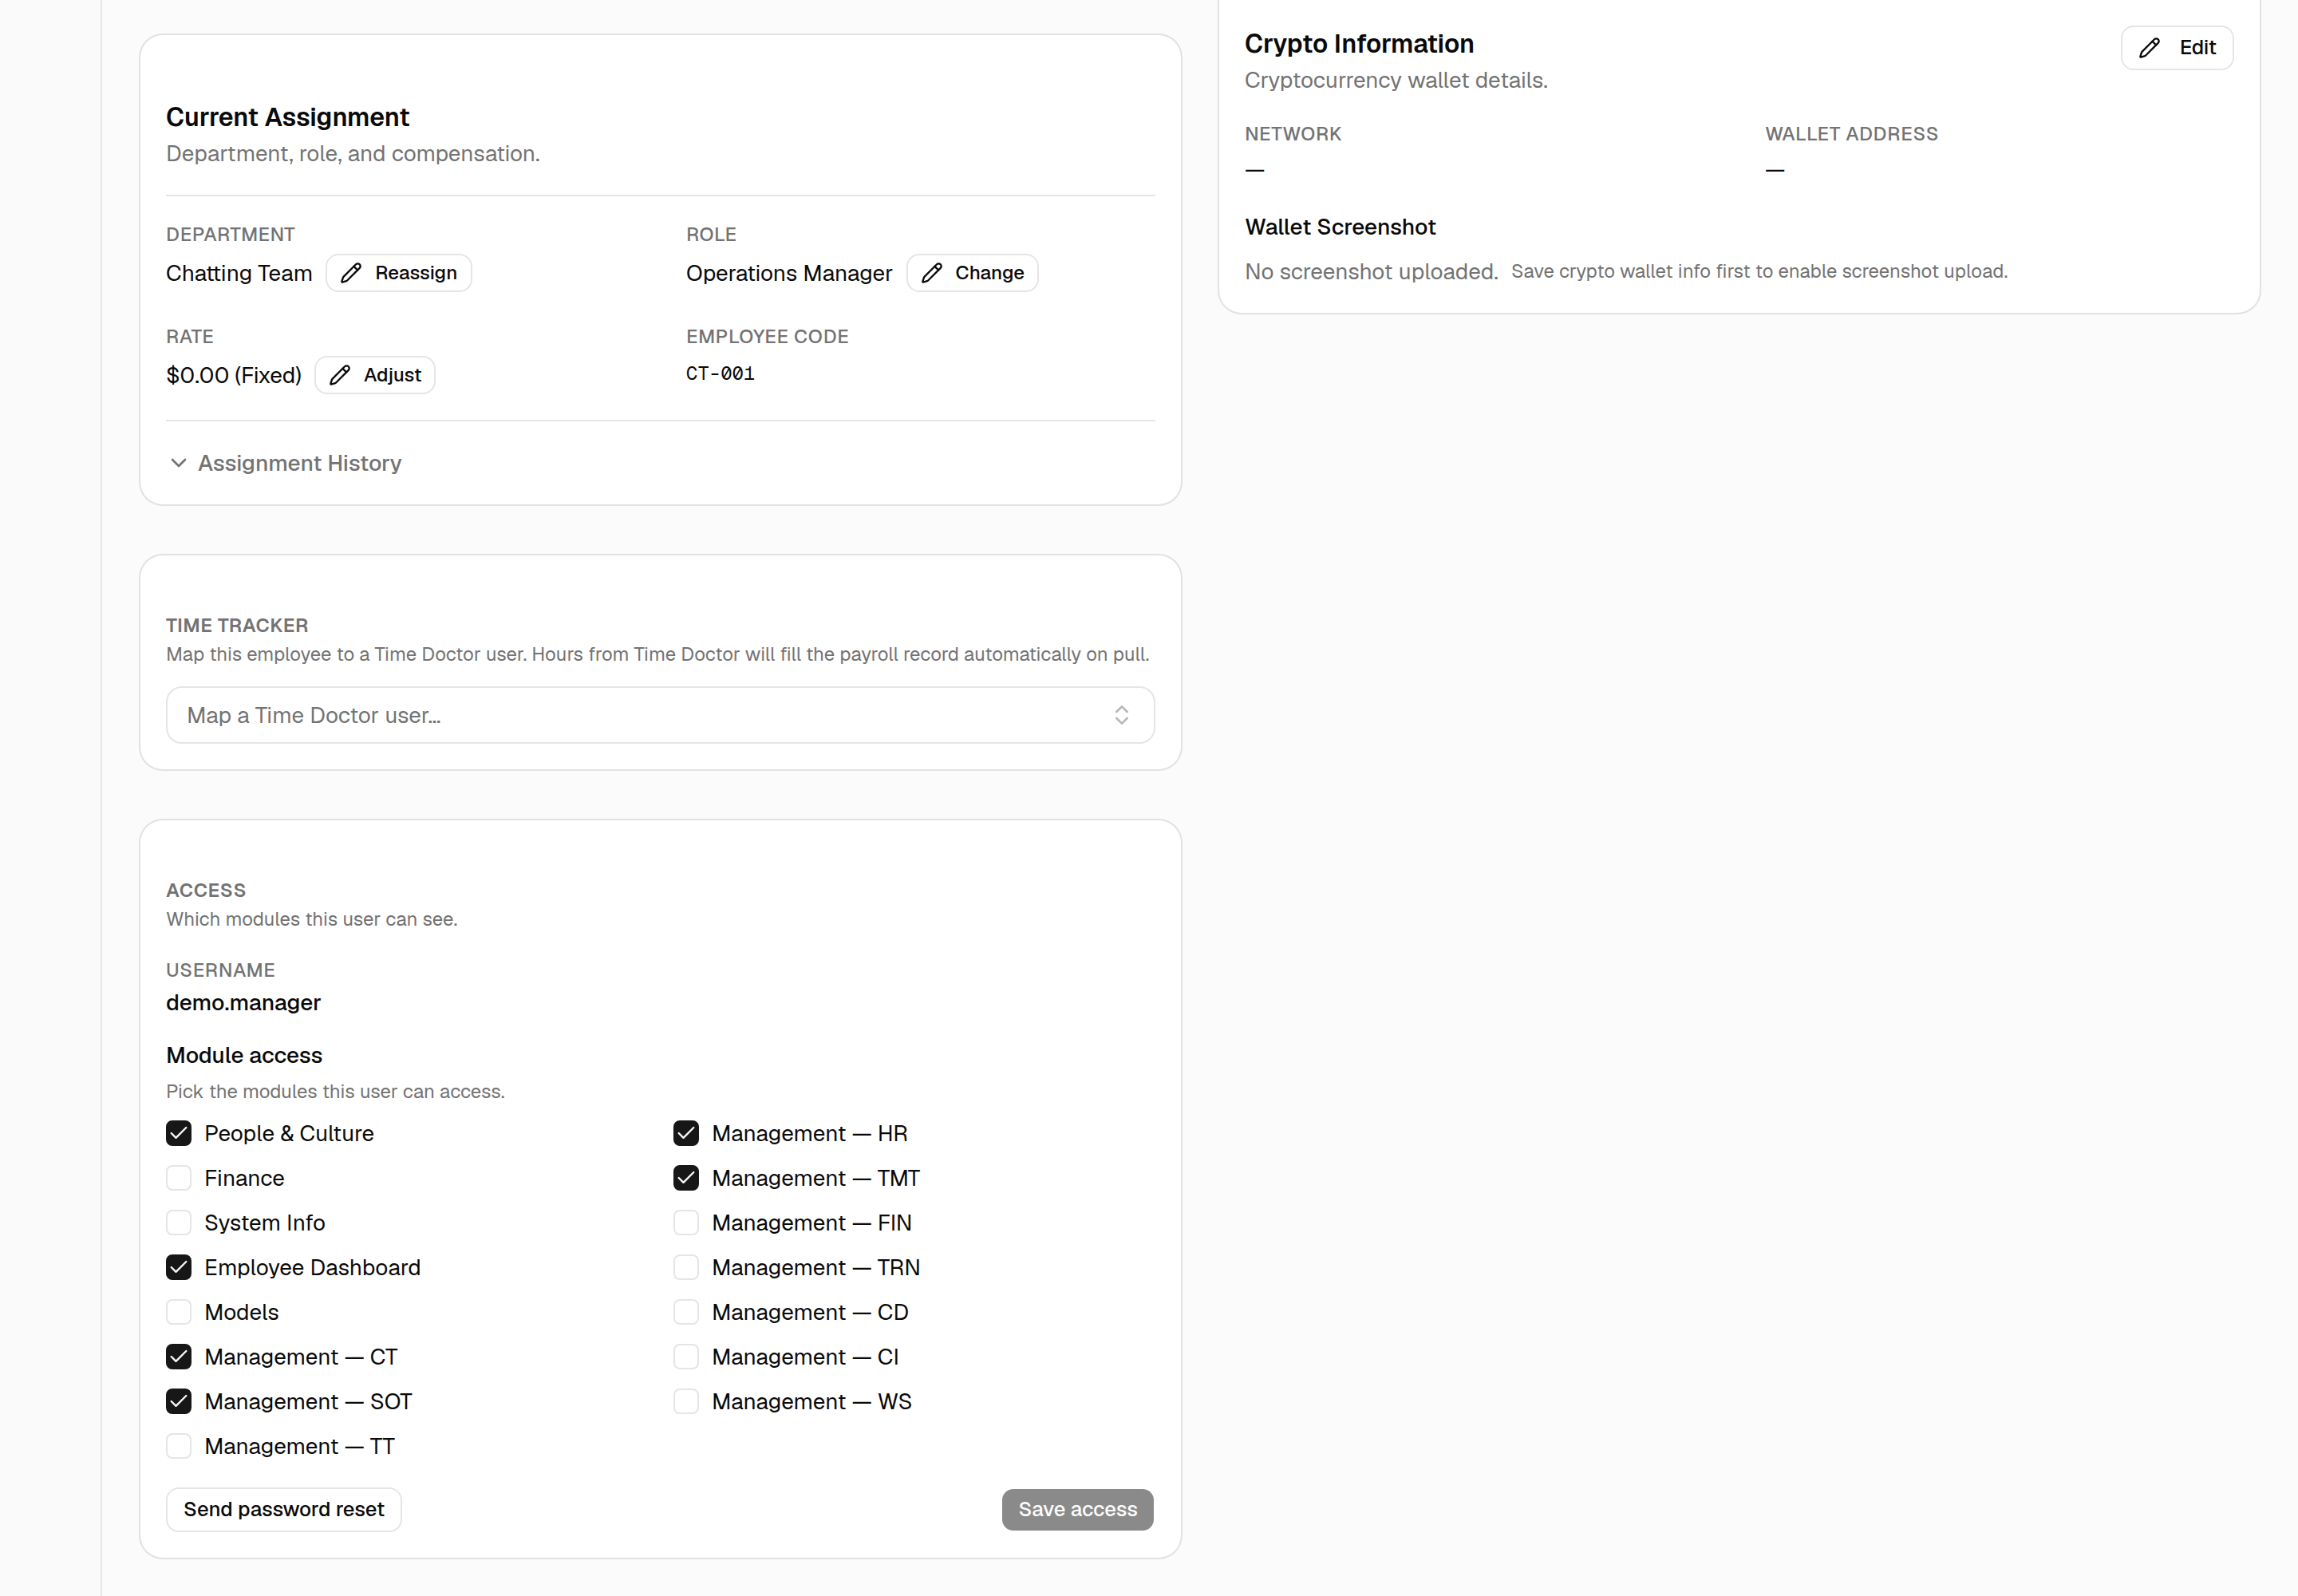
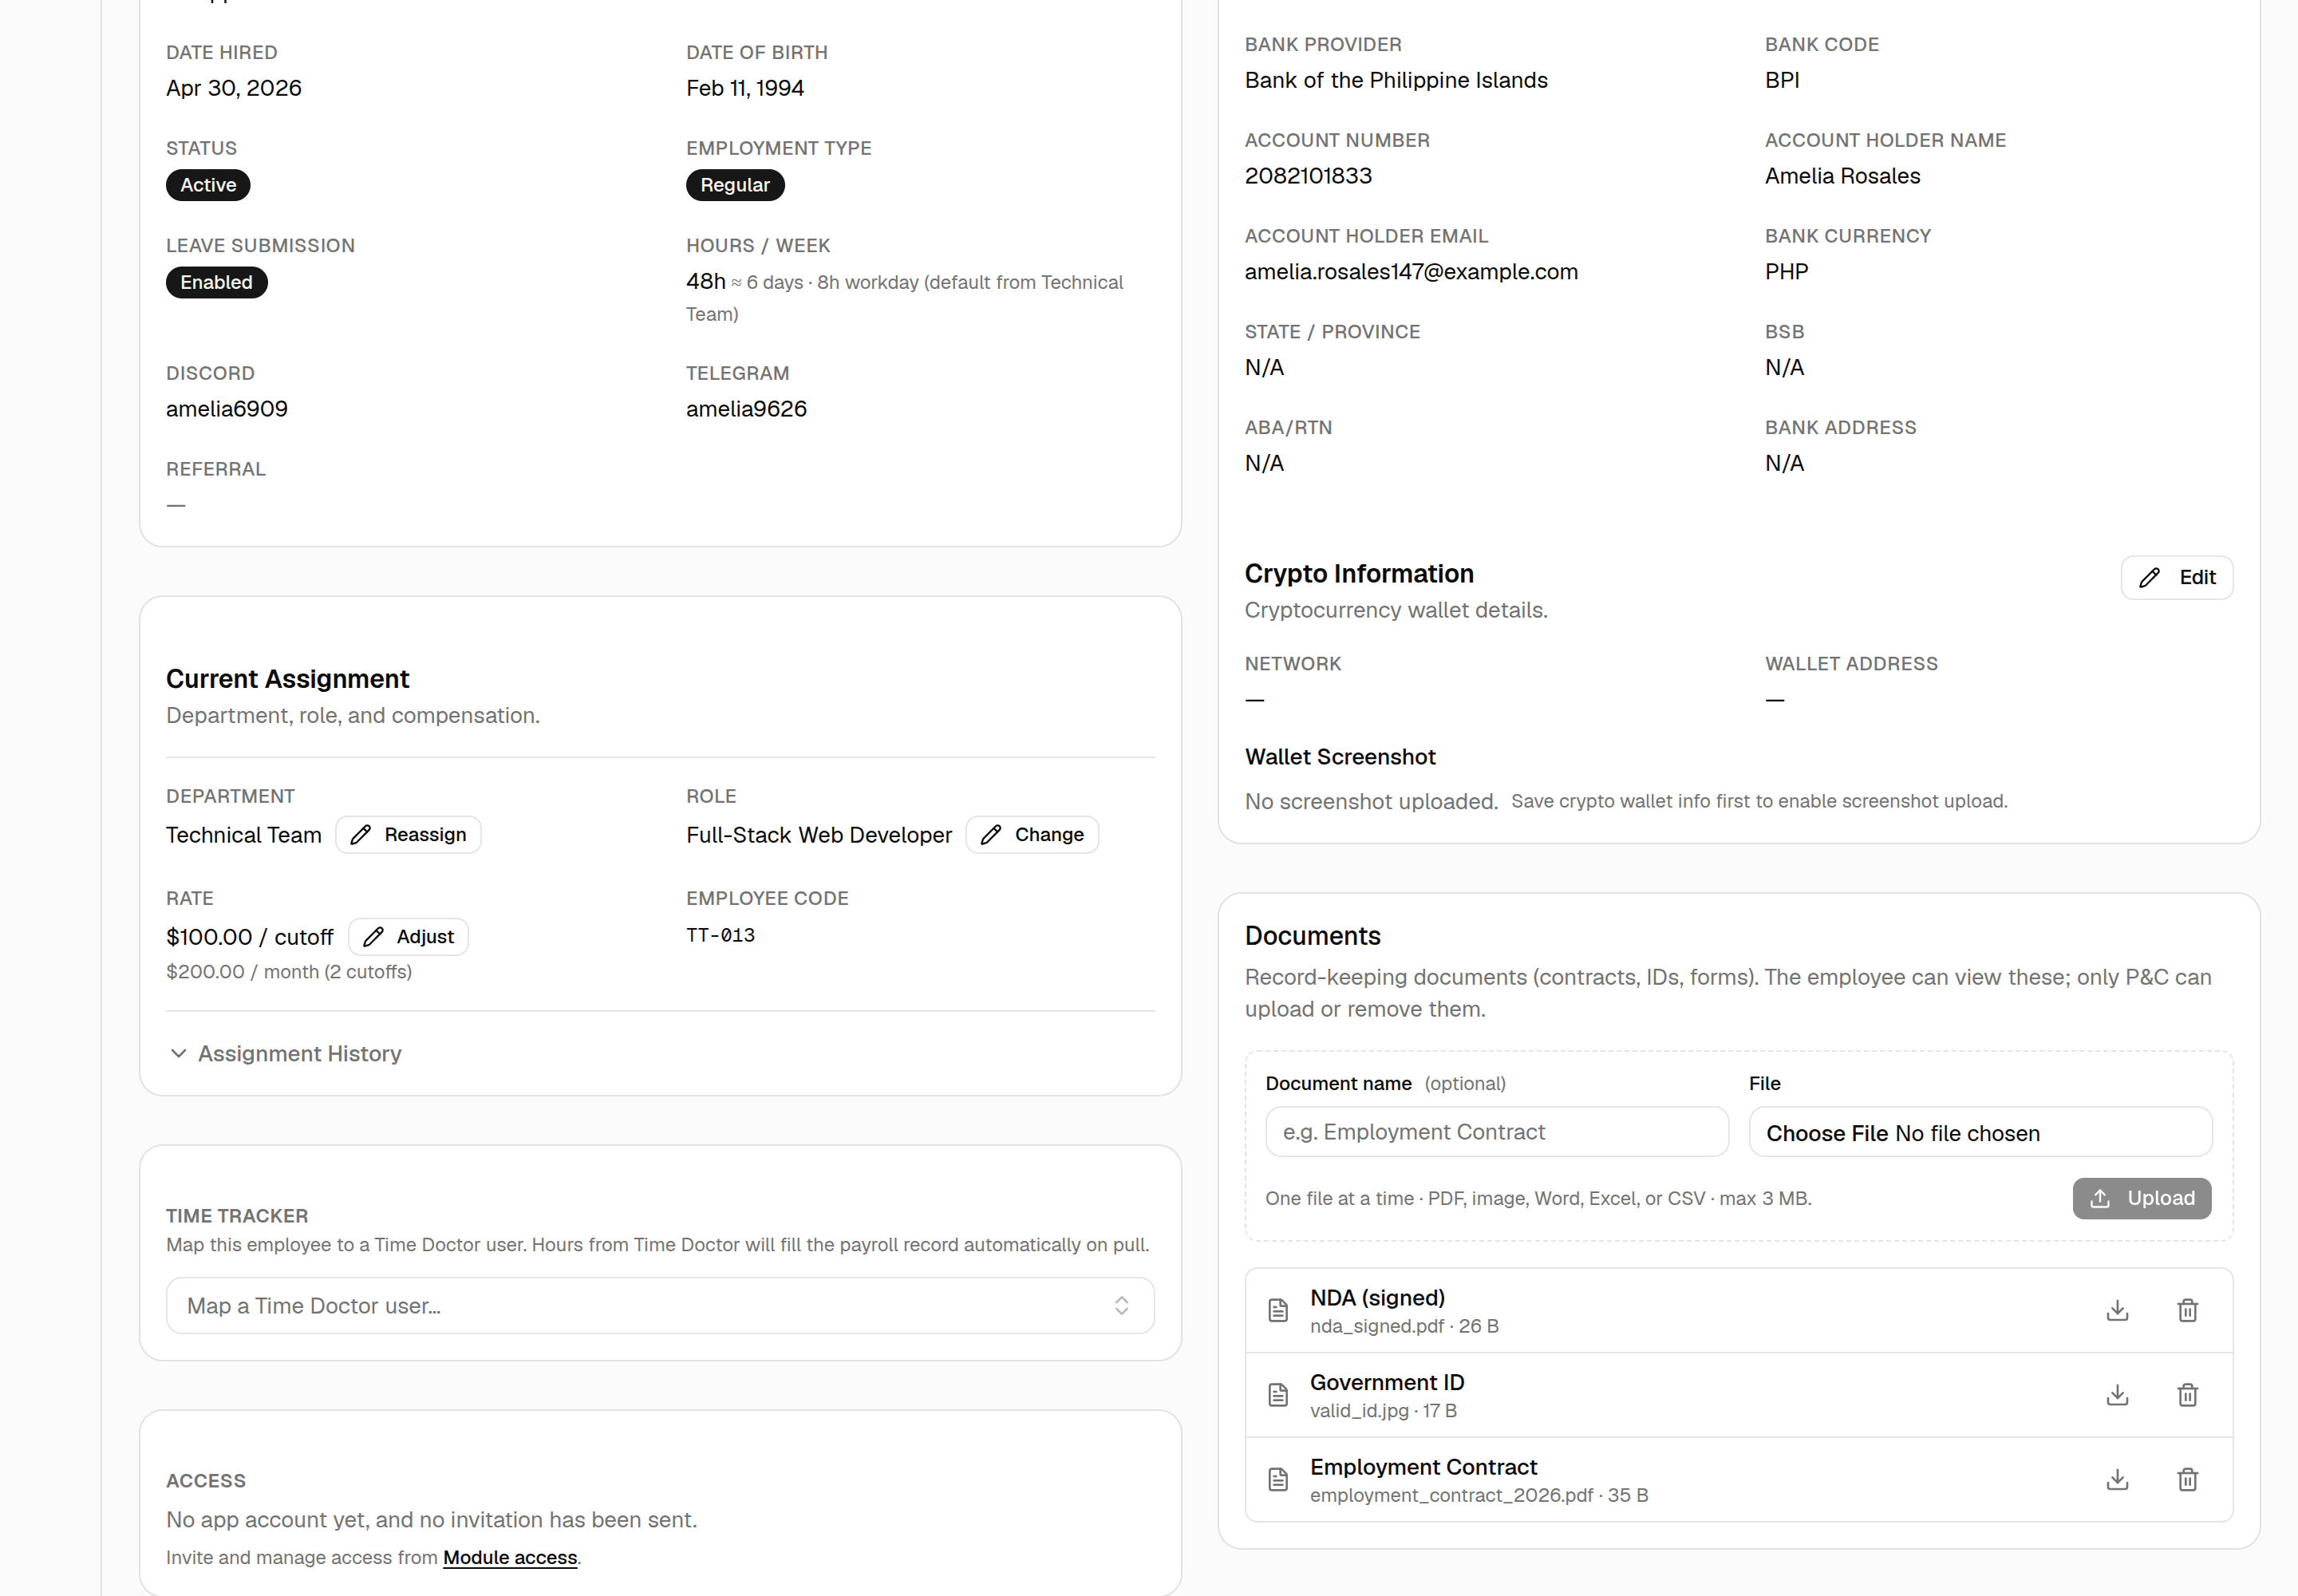
Department, role, rate, and employee code — each editable in place:
- Reassign (Department) — move the person to another team. A mid-cutoff transfer re-routes their pending time-adjustment and leave approvals to the new team's manager.
- Change (Role) — swap their job role.
- Adjust (Rate) — change pay type, rate, and pay schedule.
- Assignment History — expand to see every past department and role, with an Undo last reassignment action when a recent move can still be reverted.
Paying an employee monthly¶
By default everyone is paid every cutoff — twice a month. A fixed-salary employee can instead be paid once a month, the same arrangement external contractors have. In Adjust (Rate), set Pay schedule → Once a month and pick which half of the month the salary lands in: 1st cutoff (1–15) or 2nd cutoff (16–end of month).
Two things to know before you switch someone:
- Enter the full month's pay as the rate, not half of it. The rate field's label follows the schedule and will read Rate (USD per month) once monthly is selected, so it always says which unit you're typing.
- Only the salary waits. The employee still gets a payslip in the other cutoff, and their earnings there — commission, bonuses, retainer, overtime, rewards — are still calculated and paid in that cutoff. That payslip simply shows no base pay, and says why ("Monthly salary issued in the 2nd cutoff"). If nothing else landed there, the payslip is $0 and ArunaPay skips it with the same explanation rather than reporting a missing amount.
- Deductions follow the salary. Unpaid leave, absences and SOT partial-cover docks are a slice of the salary, so they can't be taken from a payslip that carries none. For a monthly employee they're applied on the payout cutoff and cover the whole month — an unpaid day on June 5 is docked on the June 16–30 payslip. Nothing is ever docked from a payslip that has already gone out.
Monthly is only offered for Fixed pay. Hourly pay is hours × rate and the
hours belong to the cutoff they were worked in, so the dropdown locks to Every
cutoff for hourly staff. The roster's Schedule column shows a
Monthly · 2nd cutoff badge for anyone on the monthly arrangement, and the
nominated half is remembered if you switch someone back to per-cutoff and later
return them to monthly.
Additional departments¶
Sometimes work crosses team lines — someone from Training needs to appear on the SOT scheduling board, or a CT surface needs a person from another team. Don't reassign them for this. A reassignment moves their employee code, rate and the department that pays them; it's the wrong tool for "also available over there".
Use Additional departments instead. Pick a department, optionally say why (e.g. "Covering streams"), and they become available to that team on top of their own.
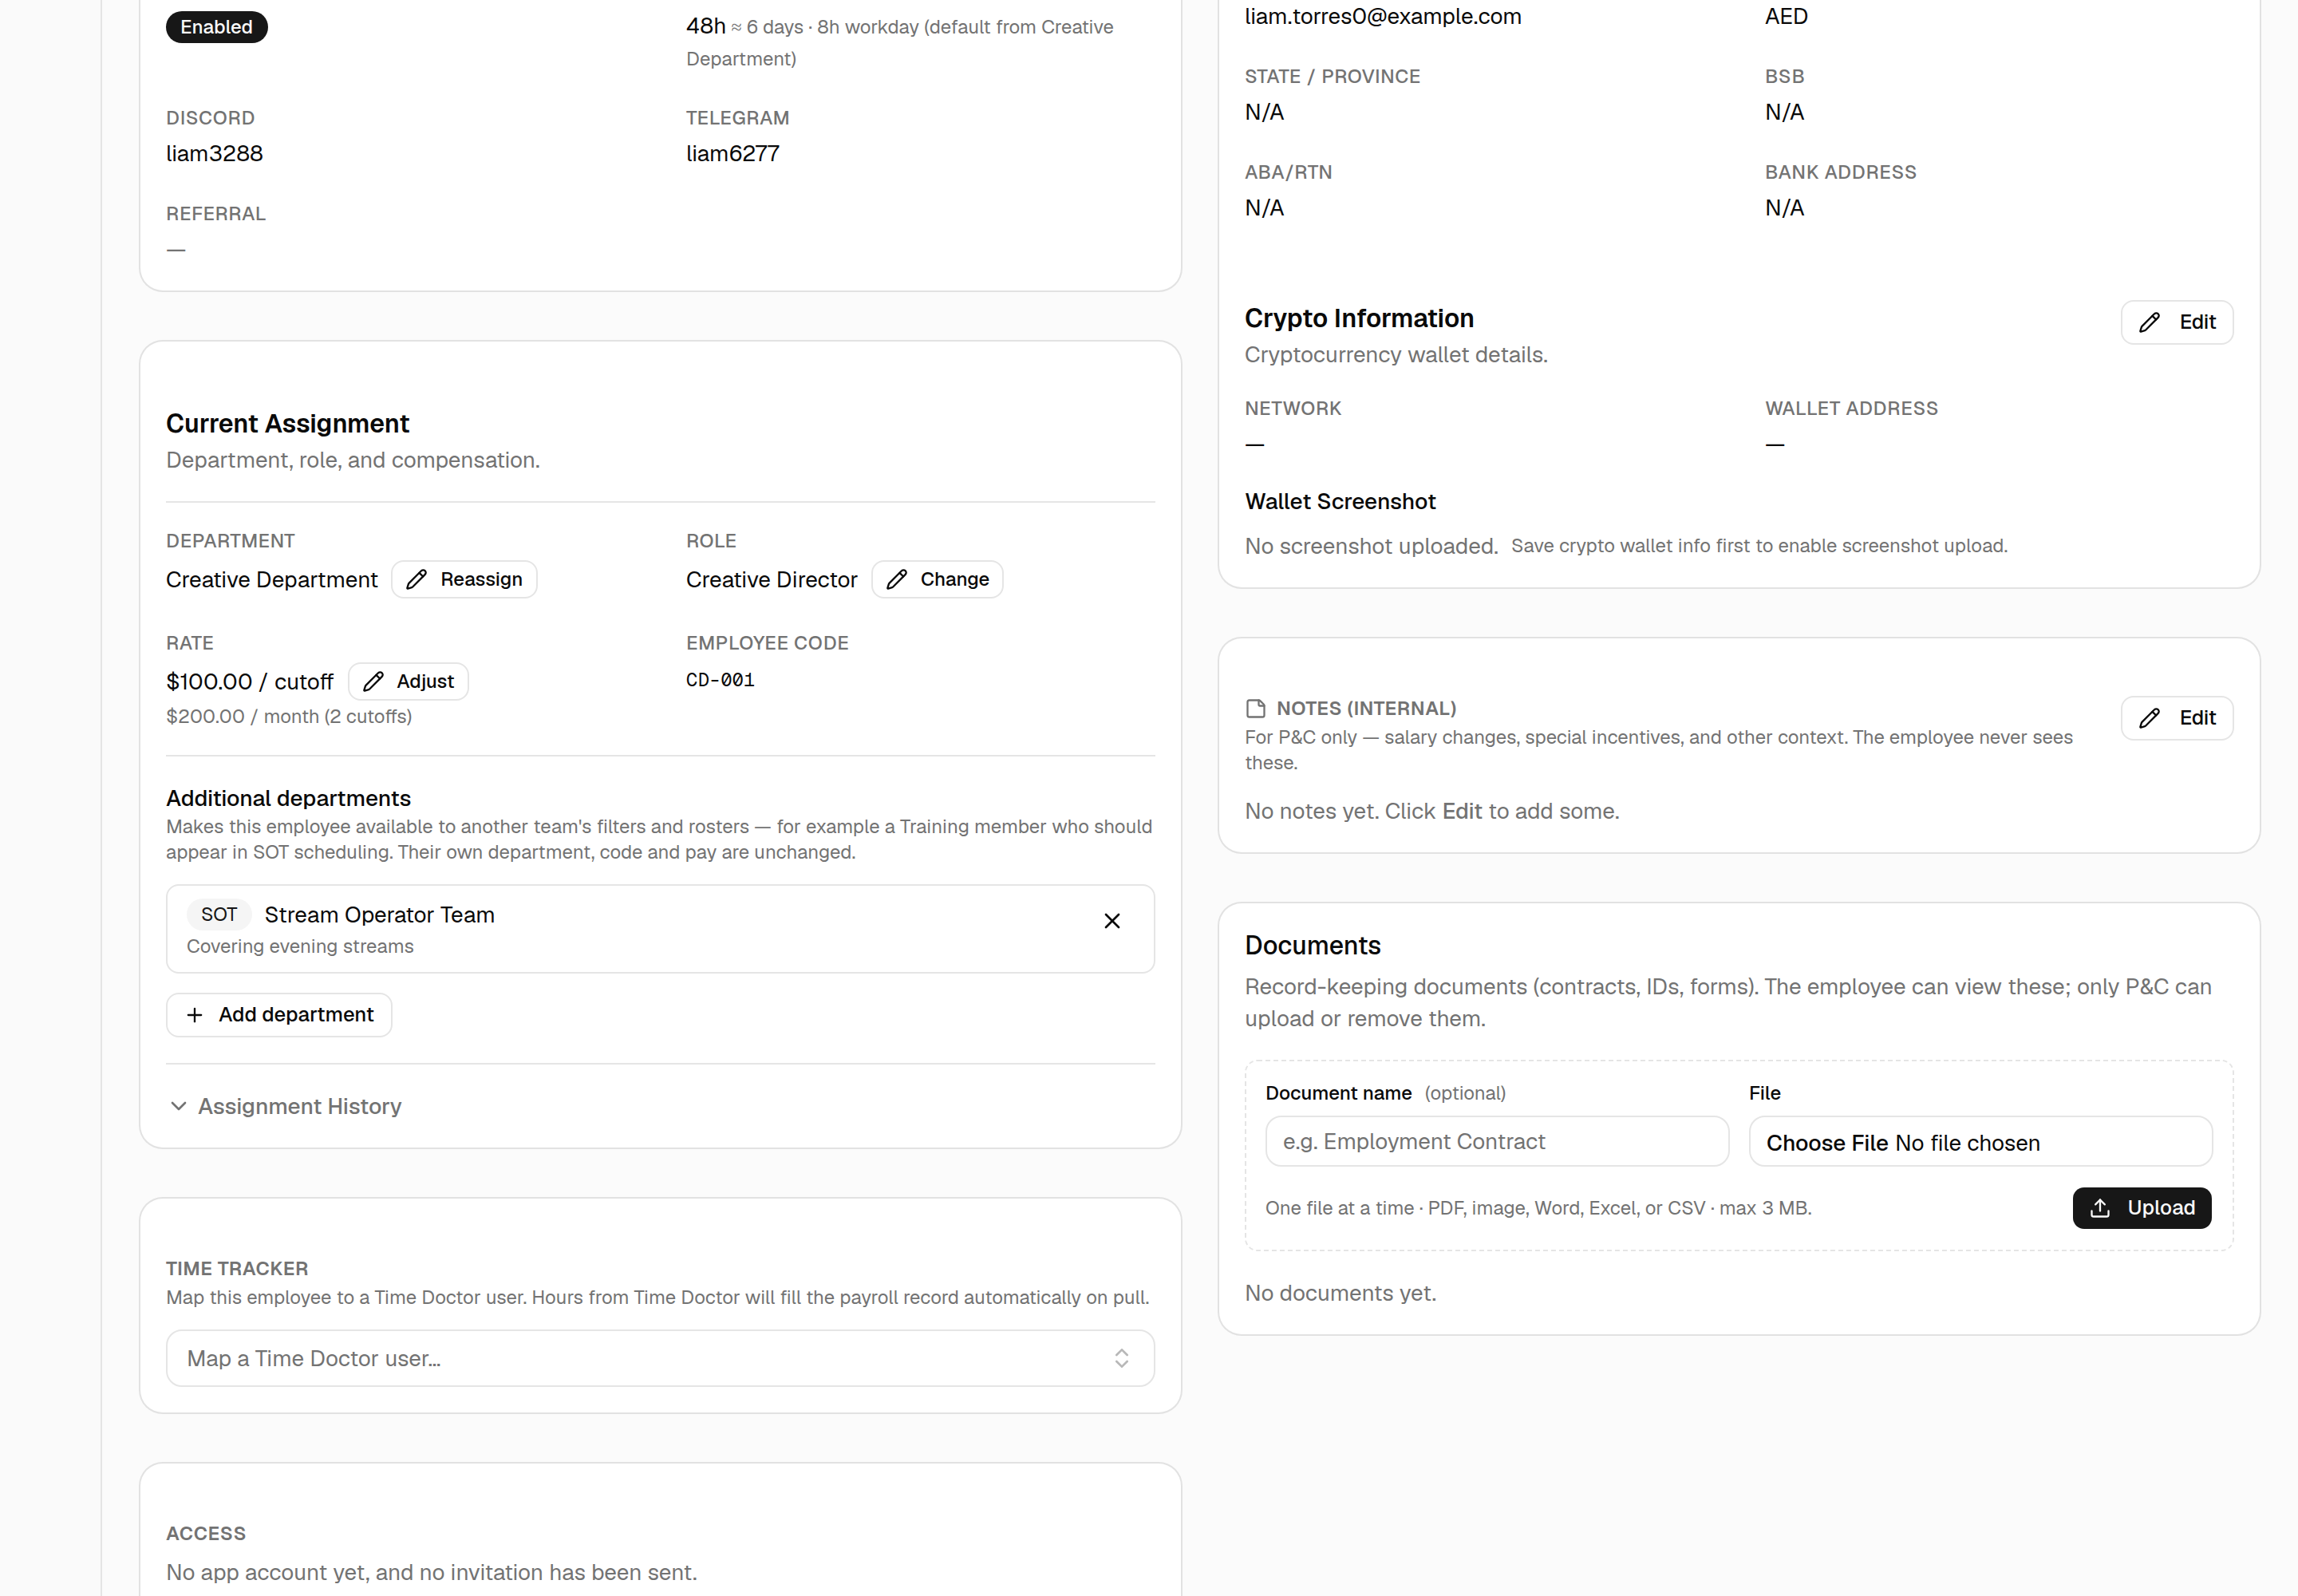
What it changes:
- They appear in that department's people filters — filtering the roster by SOT will now surface the Training member you lent to SOT.
- They appear in that department's rosters and pickers — for SOT that means the Operators tab, so the receiving manager can designate them; for CT, the team pools.
- They can open their own schedule for that department.
What it does not change:
- Their department, employee code, rate, and which department's payroll they sit on — all untouched.
- Leave approvals. Their own manager still approves their leave; granting access doesn't hand that to the receiving team.
Remove the grant with the × next to it whenever the arrangement ends. Their own department is never offered in the list — it already gives them everything the grant would.
Availability isn't the same as being designated
Granting SOT access makes someone selectable on the Operators tab; the SOT manager still has to tick them as an operator before they can be scheduled. The two steps are owned by different people on purpose.
Payment Information¶
Banking Information (payment method, bank, account details, currency) and Crypto Information (network + wallet address, with a wallet screenshot upload once wallet info is saved). This is the payout data payroll snapshots each run.
Both are optional, and independent. Plenty of people have only one — bank details and no wallet, or a wallet and no bank account — and some have neither yet. A block with nothing on file says so and offers Add; a block with details on file offers Edit and Remove. Removing asks for confirmation and deletes the details for good, though payslips already issued keep their own copy, so nothing on a past payslip changes.
A block is all-or-nothing: leave it empty, or fill in every field. A half-filled one is refused, because payroll can't pay against a partial account.
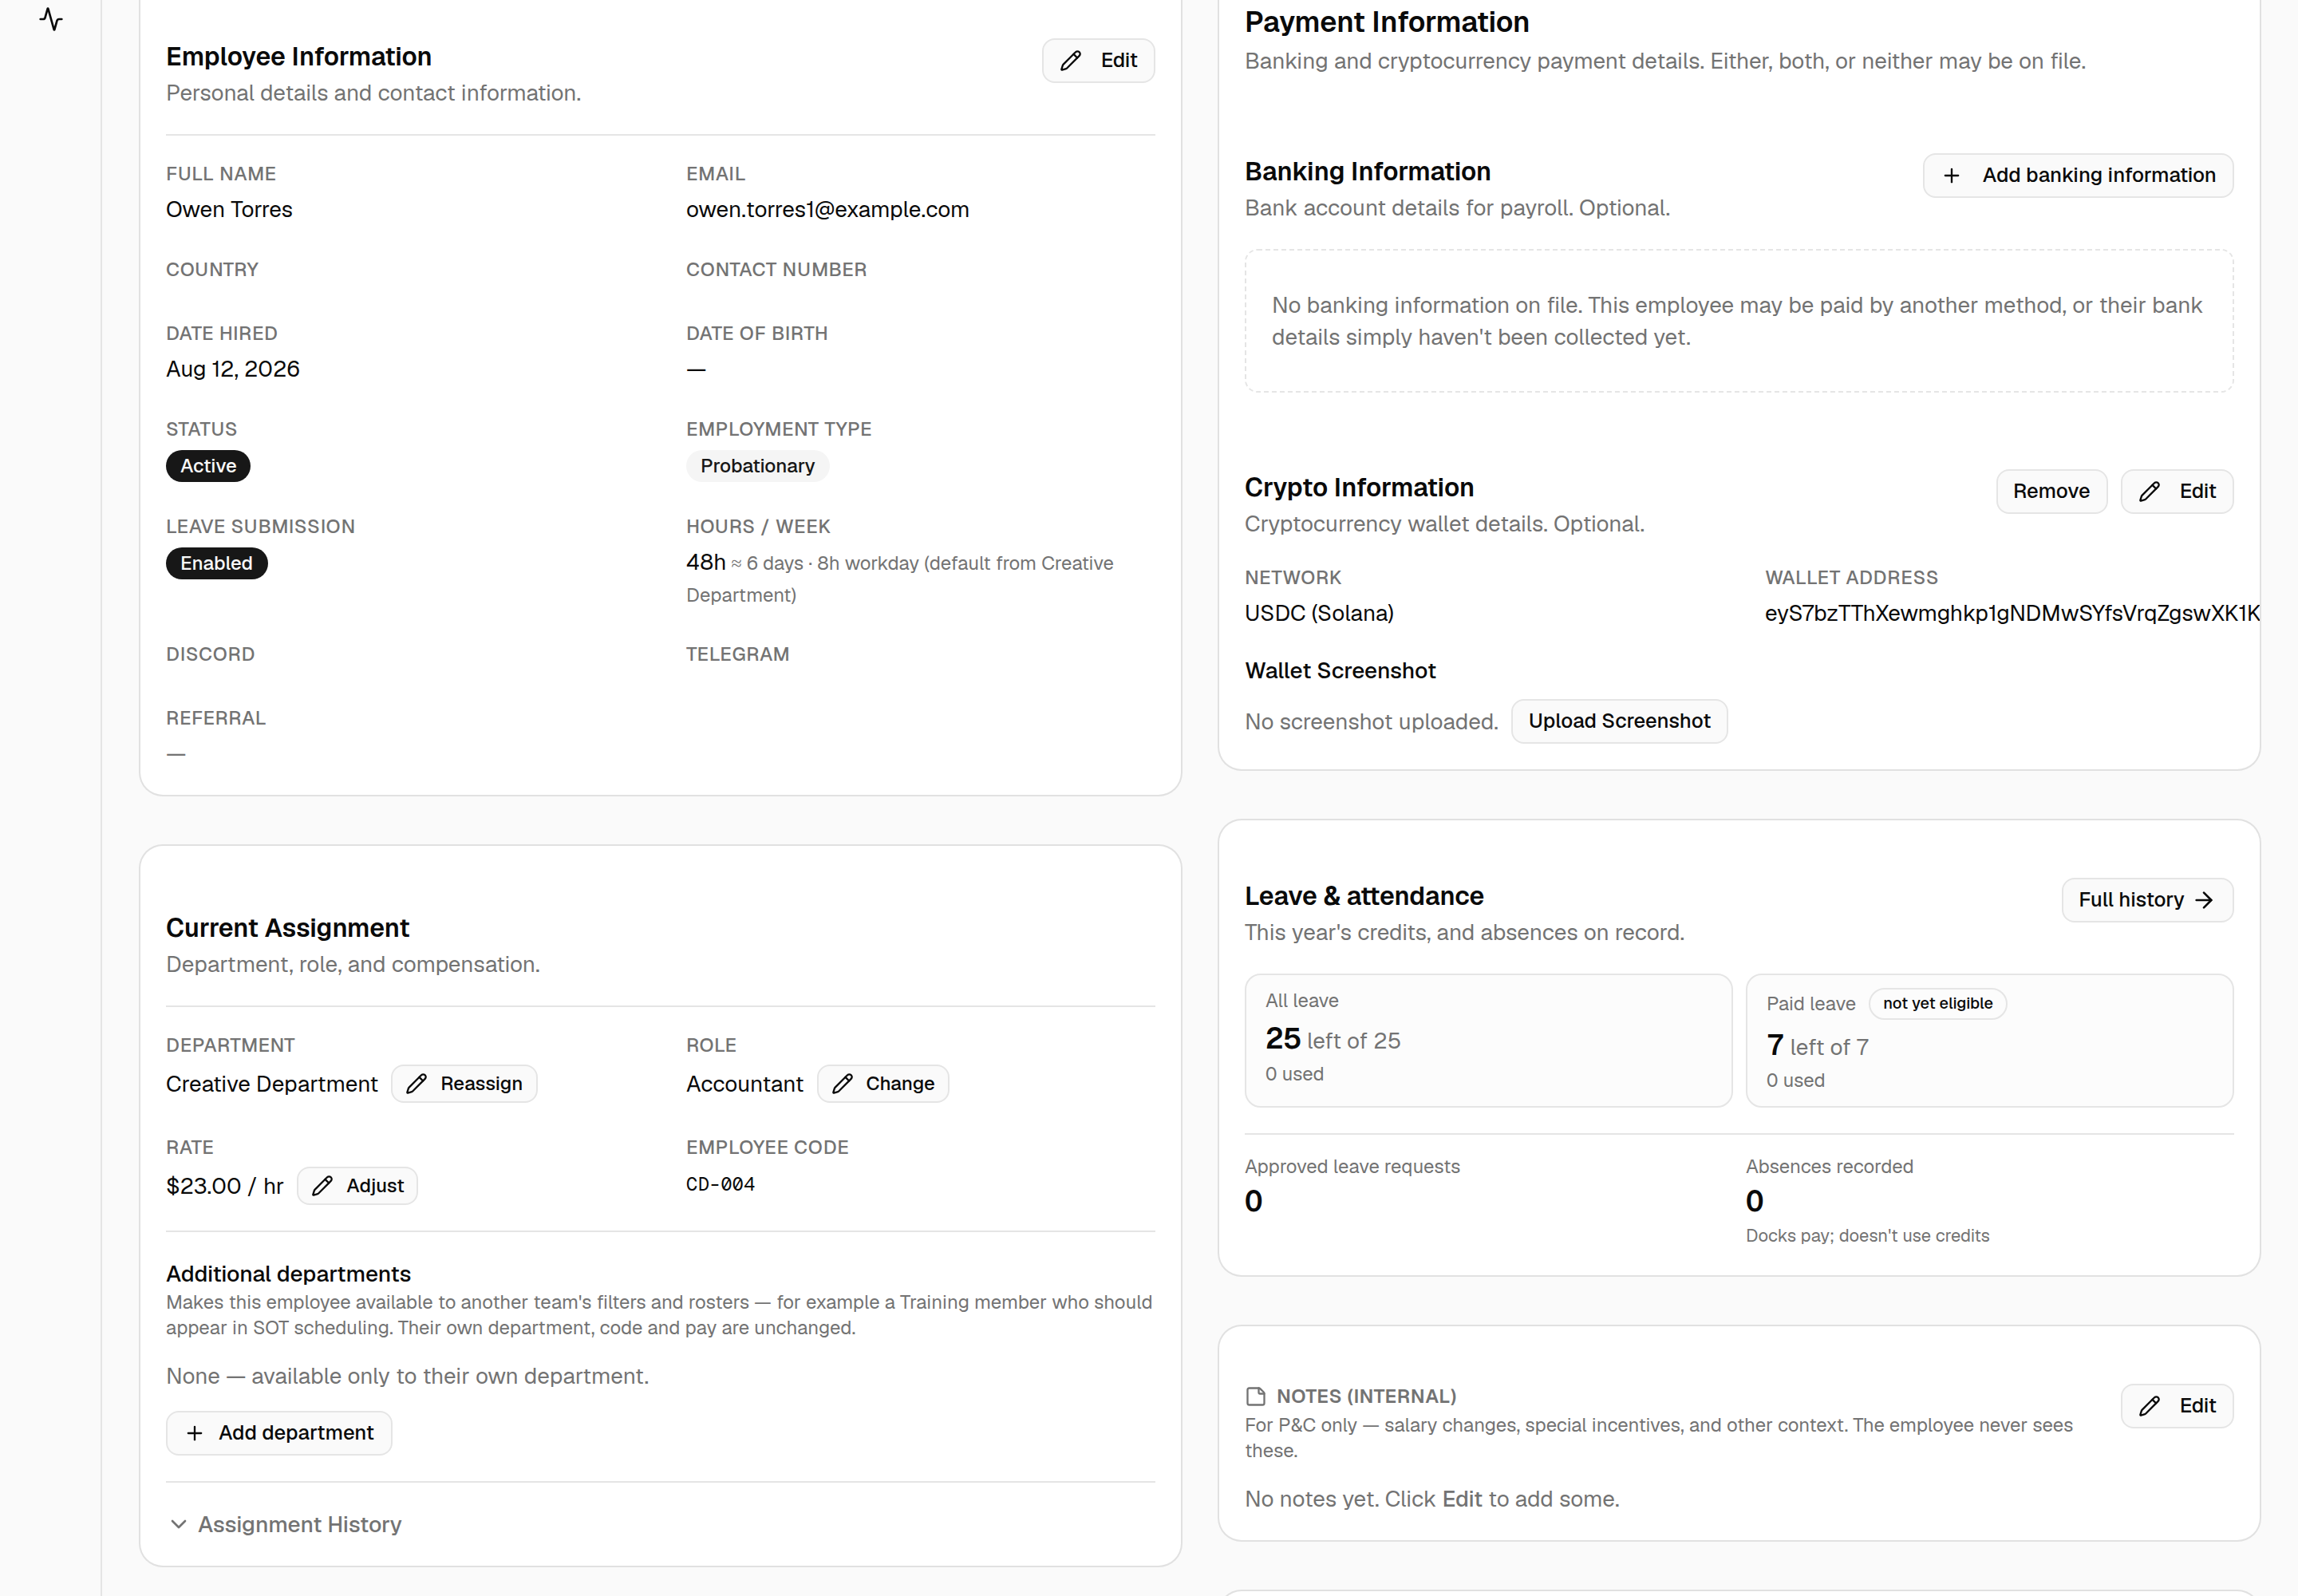
The regional bank fields — State / province, ABA / RTN, BSB, Bank
address — are always shown and labelled with who they apply to. Leave the ones
that don't apply blank; they're stored as N/A. A BSB or ABA/RTN entered against
a currency that doesn't use it is refused with a message rather than quietly
dropped, so a routing number left behind by a currency change can't reach
Finance unnoticed.
Time Tracker¶
A Map a Time Doctor user dropdown right on the record — map or clear the TD user here without going to the separate Time-tracker page. Once mapped, hours pull into payroll automatically.
Access¶
The person's app-account controls:
- If they have an account, it shows their username, the module checkboxes (tick what they can see, then Save access), and Send password reset — which emails them a reset link (use it if an account may be compromised; they must set a new password before signing in again).
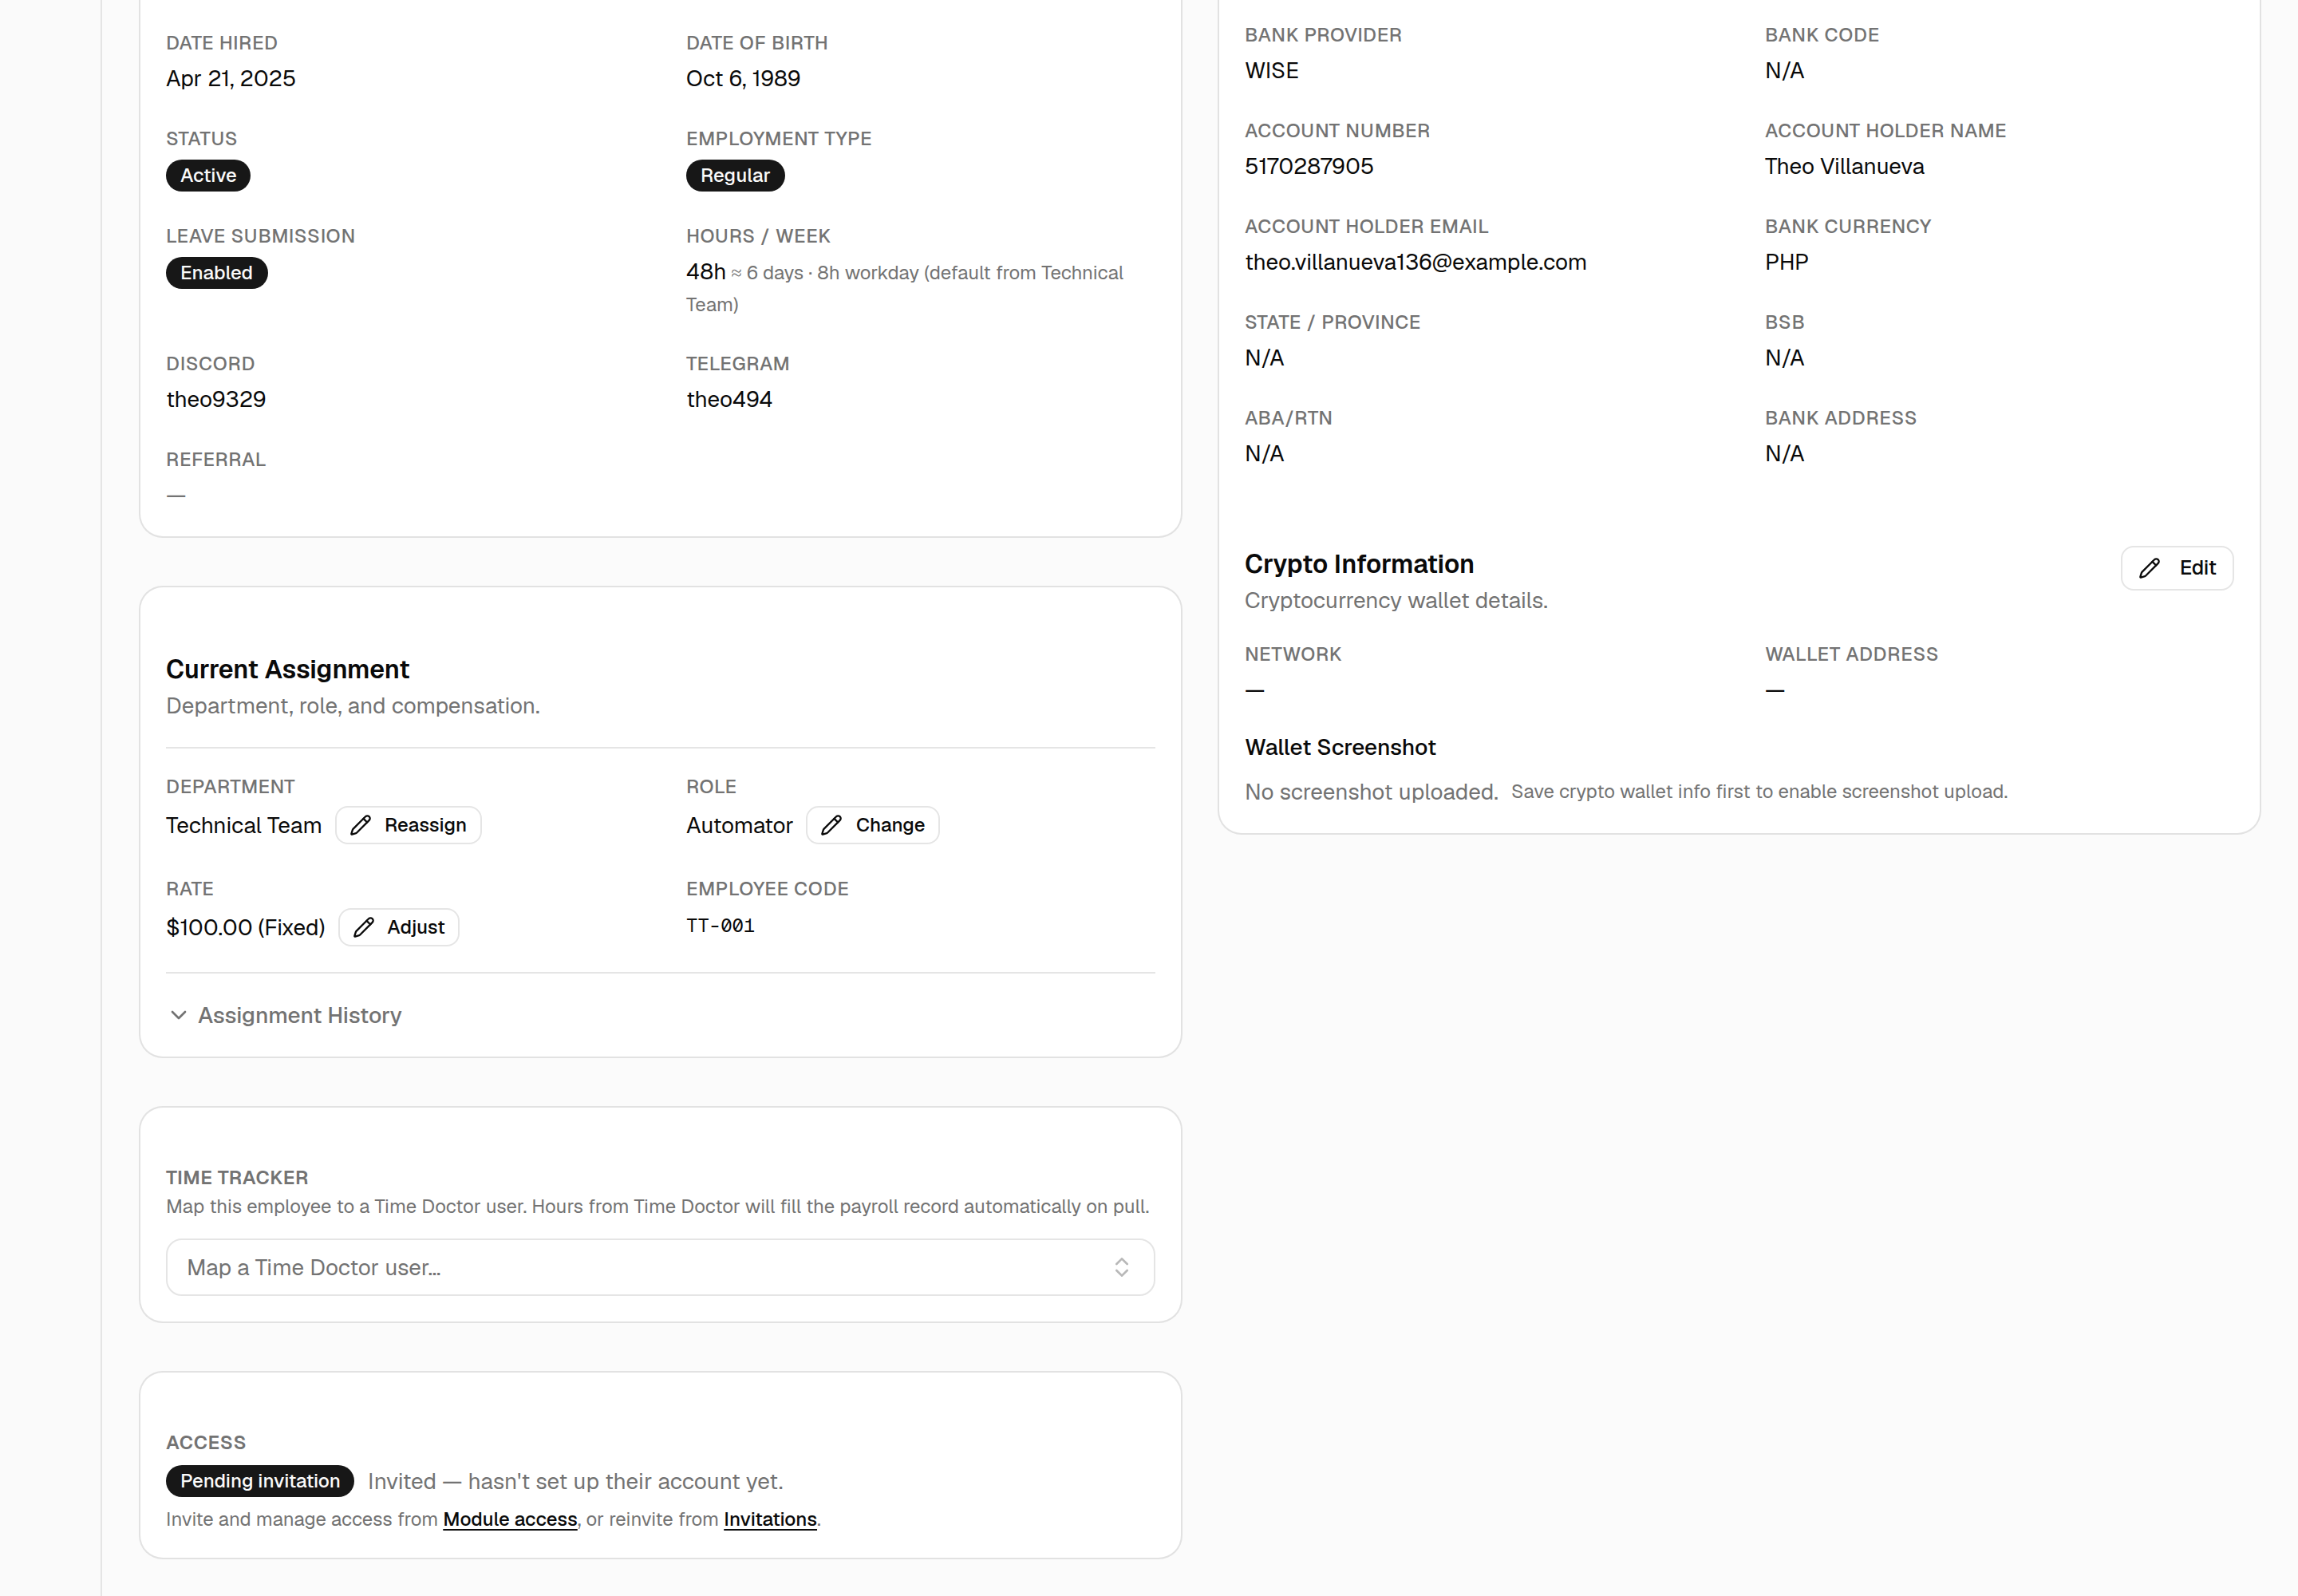
- If they have no app account yet, this card is read-only: it shows their invitation state — a Pending invitation / Expired invitation badge, or a note that none has been sent — and links out to Module access (to invite) or Invitations (to reinvite). You no longer invite from the detail page itself; inviting lives on those two pages.
Notes (internal)¶
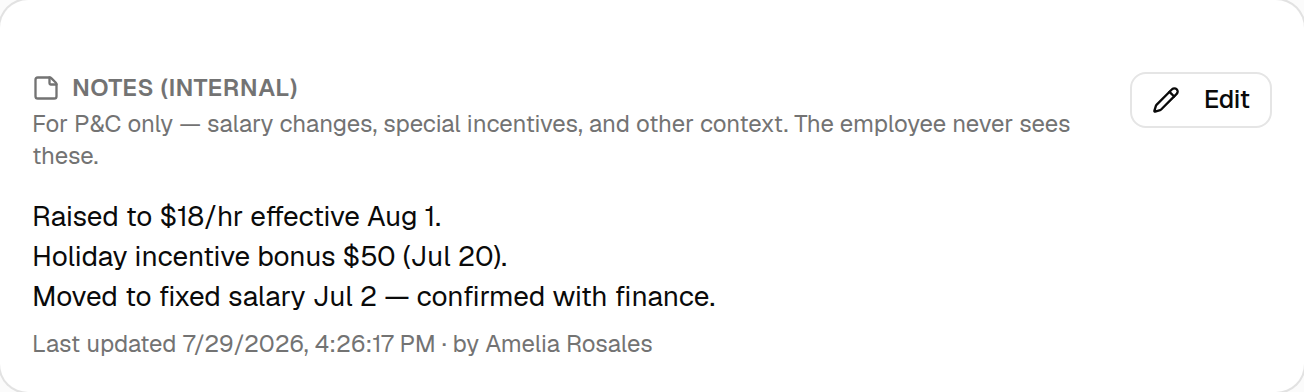
A free-text notes area for P&C's own record-keeping — salary changes, special incentives, and any other context worth keeping on file. These are internal: the employee never sees them, and neither do team managers.
- Click Edit, type your notes, and Save notes. It's one shared text area per employee (not a per-entry log), and it records who last edited it and when.
- When an employee has notes, a Has notes badge shows in the detail header, and a note icon appears next to their name in the roster (see §1).
Documents¶
Record-keeping files for the employee — contracts, IDs, signed forms, and the like. Only P&C can upload or remove documents here; the employee sees them (read-only) on their own dashboard under My Documents.
- Give each file a name (e.g. Employment Contract) separate from the filename, choose one file, and Upload. Upload one at a time; each file is PDF, image, Word, Excel, or CSV, max 3 MB.
- Click a document to open it in a new tab, use the download icon to save a copy, or the trash icon to remove it (you'll be asked to confirm).
The same document management is available on an external contractor's detail page (under People & Culture → External contractors), with the identical P&C-only upload/remove rules.
3. Invitations: create, reinvite, revoke¶
Open People & Culture → Invitations.
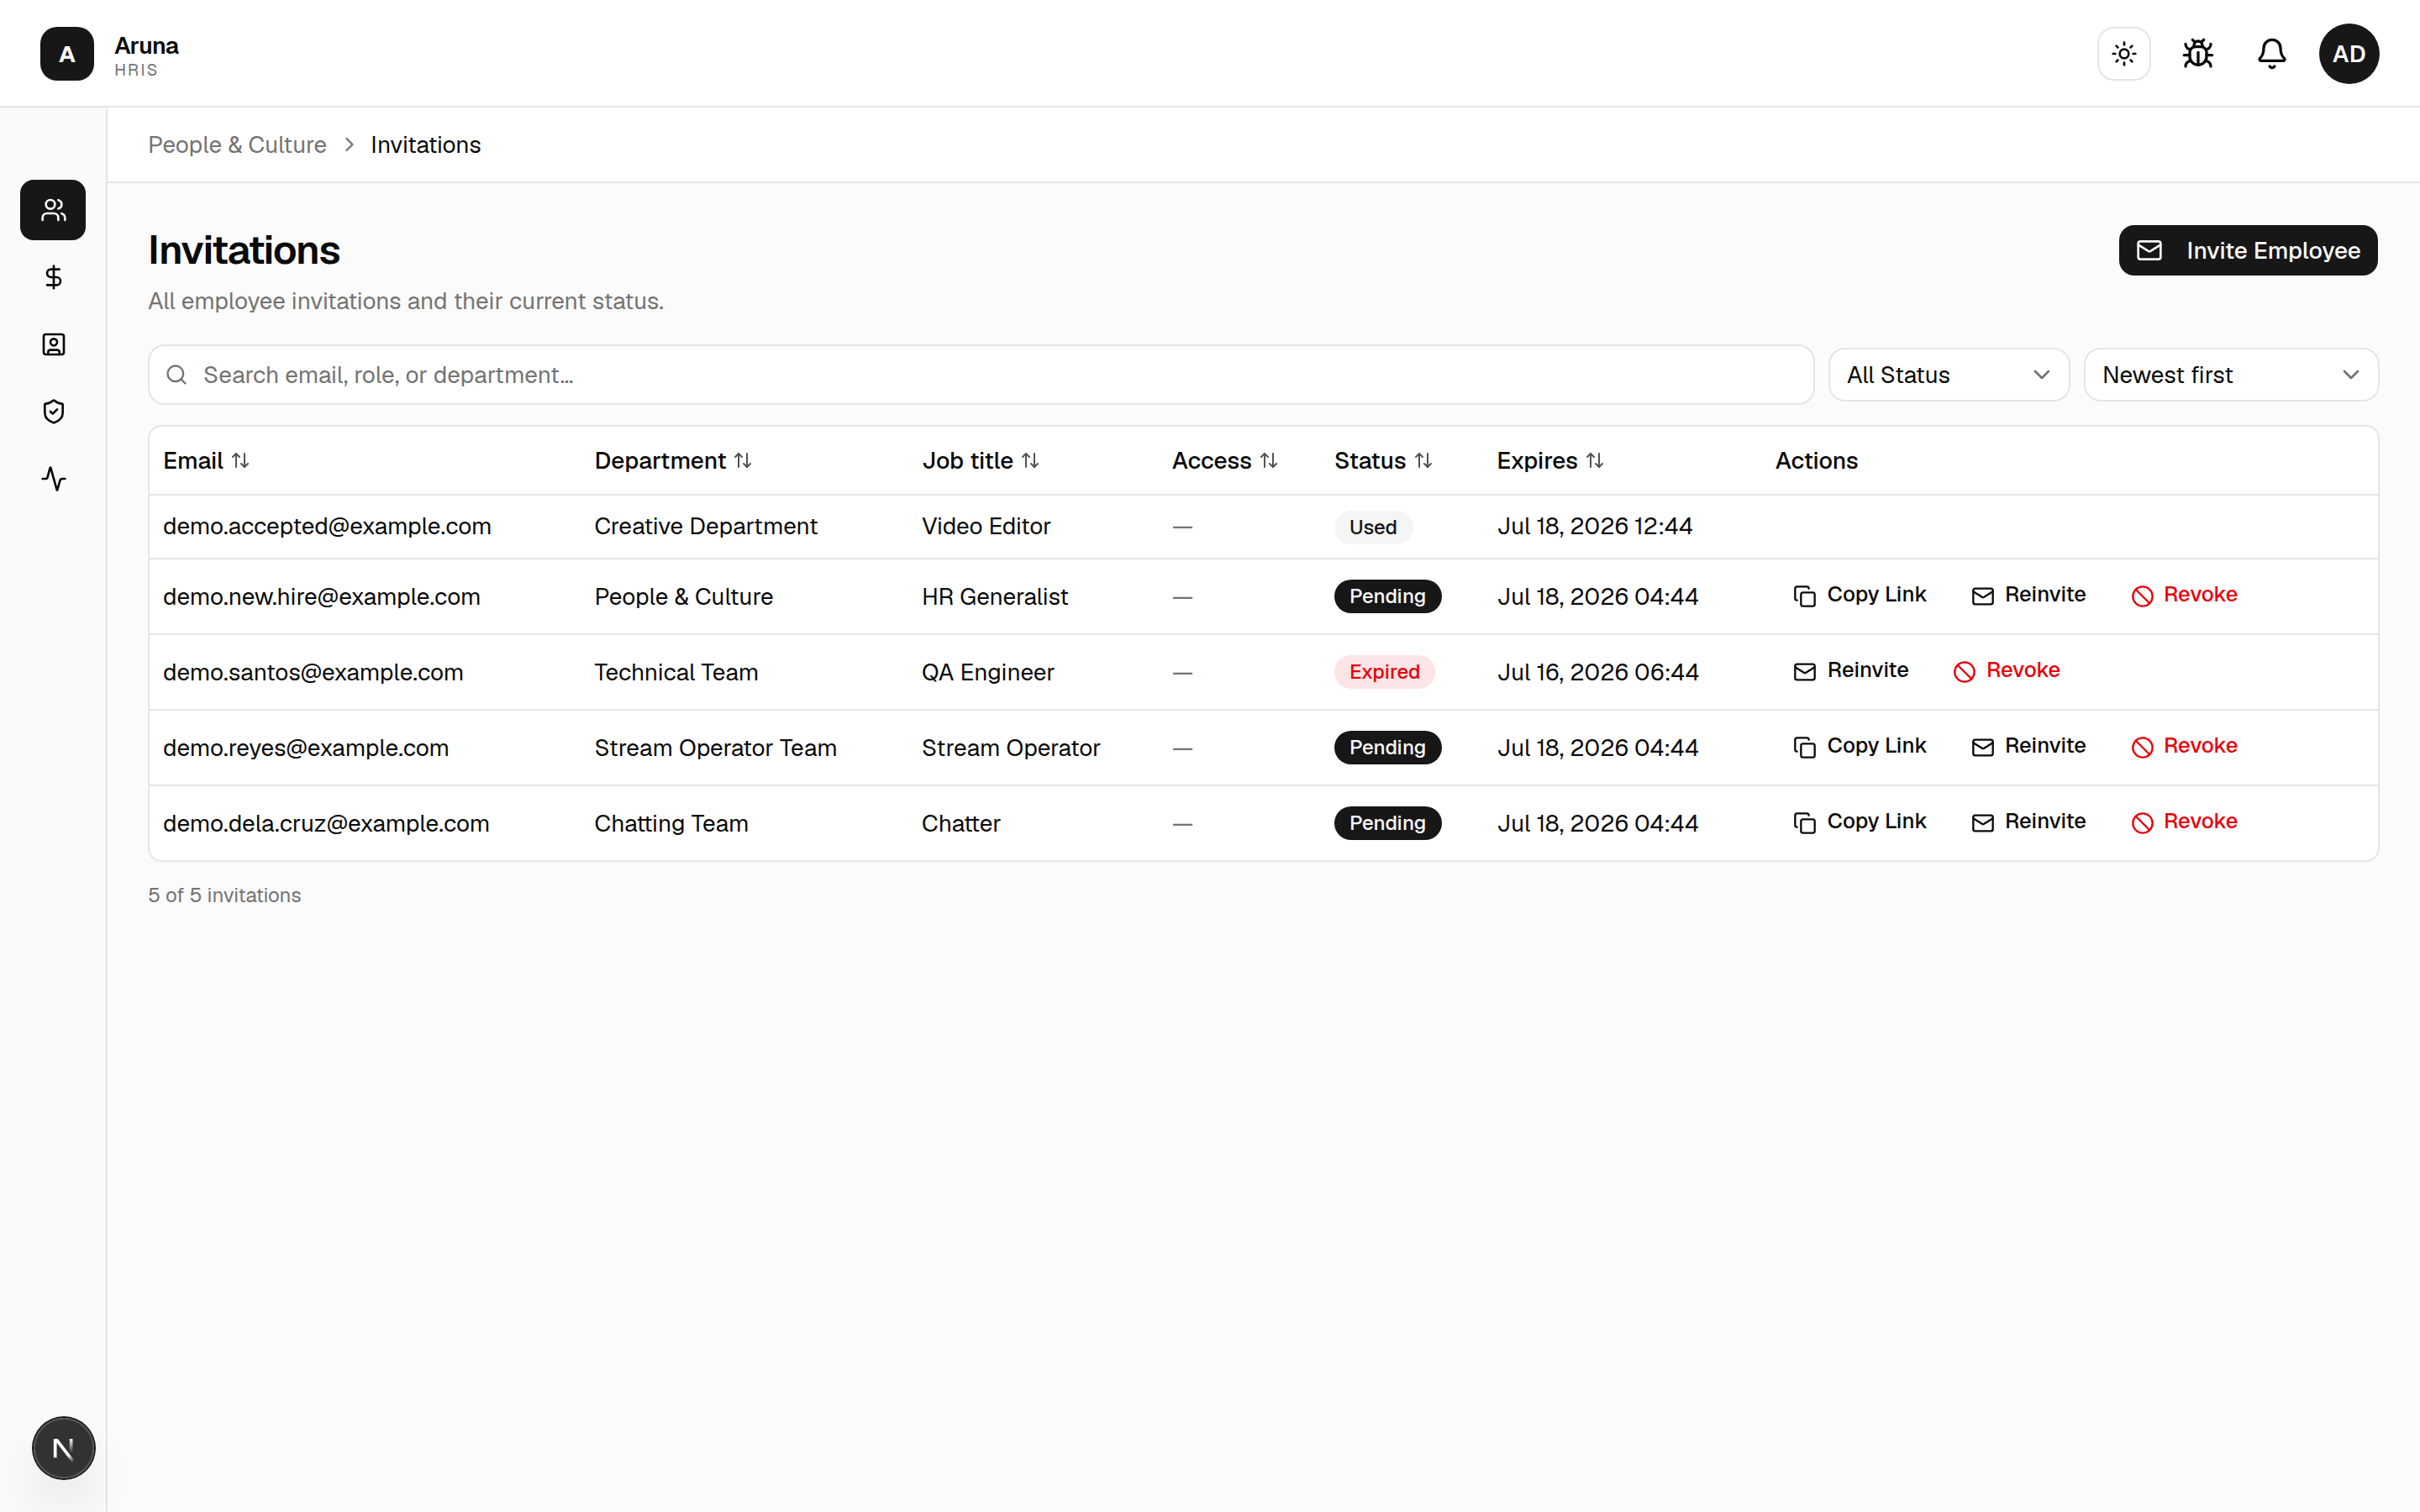
The Kind column says what each invitation is for, because the three behave differently when the link is opened:
- New employee — no record exists yet; they fill in a full profile and the employee is created when they accept.
- Existing employee — the record is already on file, so they only pick a username and password.
- Converted contractor — the record exists but its personal details don't, so they complete those, prefilled from what carried over from the contractor.
Each invitation also shows a Status:
- Pending — sent, not yet accepted, still valid.
- Expired — the 48-hour window lapsed. Use Reinvite for a fresh link.
- Used — the person accepted and now has an app account.
Row actions:
- Copy Link — grab the invite link to send manually.
- Reinvite — issues a new token and resets the 48-hour expiry.
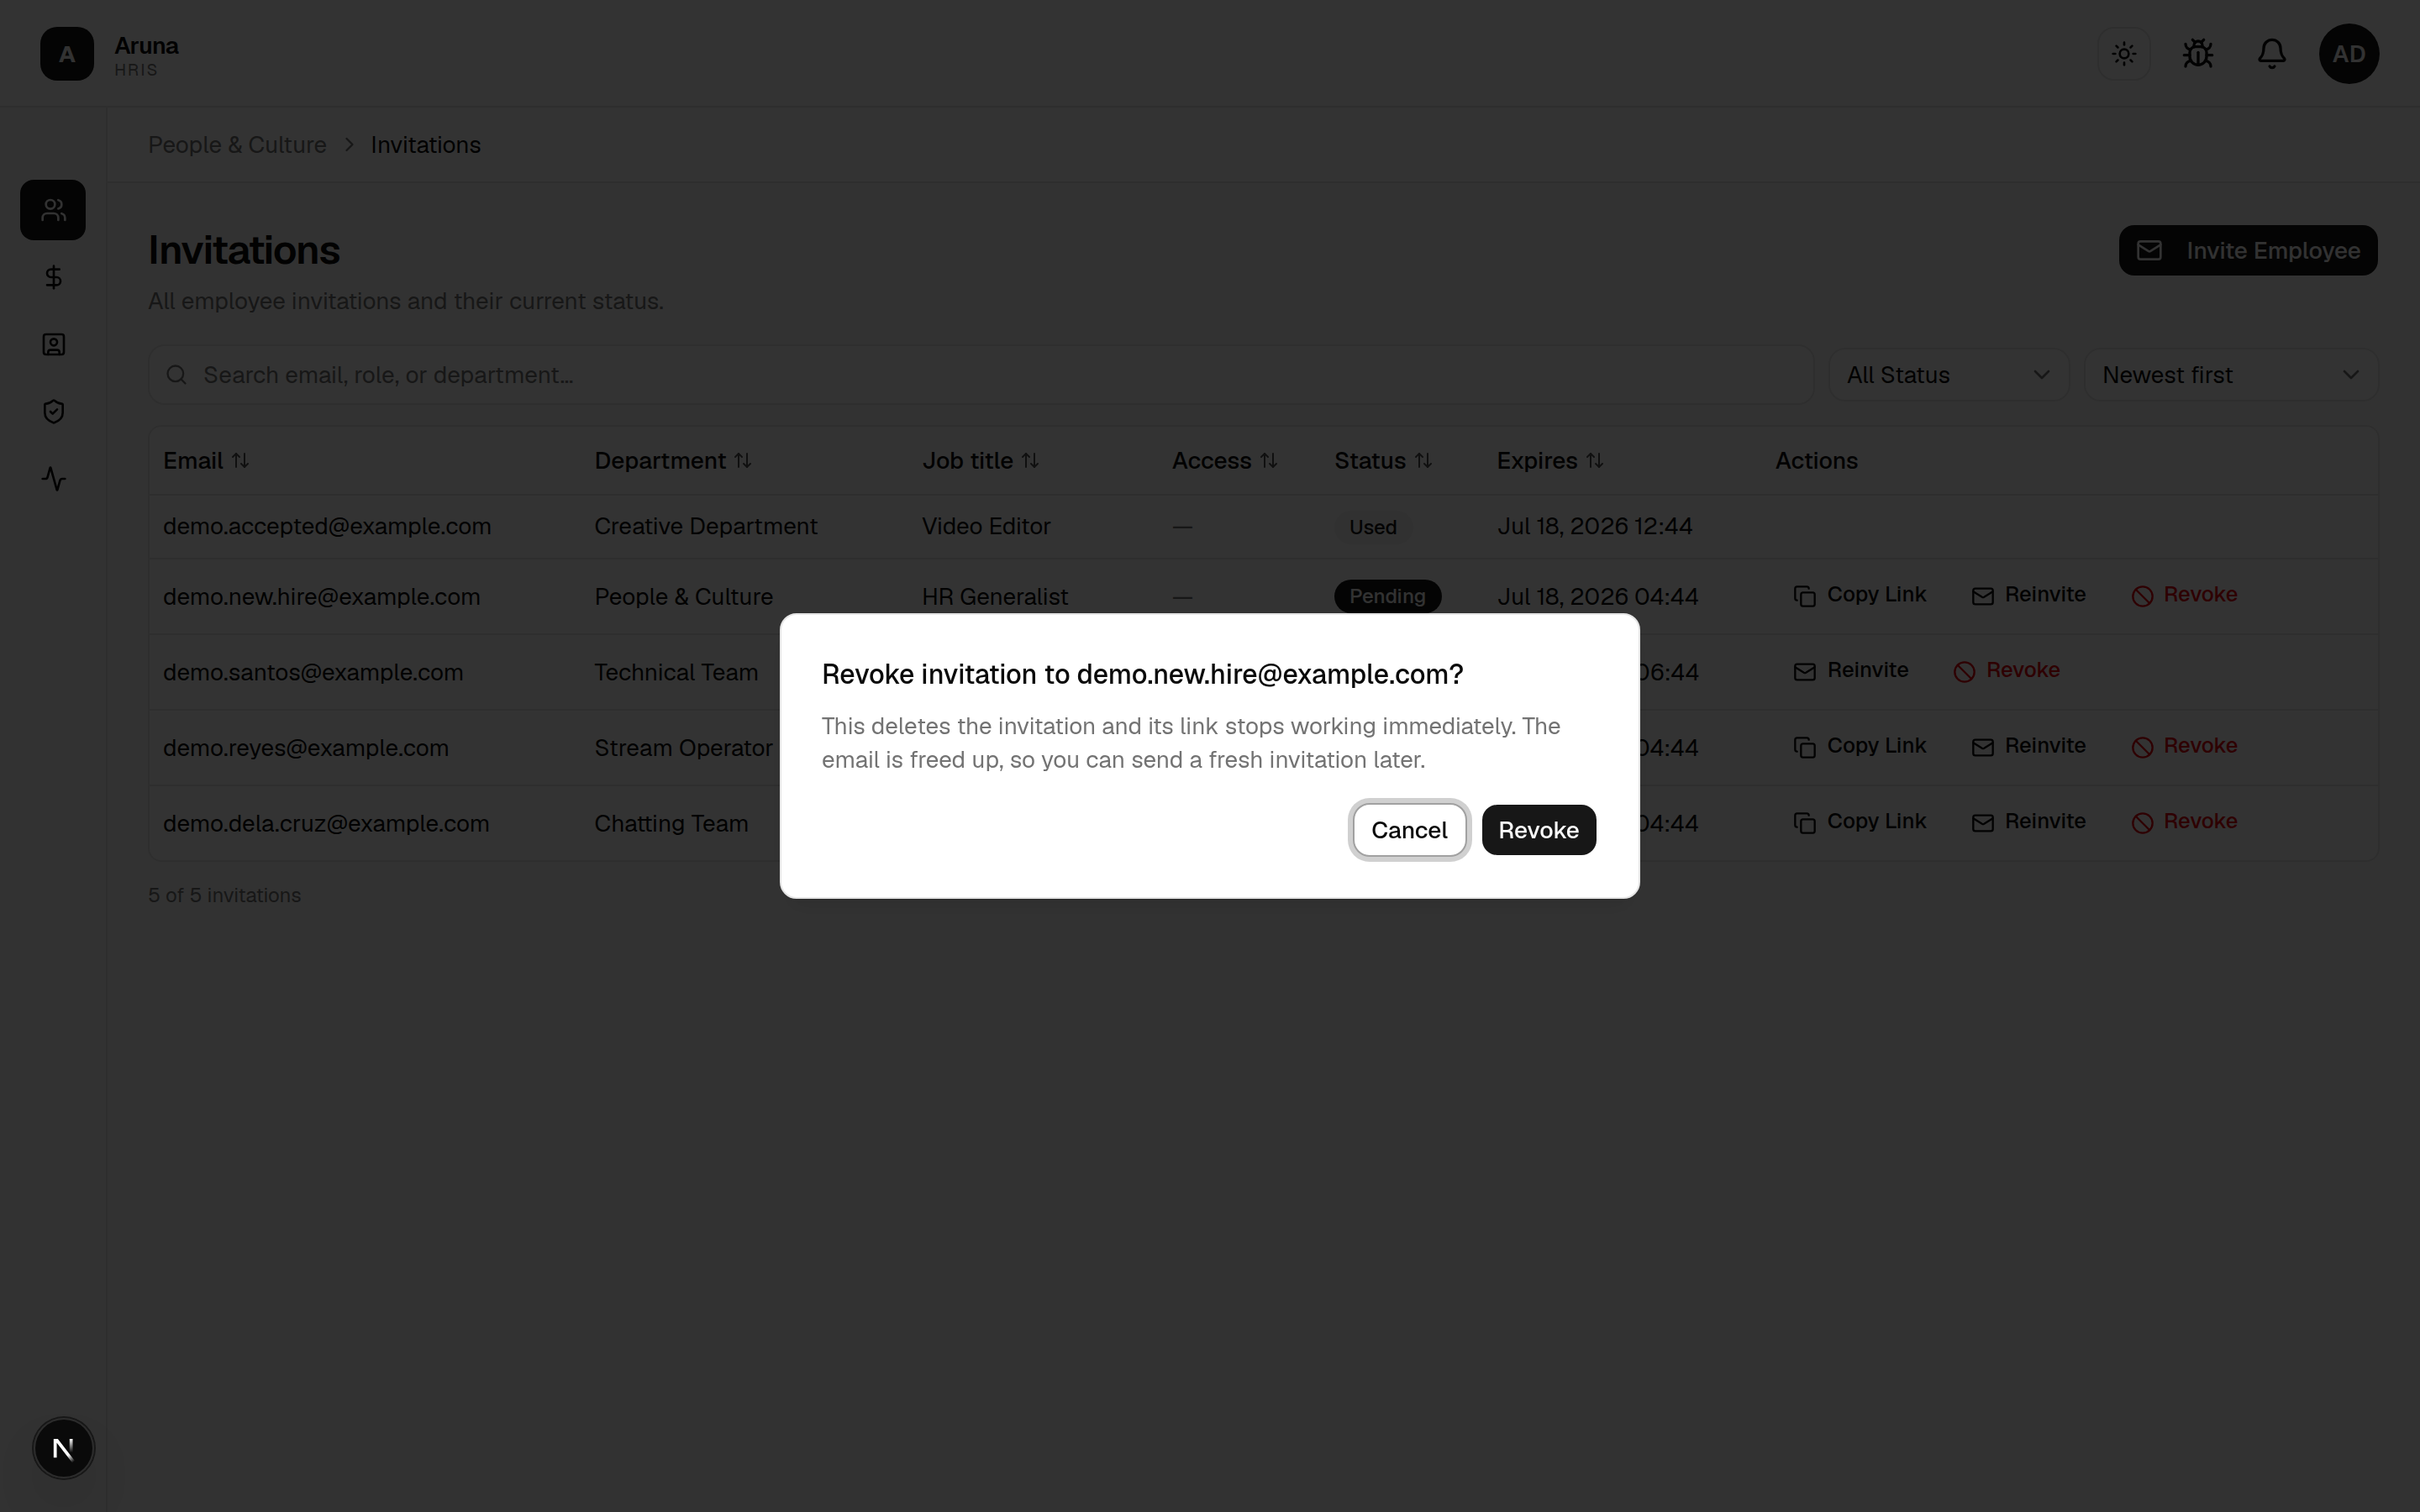
- Revoke — ⚠️ hard-deletes the invitation, freeing that email/employee to be invited again. A Used invitation can't be revoked. Revoke asks you to confirm — the link stops working immediately.
4. Module access¶
Open People & Culture → Access. This controls which modules each person can open in the app. (You can also set a single person's modules right on their detail page — this page is the bulk/roster view of the same thing.)
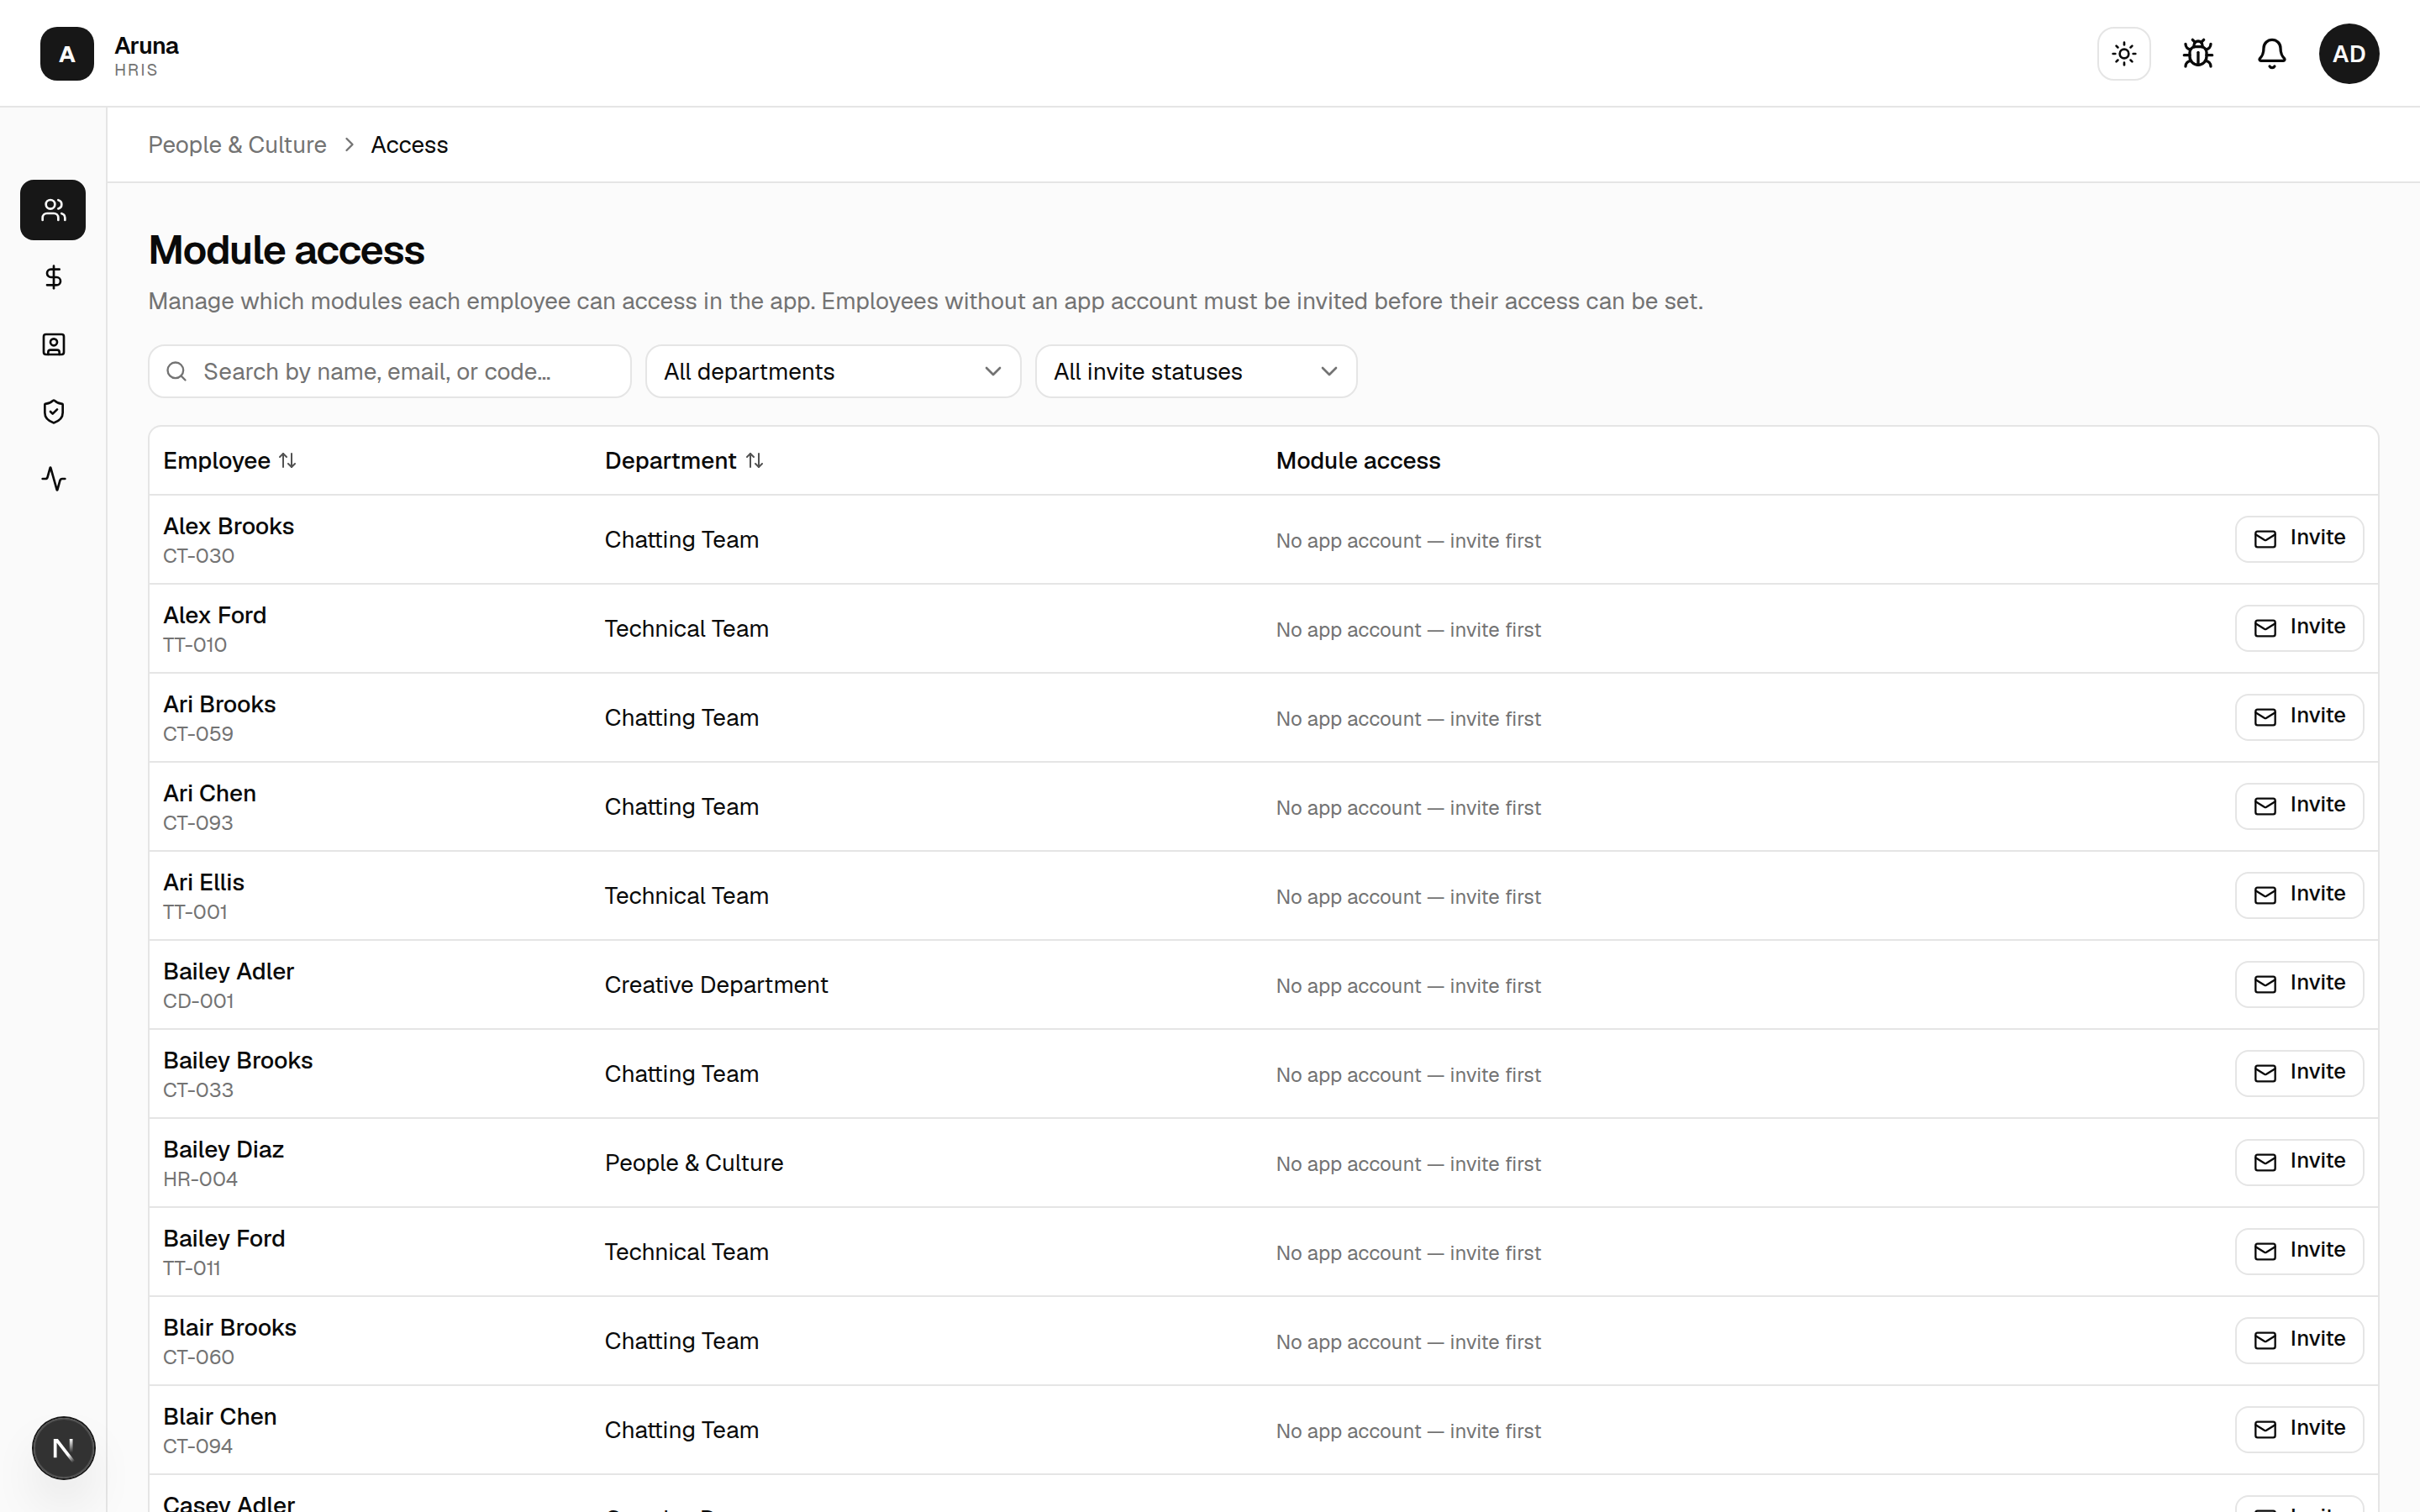
- An employee needs an app account first. Their row's status reads "Not invited" (with an Invite button), a Pending invitation badge, or an Expired invitation badge — the invited states link to View invitation on the Invitations page, where you reinvite or revoke.
- Filter by Module to answer "who can reach this?" — it's a checklist, so you can tick a department's core grant and its tools together to find everyone who can touch that team at all.
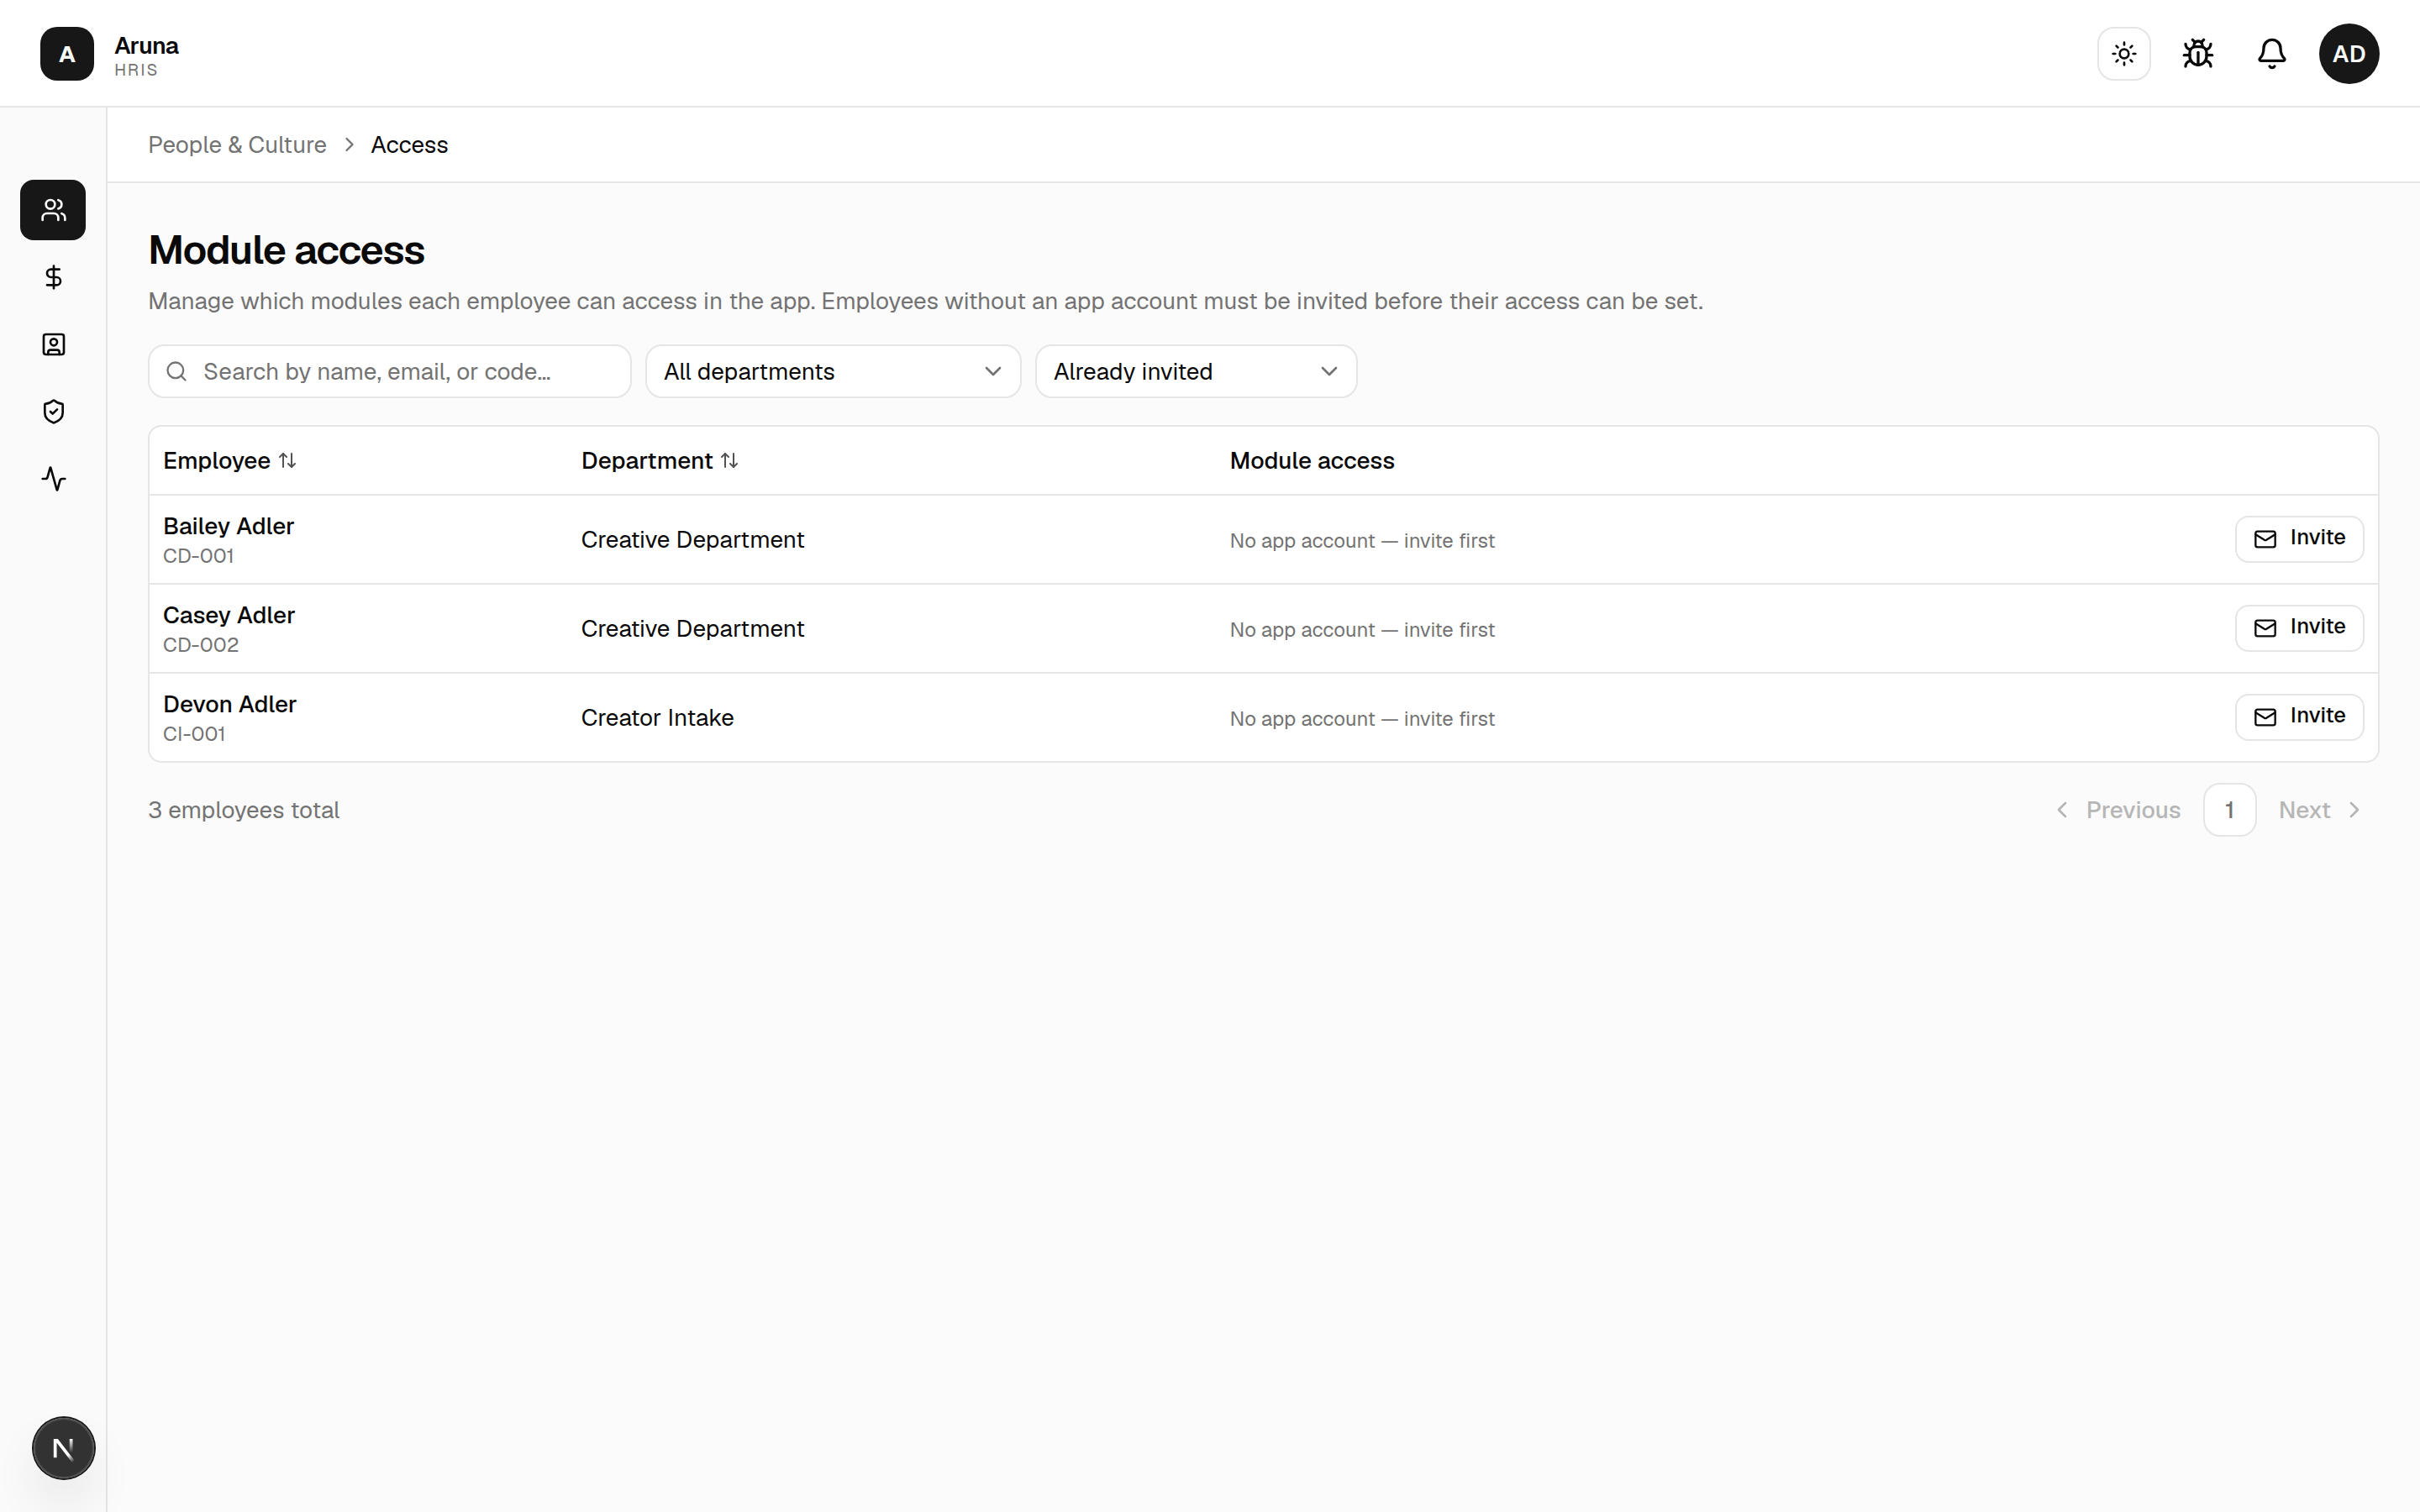
- Filter by Department and access status to work through a group. The three states — Has app account, Pending invitation, and Not invited — are distinct, so "Not invited" no longer includes people who've already accepted:
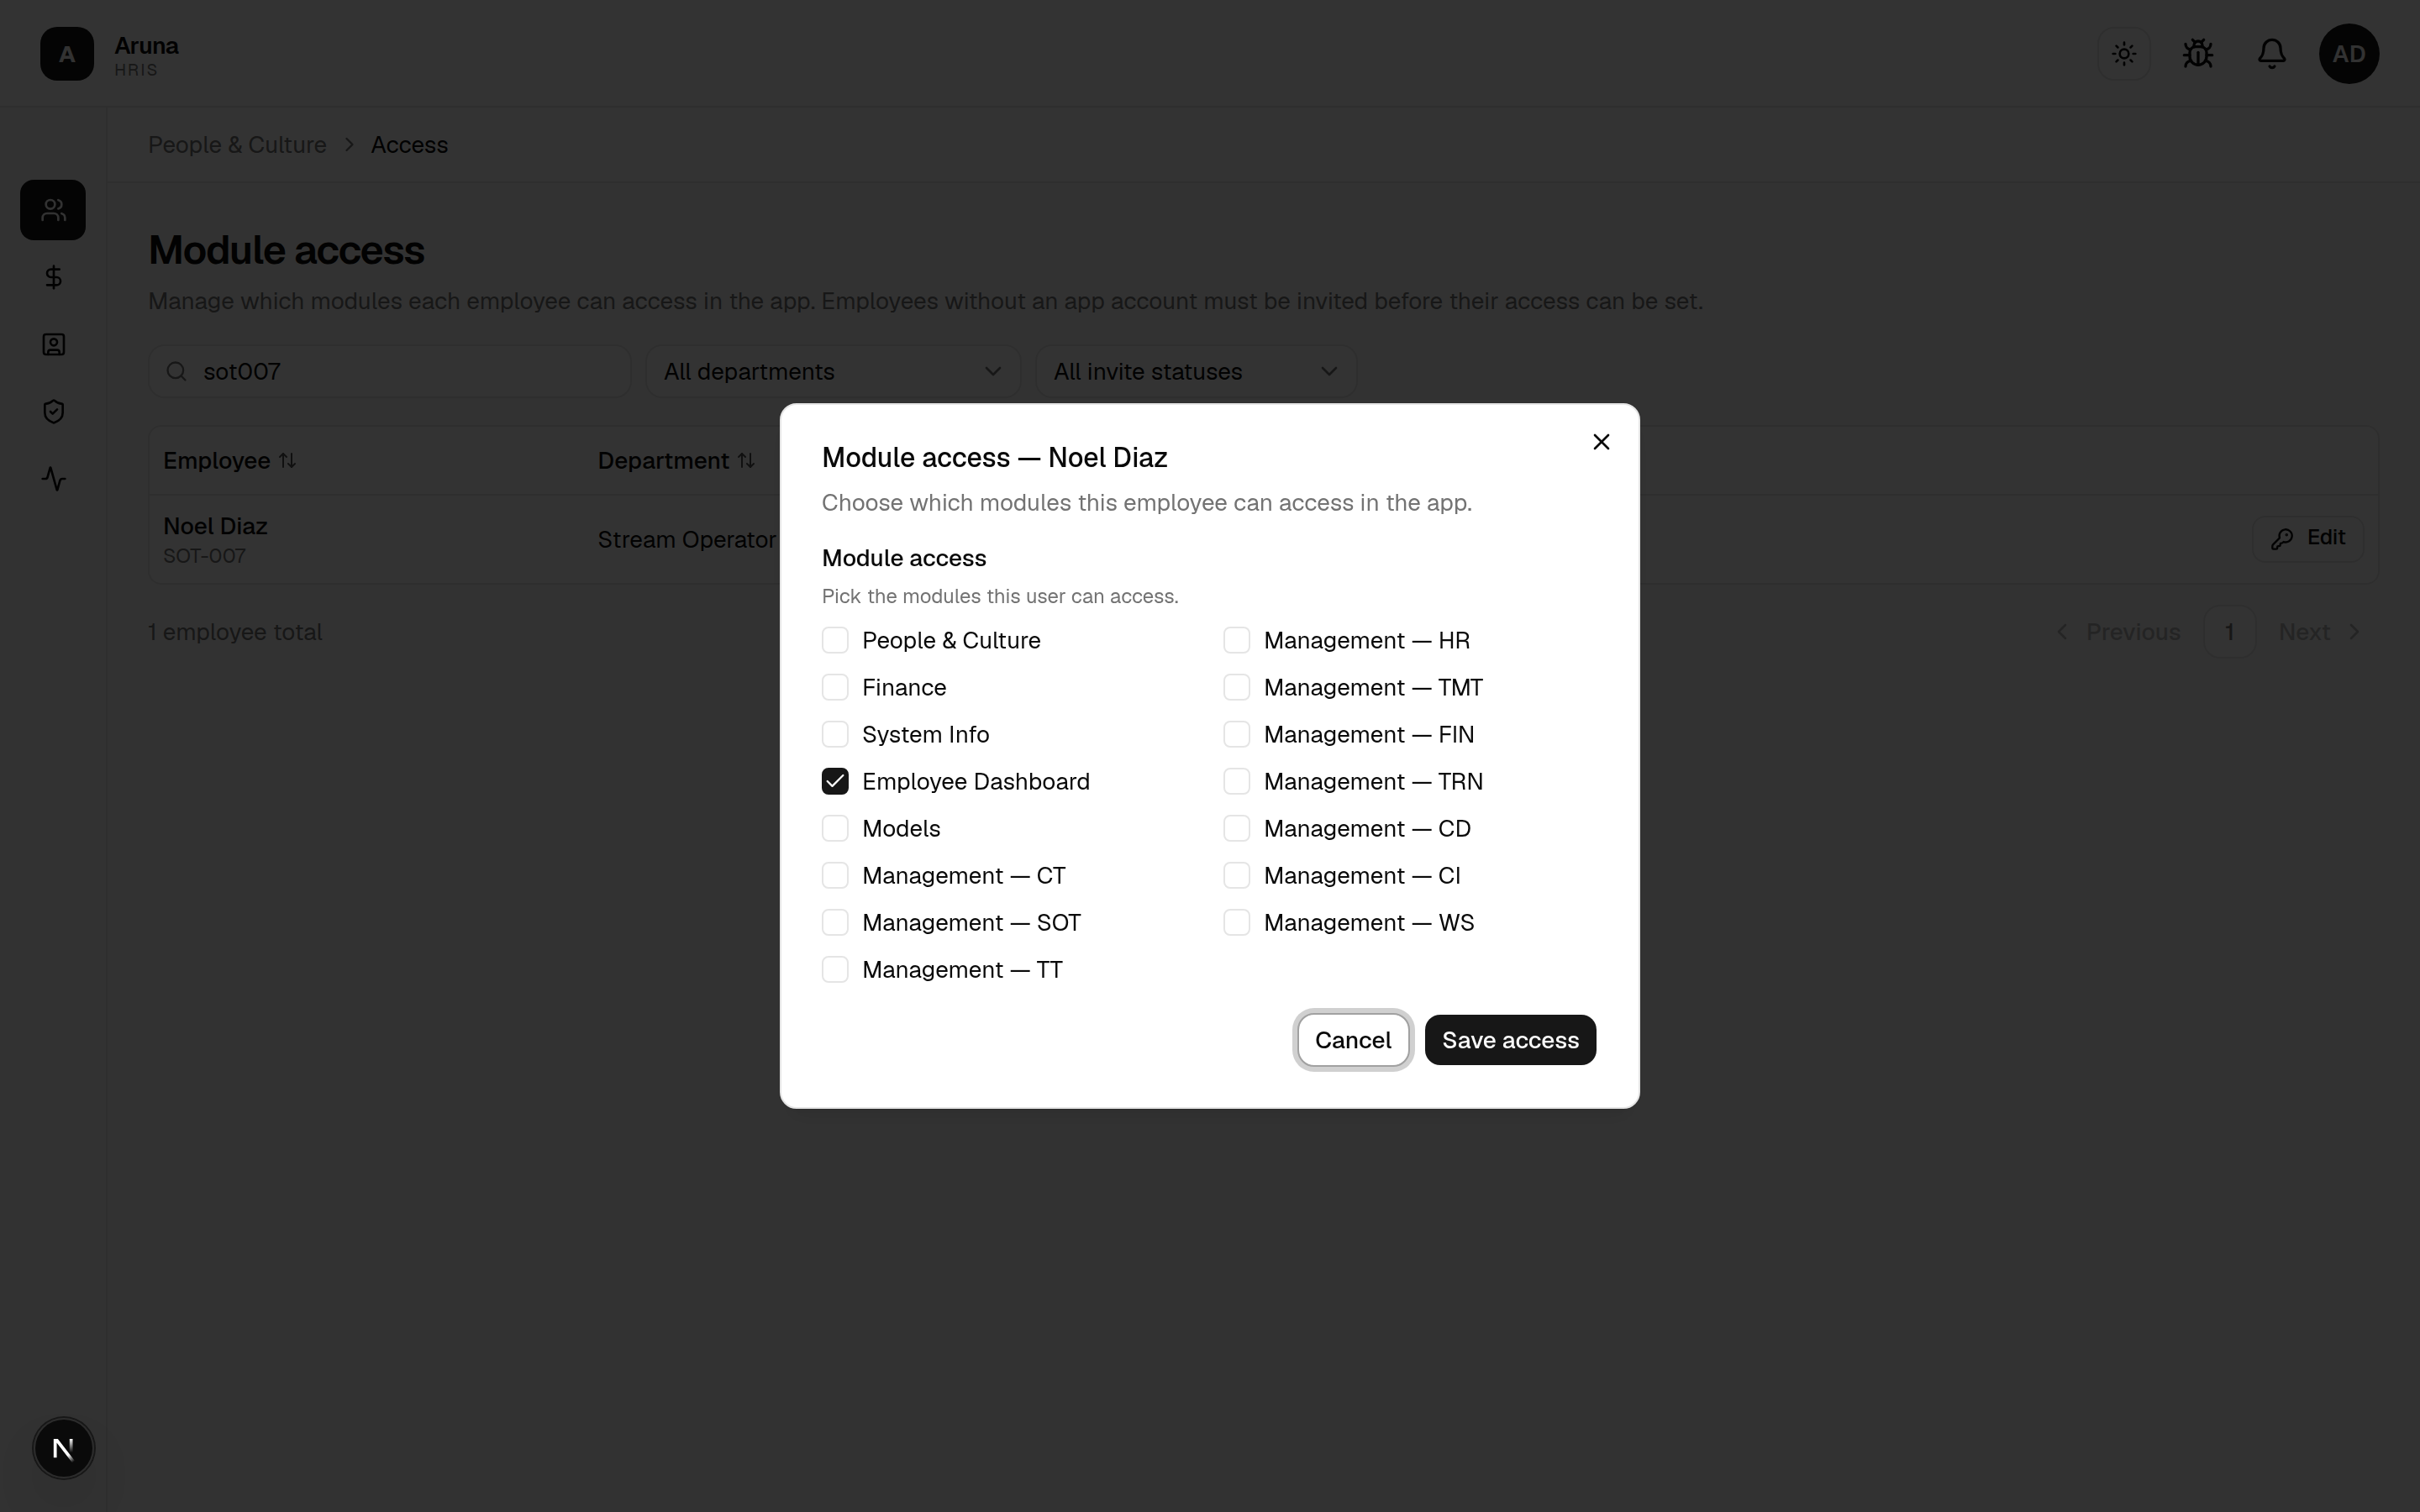
- Once someone has an account, click Edit on their row to open the module picker and Save access. It's grouped: General for the admin areas (P&C, Finance, Models…), then one row per department under Management.
Ticking a department grants its core access — time validations, leaves &
absences and announcements. Team tools (CT Overtime, SOT Scheduling Hub, TMT
Retainer Mapping…) sit underneath it and are granted one by one, so you
can give someone a single tool without also handing them the approval queues.
The 2/8 counter and the All / None link on each department row are
for granting a full manager in one click.
Switch the dialog's Change history tab to see who changed this person's access and when (scrollable, so a long trail stays contained).
5. Time Doctor mapping¶
Open People & Culture → Time tracker.
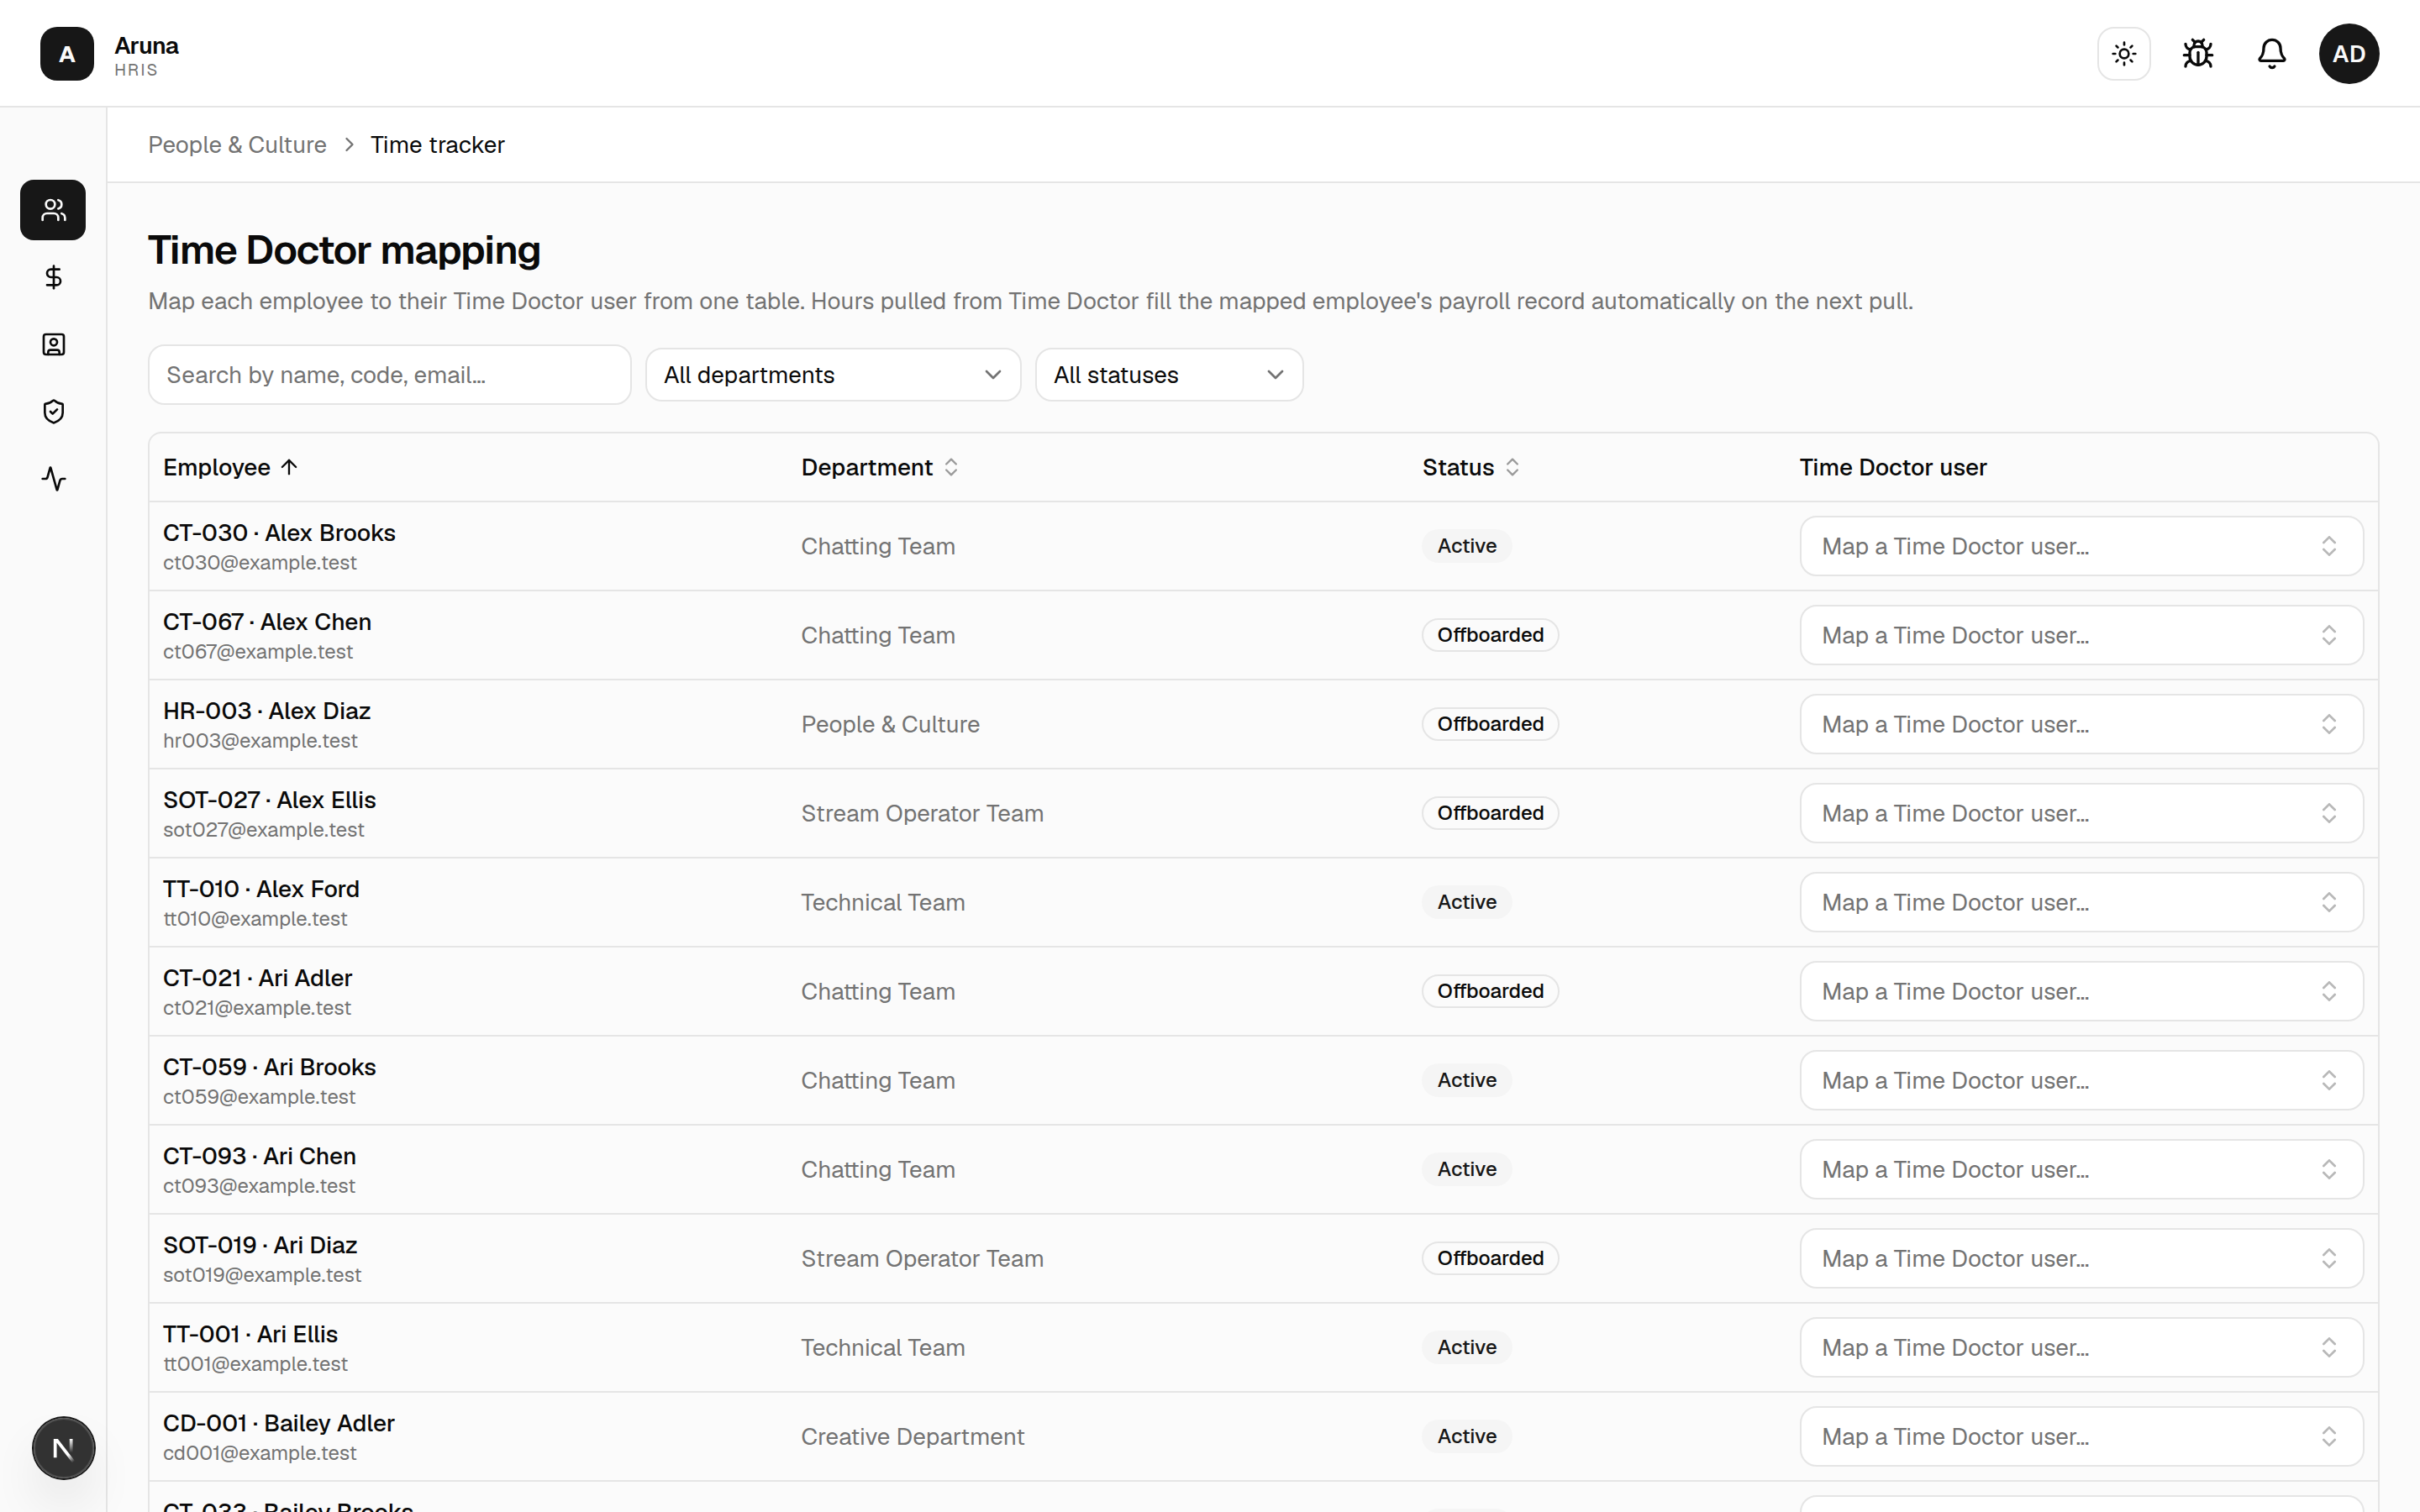
- Map each employee to their Time Doctor user — open the row's dropdown and search by name or email.
- Once mapped, hours pulled from Time Doctor fill that employee's payroll record automatically on the next pull.
- Filter by department or status to find unmapped or offboarded people.
6. Transfers, offboarding & approvals (quick notes)¶
- Department transfer mid-cutoff re-routes that person's pending time-adjustment and leave approvals to the new team's manager. Do it via Reassign on the detail page.
- Offboarding — set the Last working day in the detail page's Employee Information Edit form (see §2). The person still gets a prorated final pay, and their sessions are revoked.
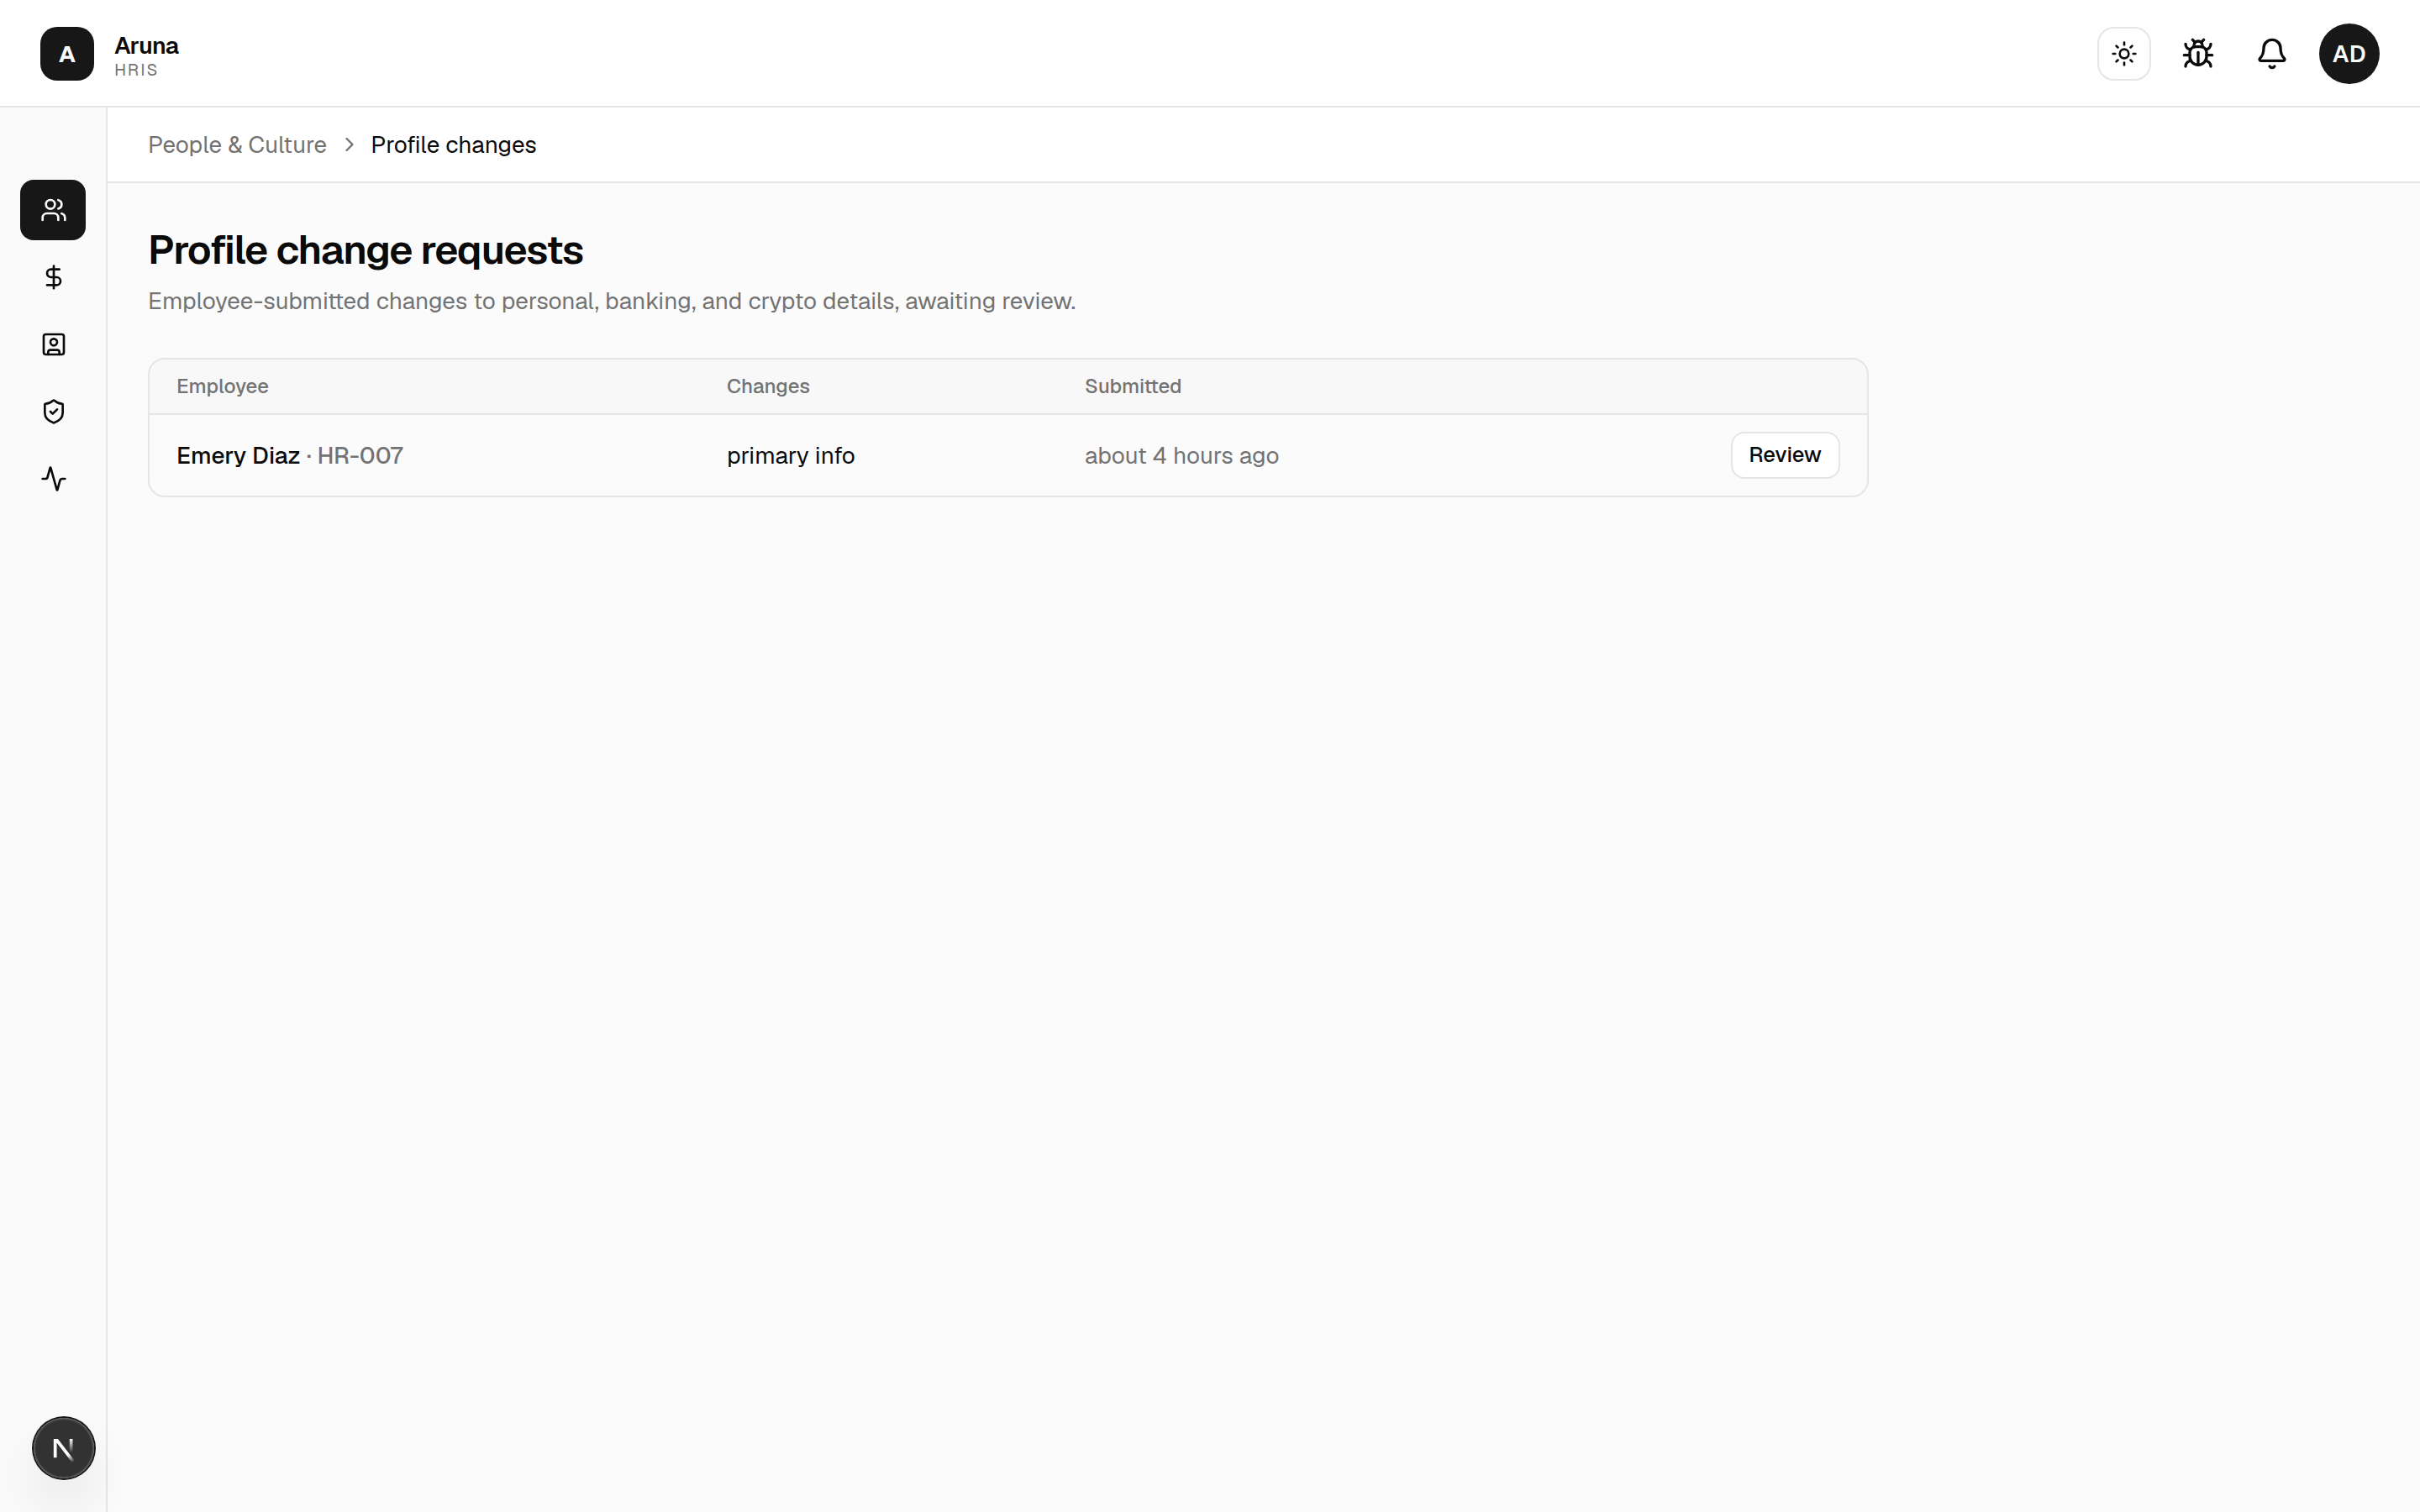
- Referral bonuses and profile-change requests flow to P&C for approval. Employee-submitted changes to personal / banking / crypto details land in People & Culture → Profile changes for review.
7. Leave credits & alignment calls¶
People & Culture → Leaves is the read-only view of every team's leave, with four tabs — Requests, Absences, Calendar and Balances. Deciding leave is the department manager's job; P&C look, and hold the alignment calls.
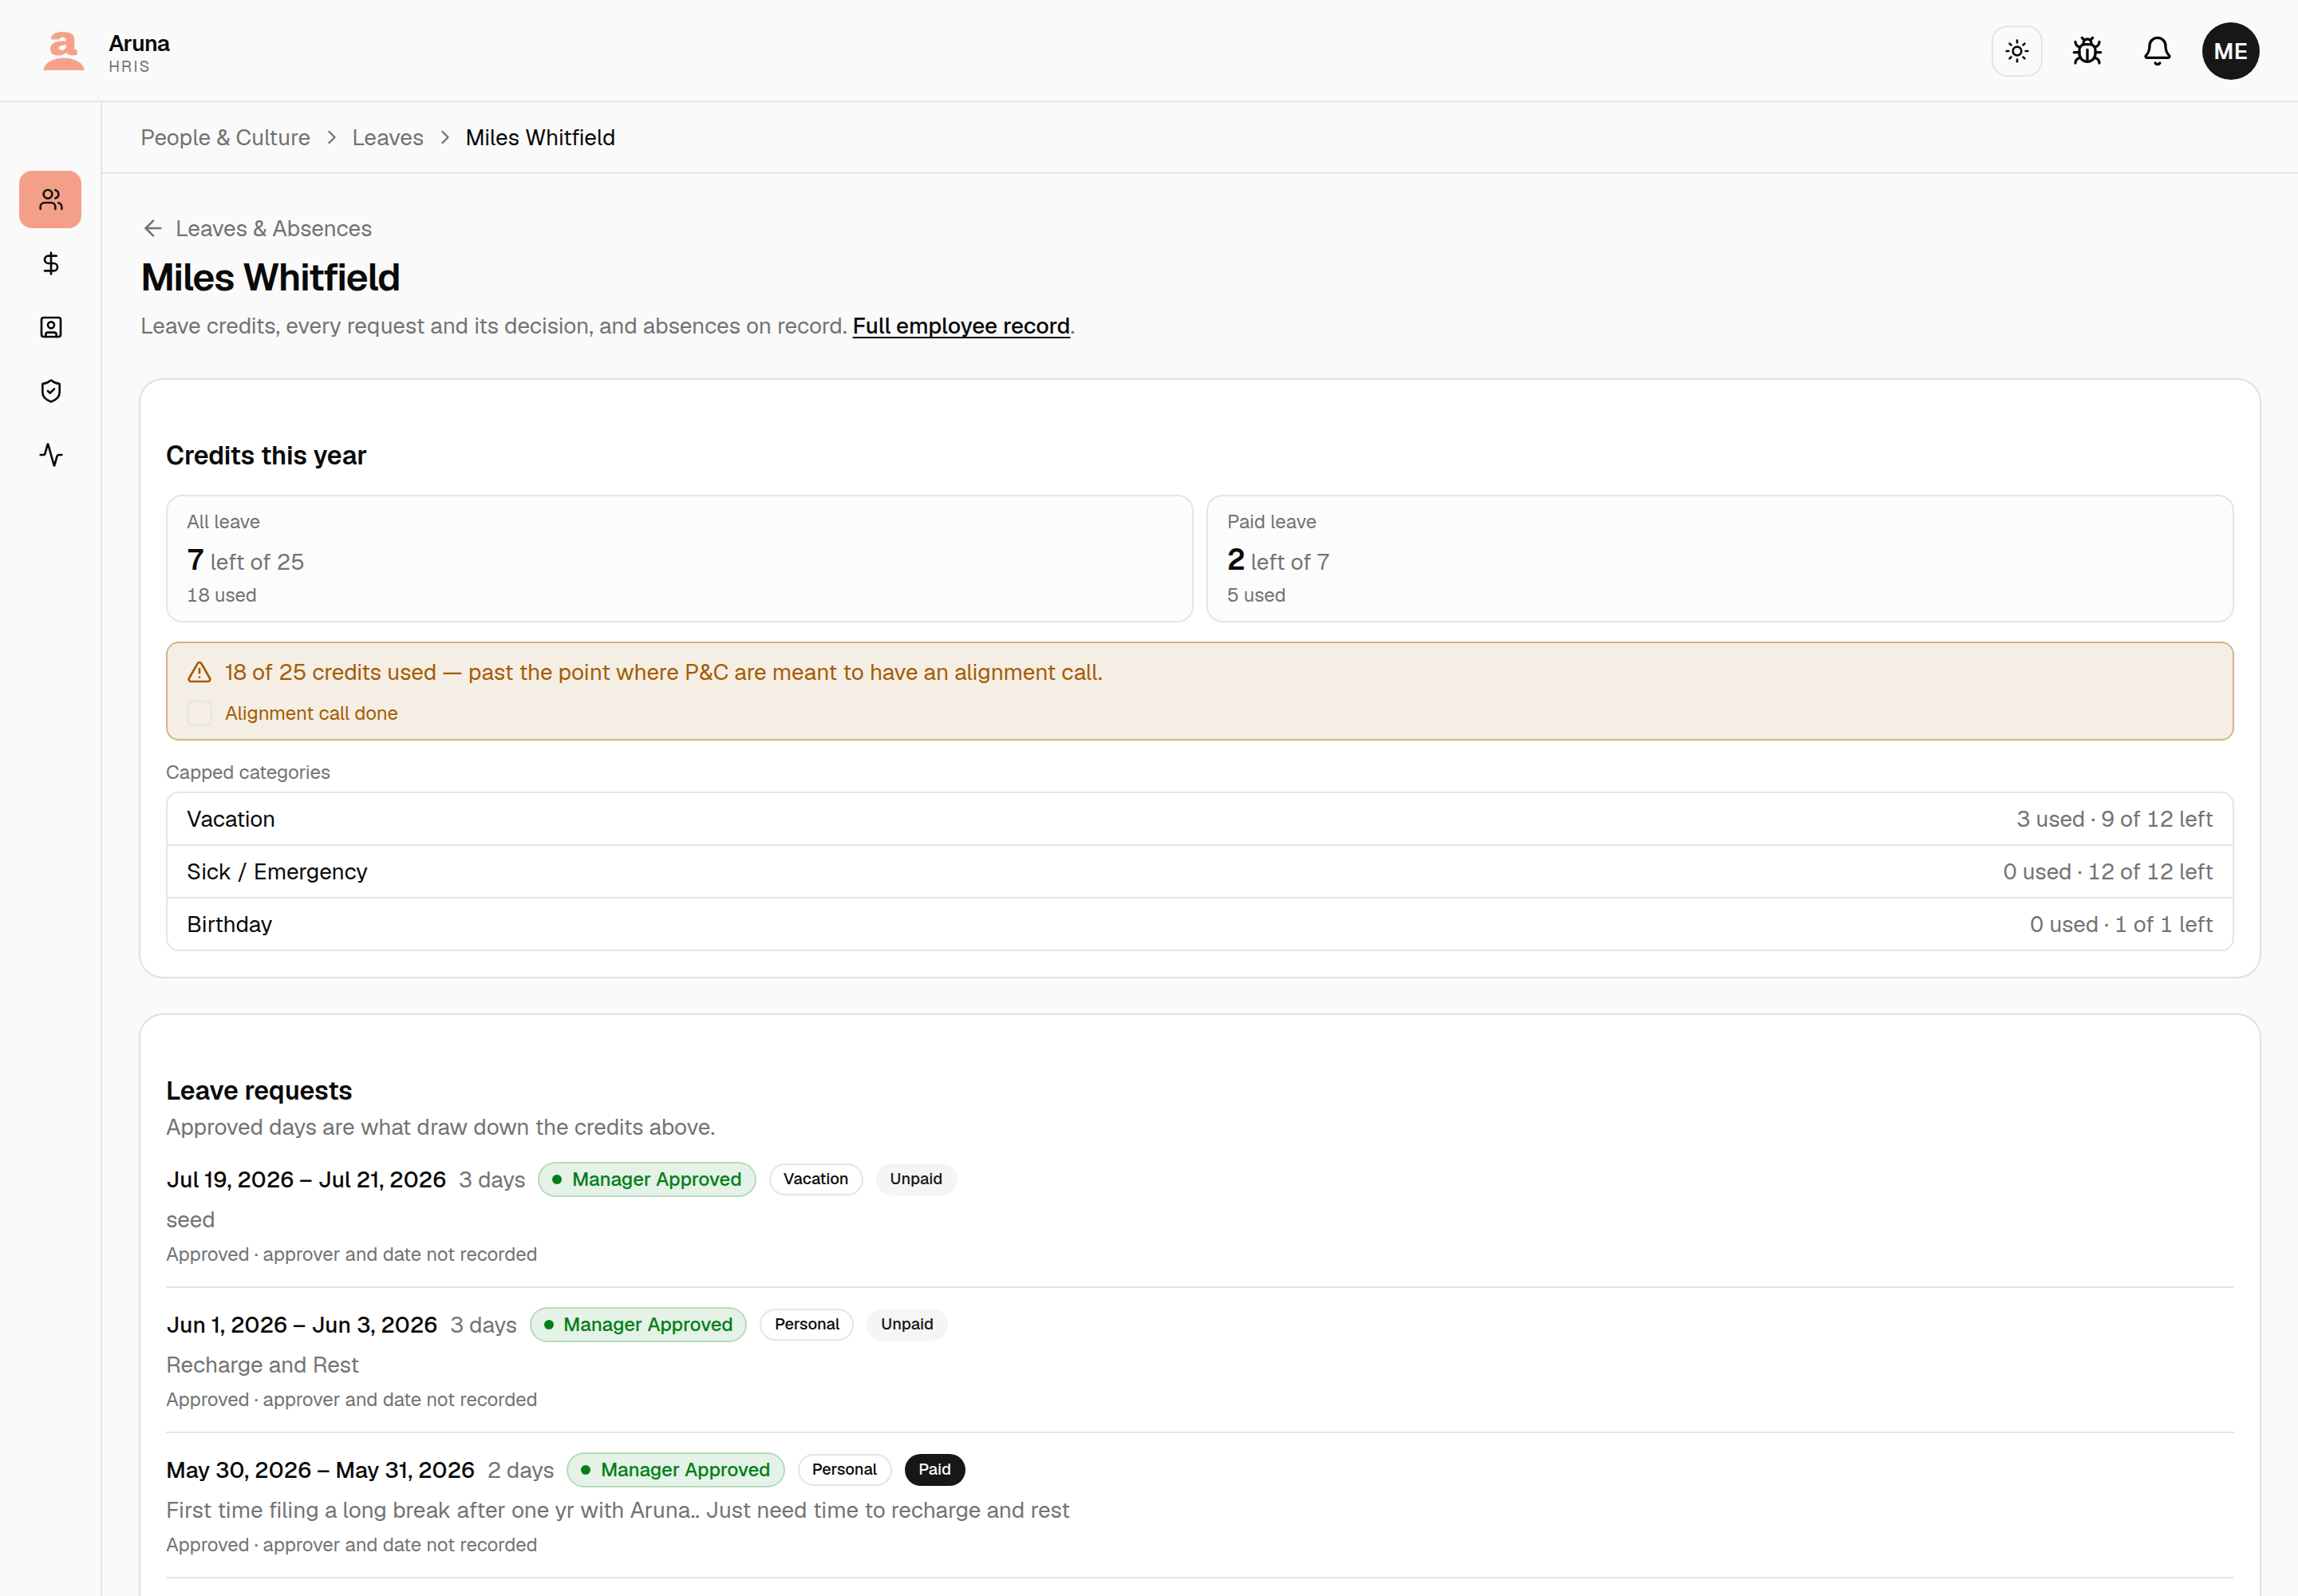
Everyone gets 25 leave credits a year, 7 of them paid. Once someone has used 15, they're flagged for a P&C alignment call — a conversation about their attendance, not a block on further leave. Nothing stops them booking more.
The Balances tab filters on that flag:
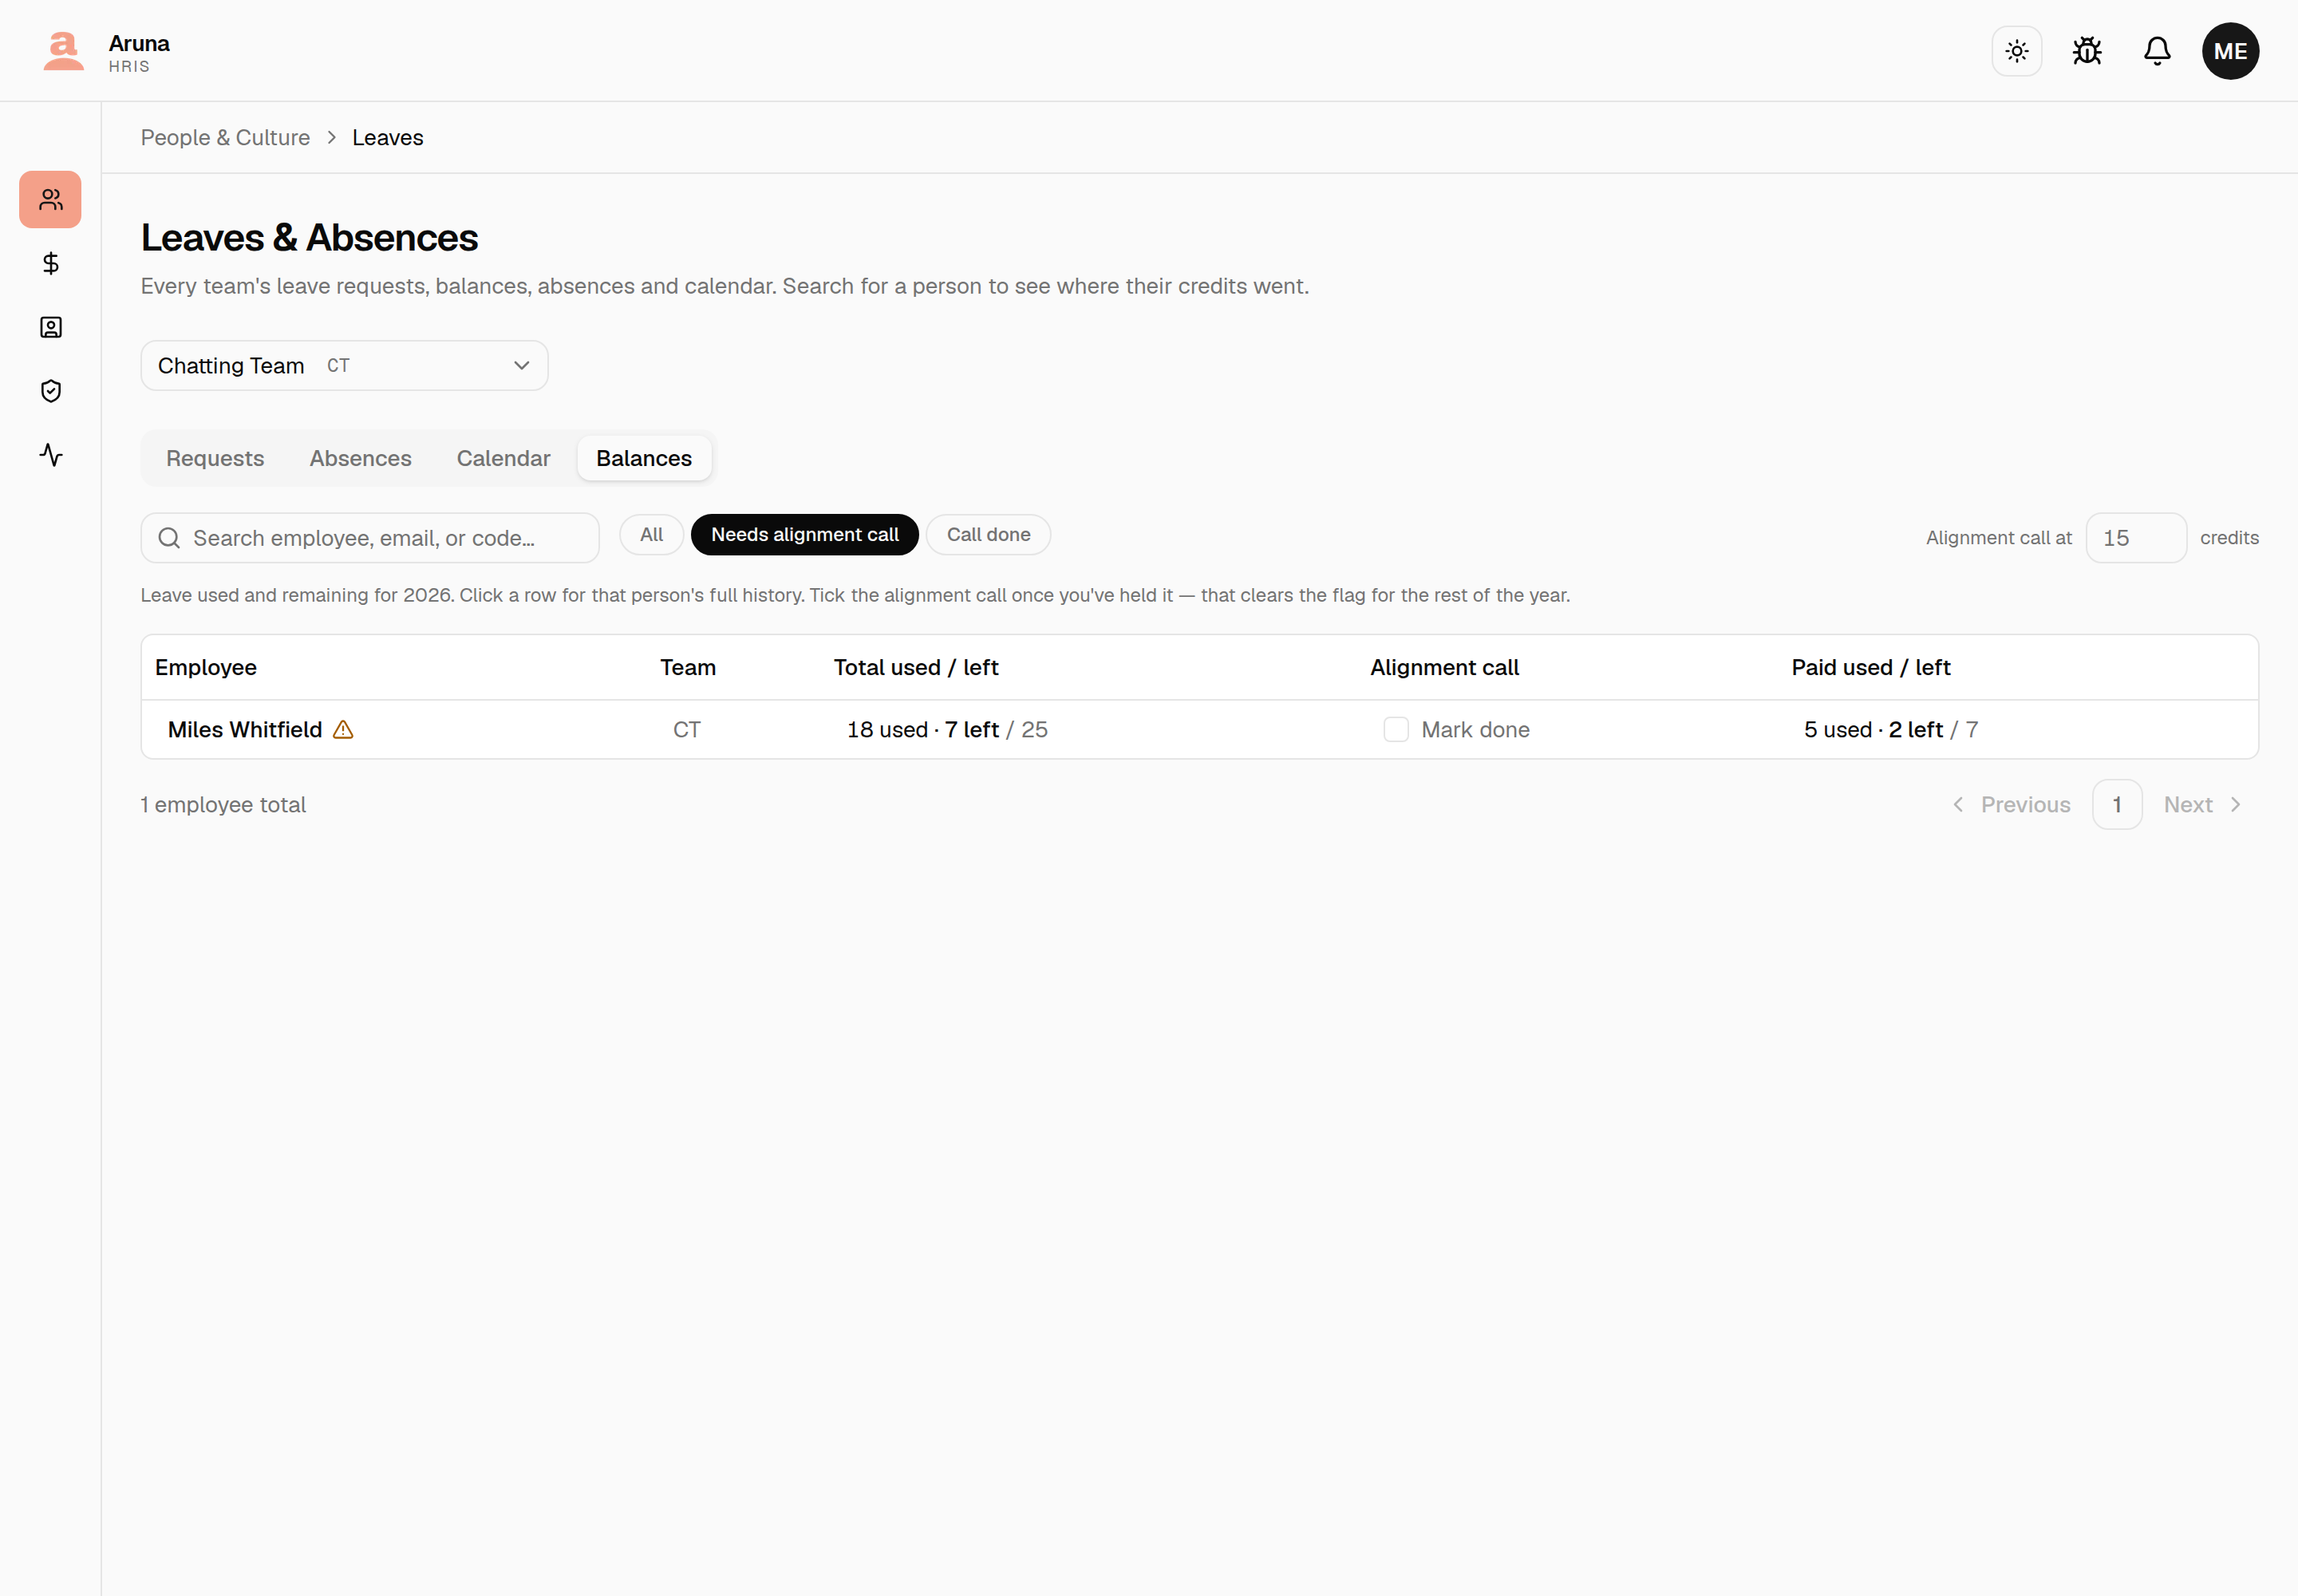
- All · Needs alignment call · Call done — the middle one is the queue: at or over the threshold, with no call recorded yet.
- Alignment call at N credits sets the threshold. Lowering it flags everyone now at or above the new number; raising it clears people. Only P&C see this control.
- Tick Mark done once you've held the call. That clears the flag for the rest of the year — there's no second prompt if they take more leave, and the flag comes back on its own when next year's credits start.
A person's page shows the same thing in full, and can be ticked from there:
Once recorded, the banner turns green and keeps the record of who held the call and when:
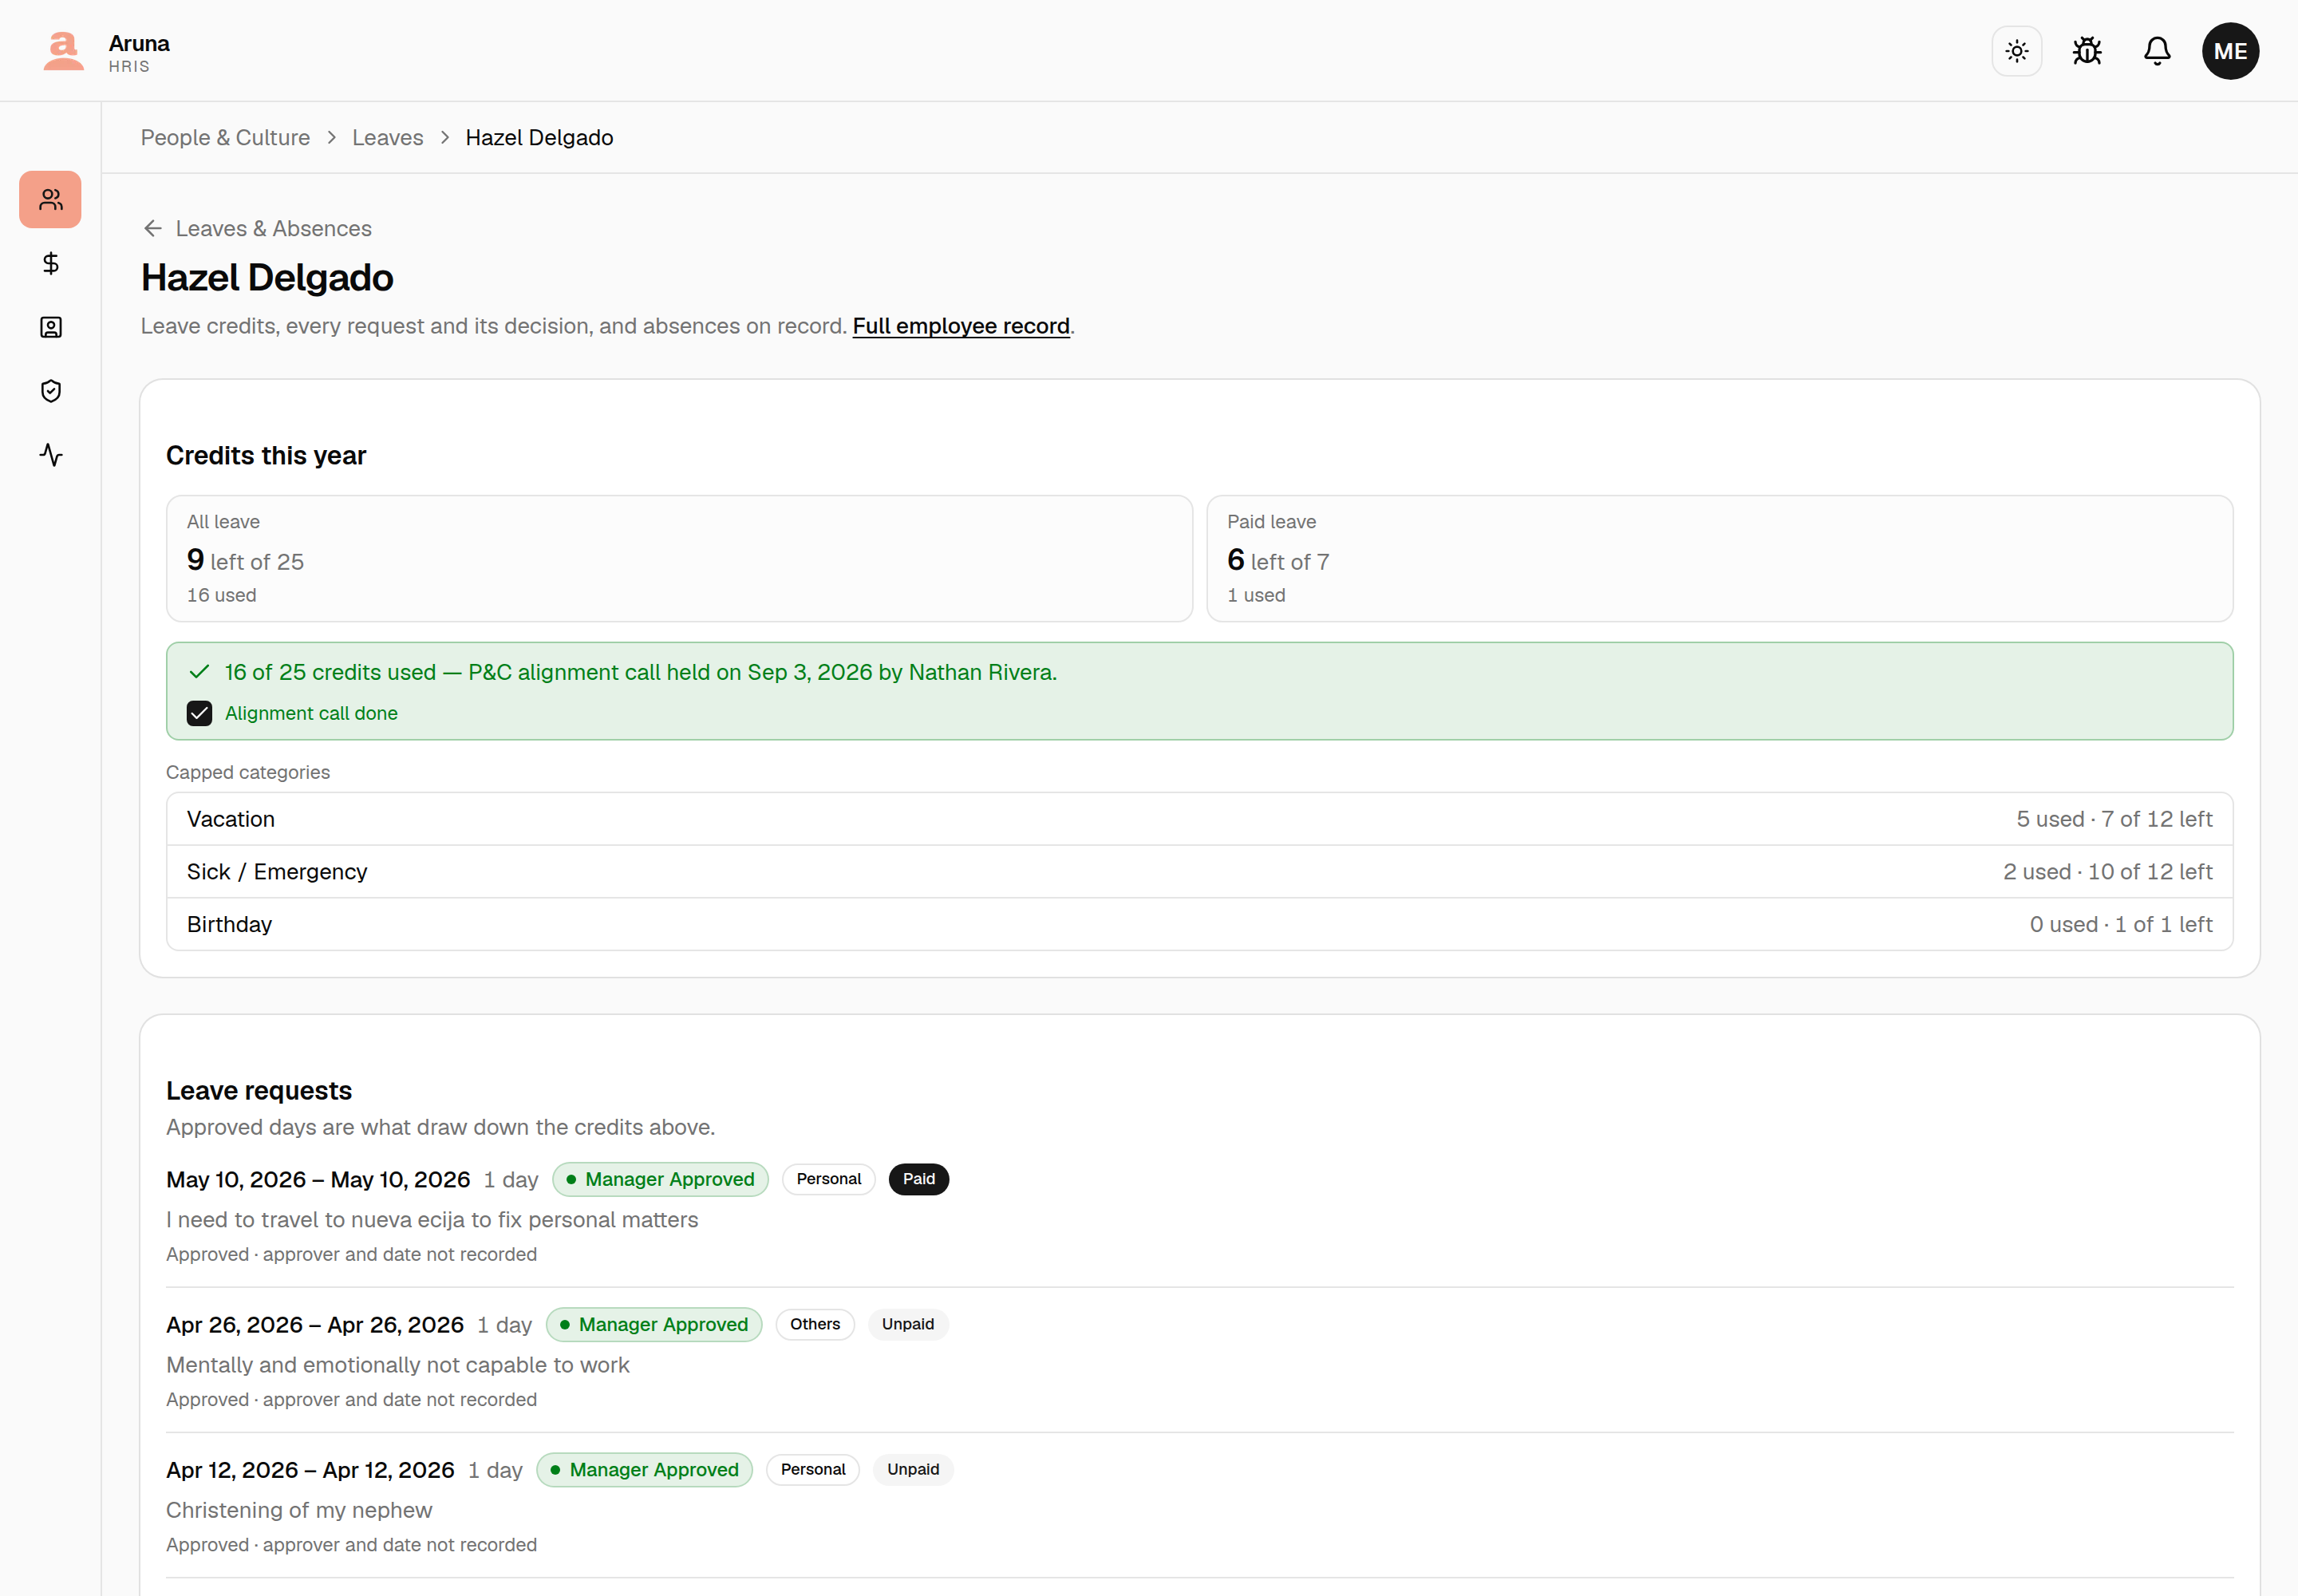
Recording a call doesn't change anyone's credits — it only clears the prompt. The used/remaining figures and the amber-to-green switch are two different things: someone can be well past 15 and have a green banner.
Department managers see the same filter and a read-only Done marker for their own team, but can't tick it — see the manager guide.
8. External contractors¶
People & Culture → External Contractors is the roster of parties who need to be paid but aren't employees — an affiliate referrer, a fixed-rate vendor. They can't carry a payroll record, so they're paid through their own contractor payouts (run from the Finance payroll page, not here). This page is only where you manage the roster itself.
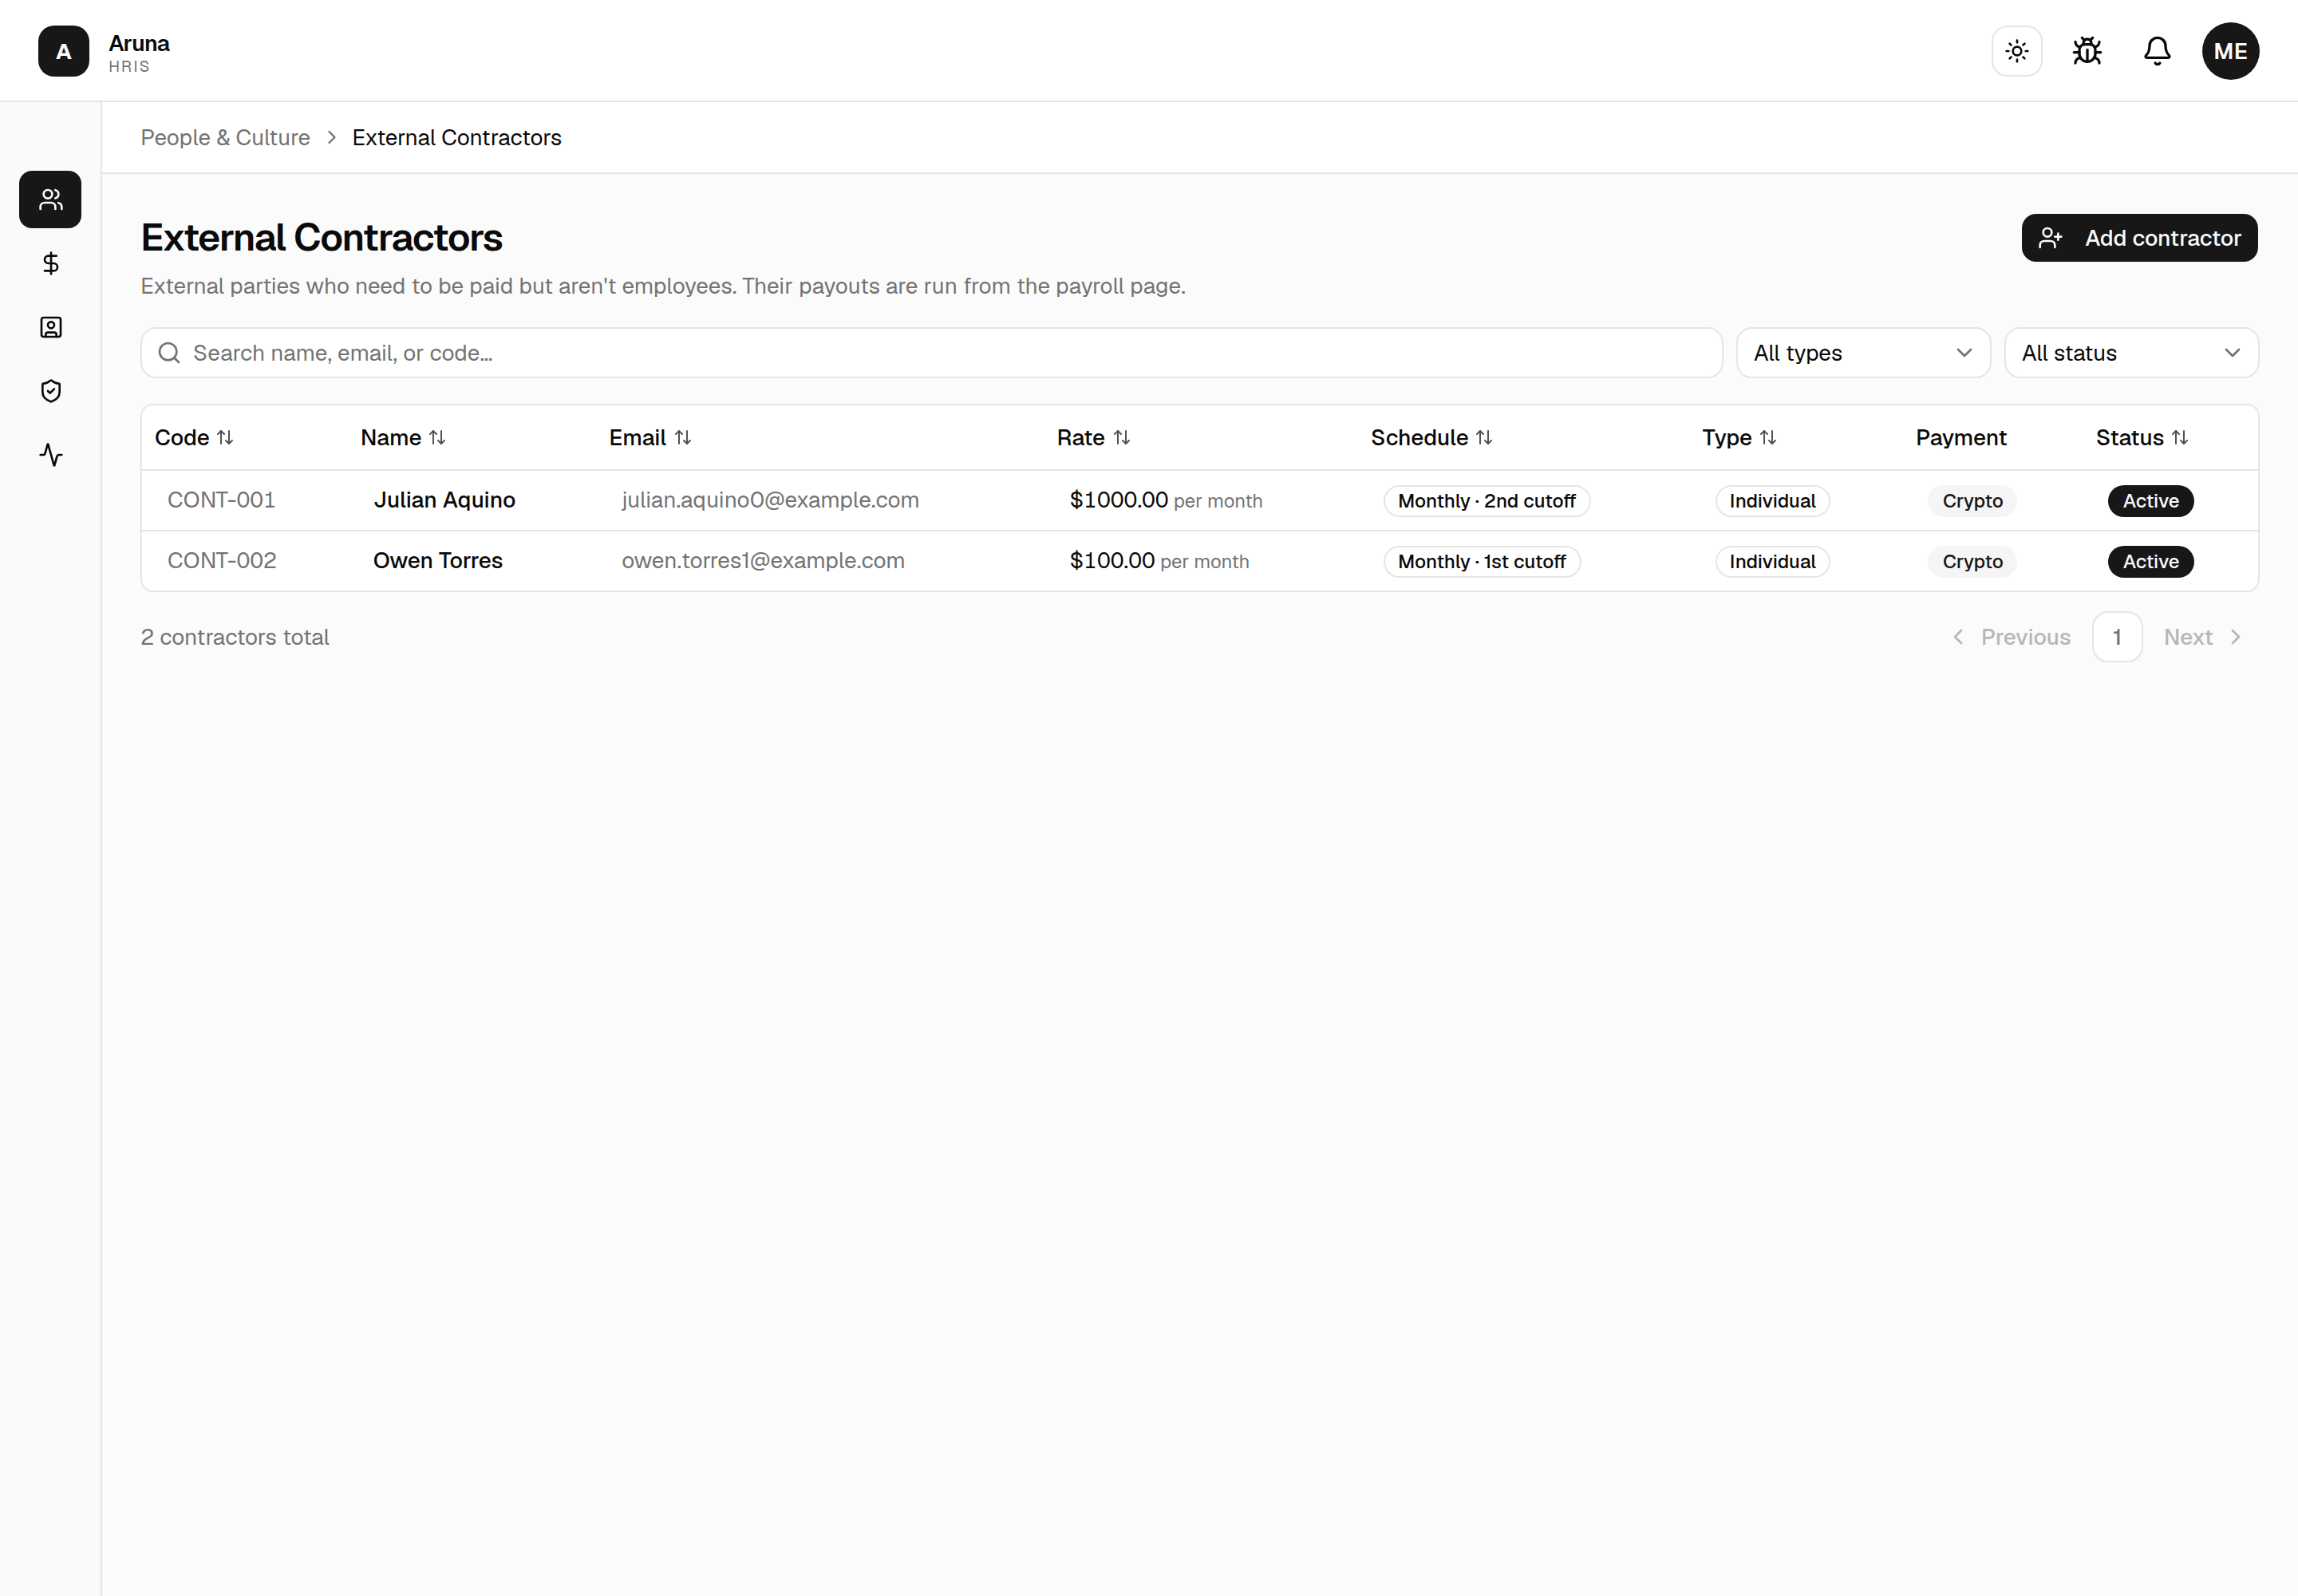
Each contractor carries a contractor code — CONT-001, CONT-002, … — the
outside-party analog of an employee's staff code. The CONT- prefix is fixed;
only the number varies.
The Rate column shows the amount and the unit it's paid in (per cutoff /
per month), and the Schedule column spells out when it lands — Every
cutoff, or Monthly · 1st cutoff / Monthly · 2nd cutoff. Both are sortable,
and you can filter the list down to monthly contractors.
Every contractor also has a Type — Individual or Vendor (a company / agency). New contractors default to Individual. You can filter the list by type and sort by it, so agencies and individuals are easy to separate.
Add a contractor¶
Add contractor opens a dedicated page. Fill the Details (name, email, Type — Individual / Vendor, status) and, optionally, a Fixed rate, a Pay schedule, and payment details (a USDC-on-Solana wallet and/or a bank account — bank fields are all-or-nothing).
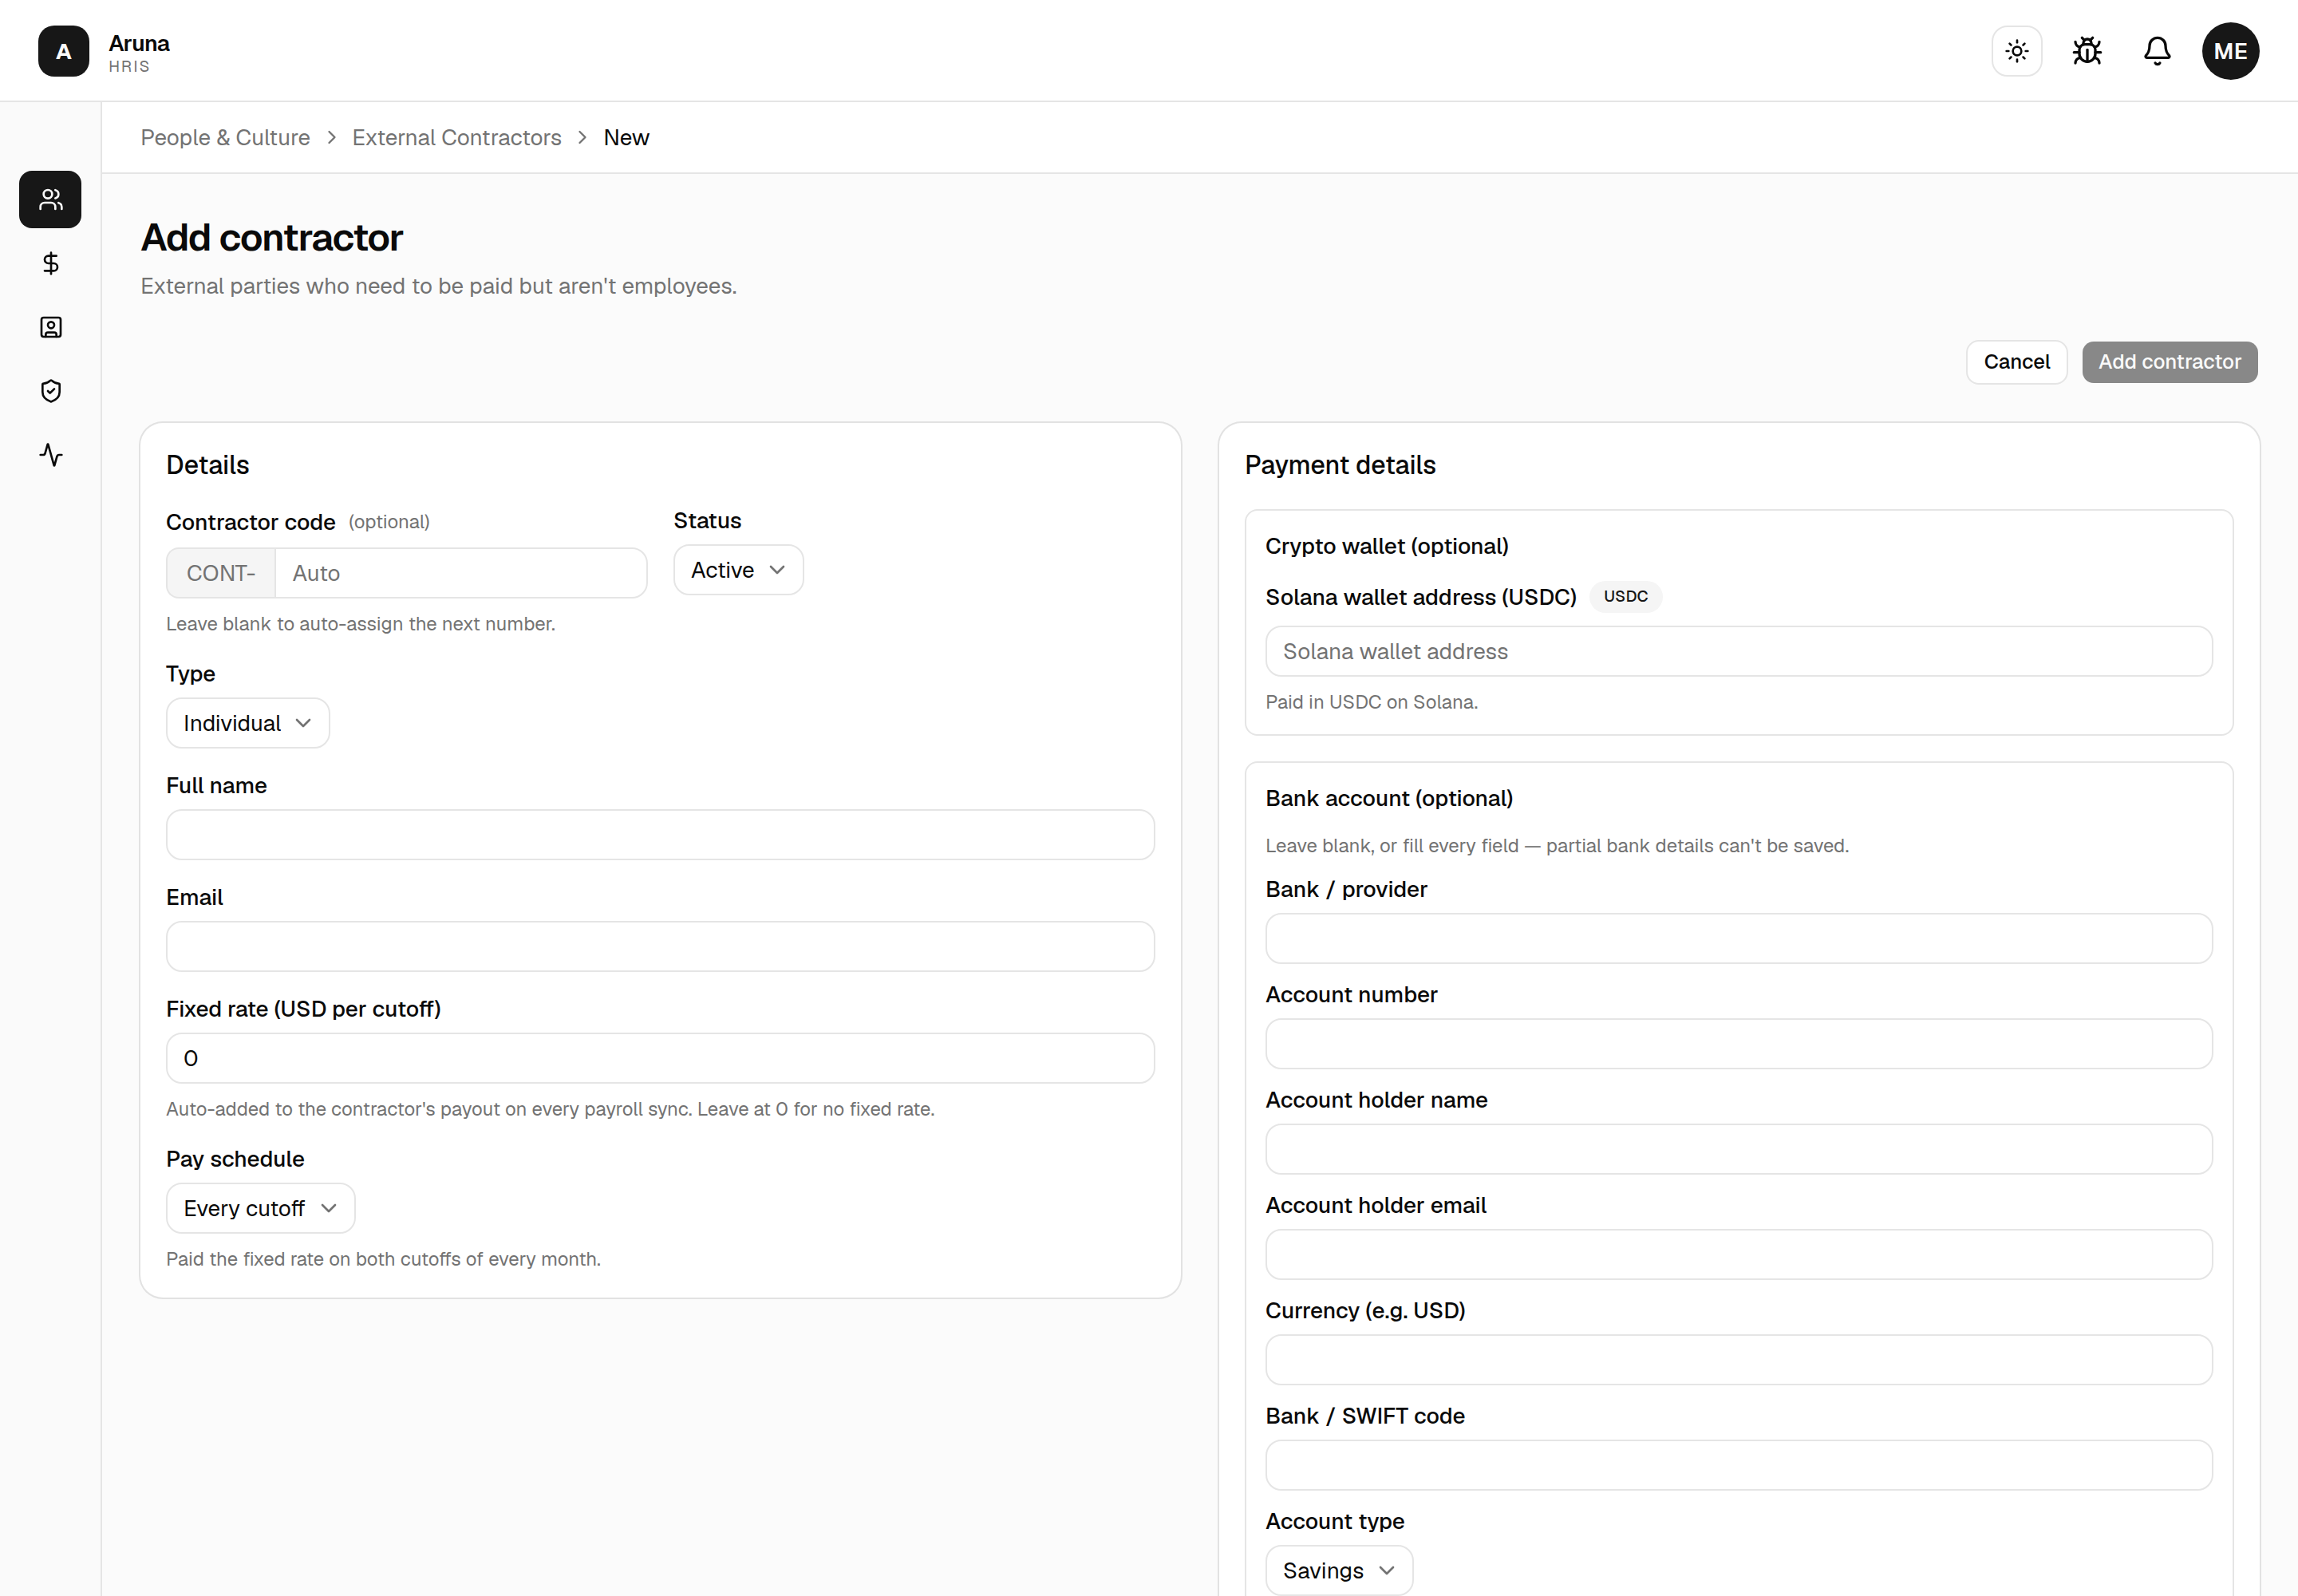
- Contractor code — leave the number blank to auto-assign the next free
one, or type a specific number (the
CONT-prefix is added for you). It must be unique. - Fixed rate — a flat amount re-issued as a system-owned line on the
contractor's payout on every payroll Sync (see the
Finance guide). Leave at
0for no fixed rate — then the contractor only gets a payout when they earn an affiliate commission or you add a manual line. The field label follows the pay schedule below, so it always says which unit you're typing: per cutoff or per month. - Pay schedule — Every cutoff (the default) or Once a month. Pick Once a month and a second dropdown appears for which cutoff the rate is paid in: 1st cutoff (1–15) or 2nd cutoff (16–end of month).
Paying a contractor monthly¶
Some contractors aren't paid per cutoff at all — they invoice a flat monthly amount. Set Pay schedule → Once a month, choose the cutoff it should land in, and enter the full month's pay as the rate (not half of it).
That contractor is then paid once per calendar month, in their chosen cutoff only. In the other cutoff of the month no payout is created for them at all — they simply don't appear on the payroll page's External Contractors tab. If something ad-hoc still needs paying in that off cutoff, Finance can always Add manual payment — the schedule only governs the automatic fixed rate.
Their invoice line names the month it covers (e.g. Monthly rate (Jun 2026)) rather than the cutoff, so it reads as a month's pay.
Switching an existing contractor between schedules is safe: on the next Sync, any draft payout that's no longer due is removed, while an invoice that was already processed or sent stays exactly as it was issued.
Edit a contractor¶
Click a row to open the contractor's page — same layout as Add, pre-filled.
The header and breadcrumb show the code and name (e.g. CONT-001 · Julian
Aquino).
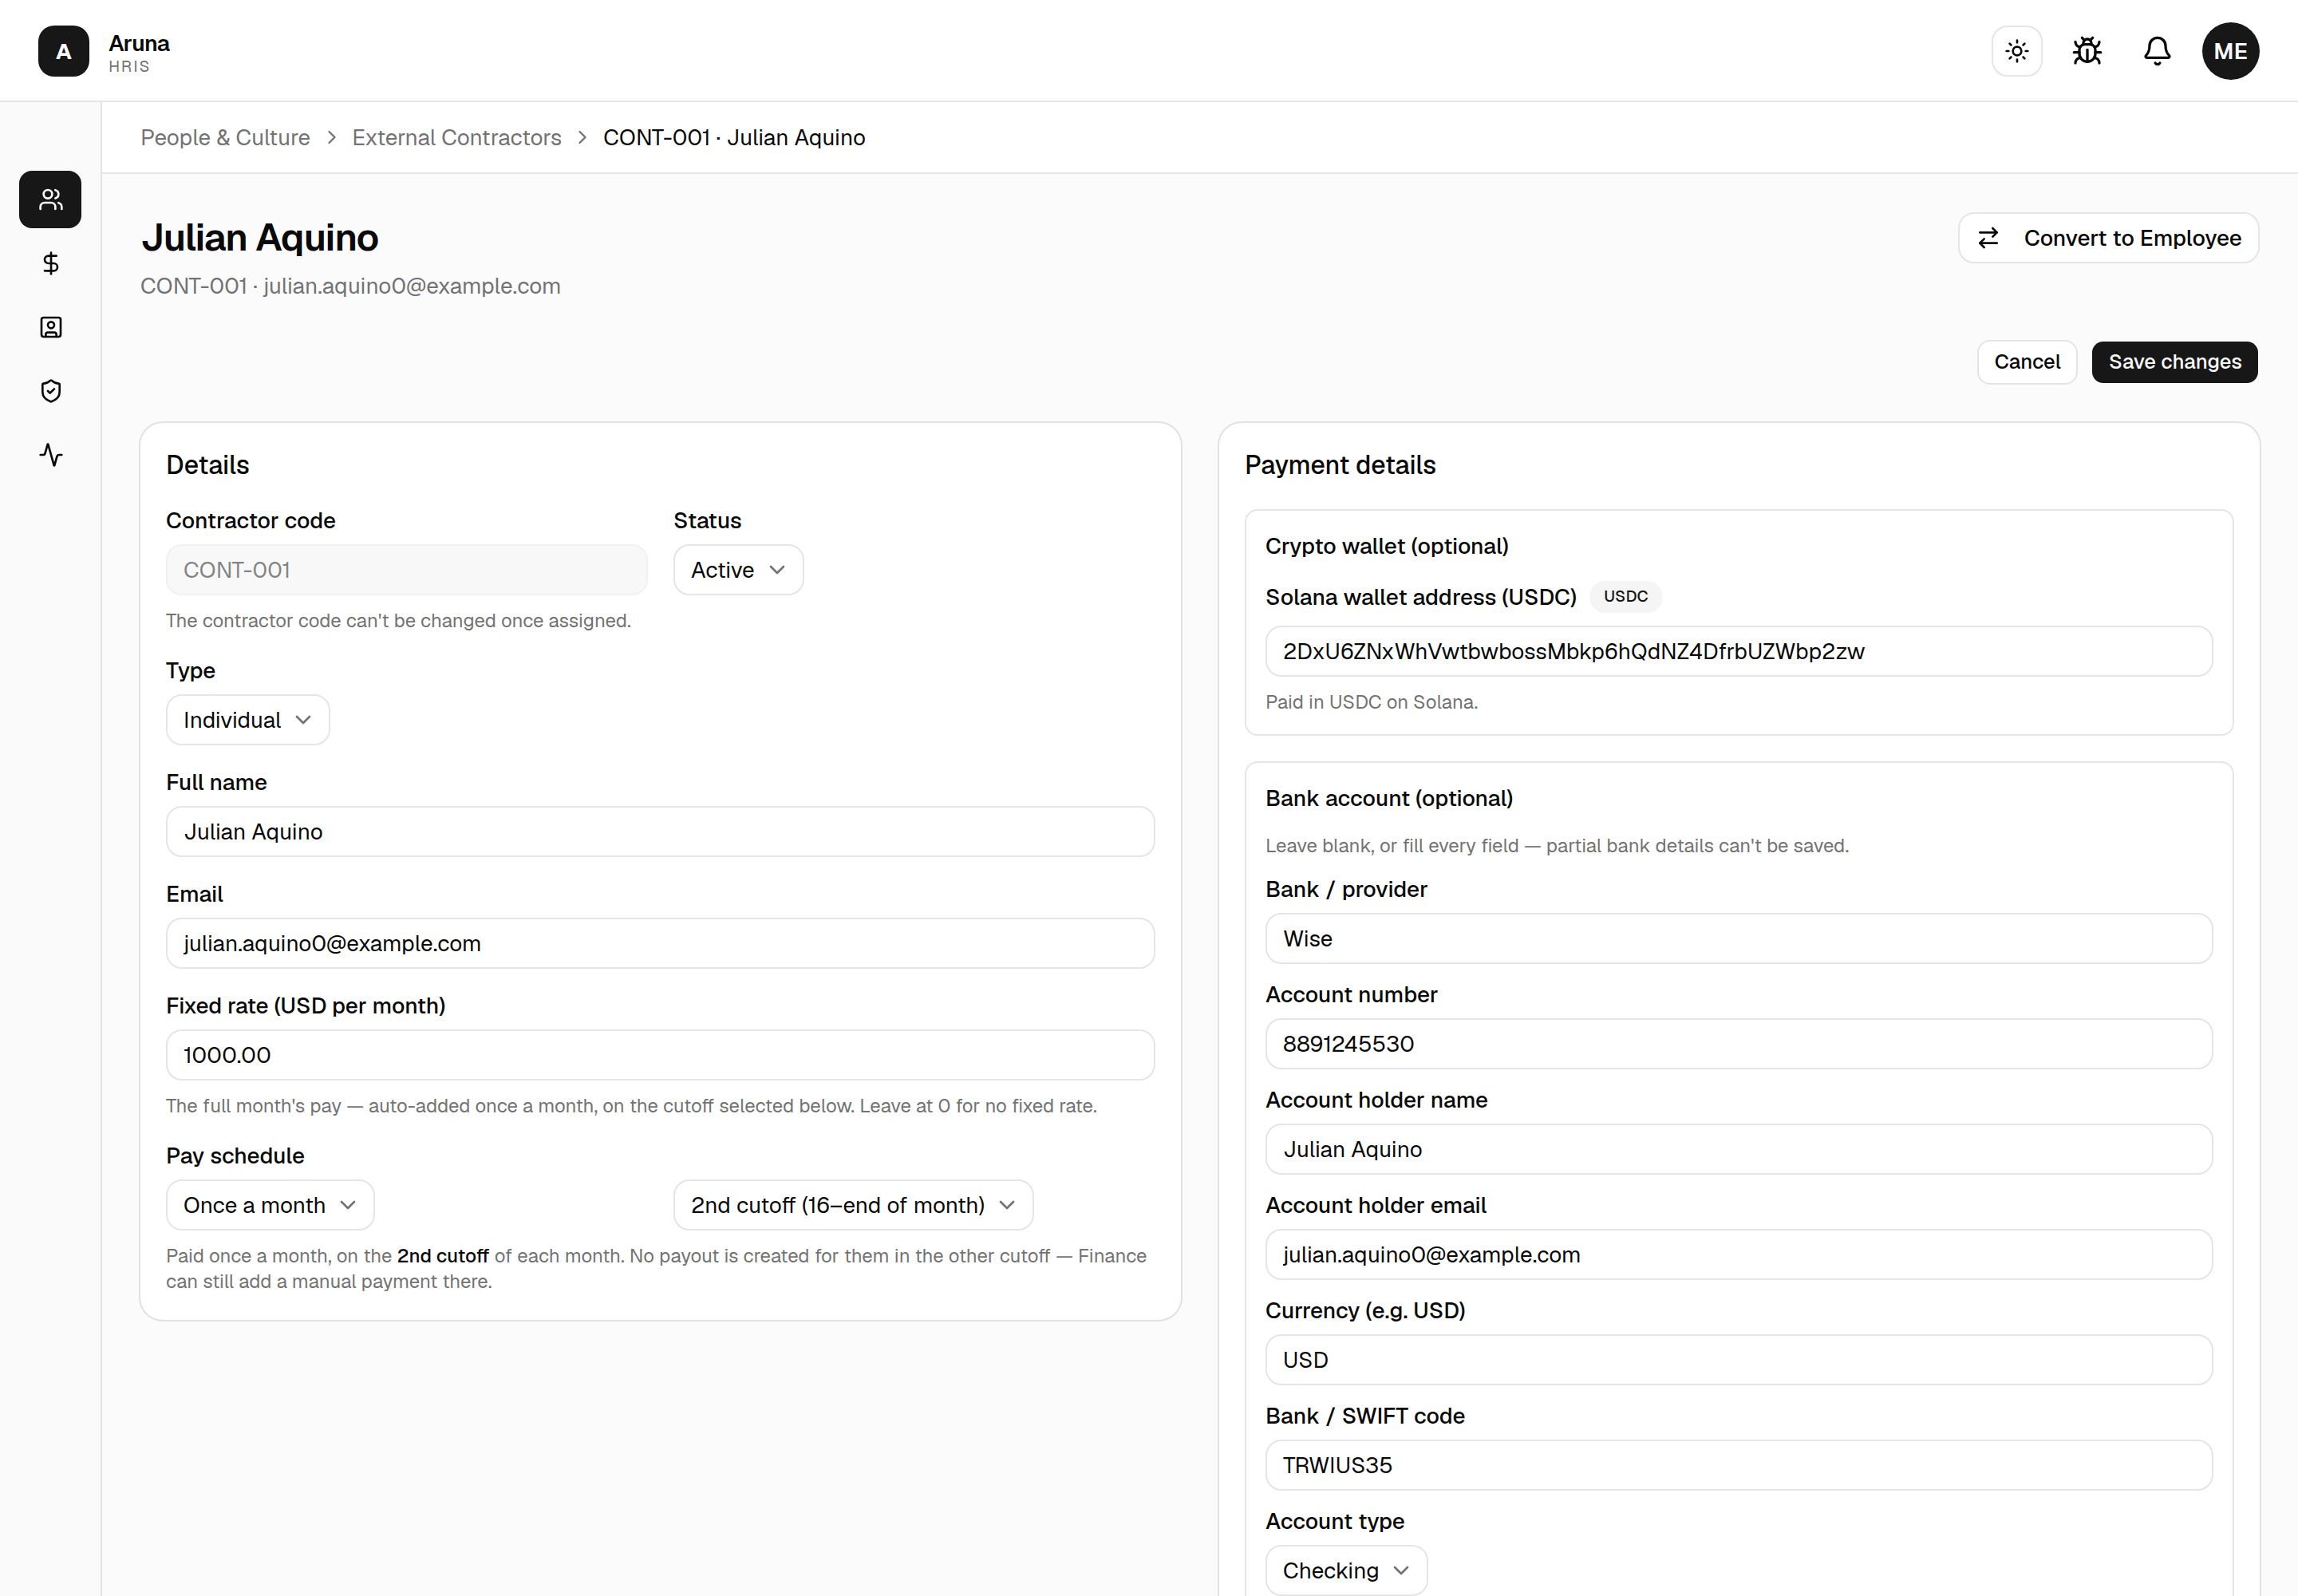
The contractor code is read-only once assigned — everything else (name, email, rate, pay schedule, wallet, bank) is editable. The example above is a monthly contractor: $1,000 for the whole month, paid in the 2nd cutoff. Deactivating a contractor (Status → Inactive) stops their fixed rate from being re-issued on future Syncs.
Convert a contractor to an employee¶
When someone hired as an external contractor comes in-house, Convert to employee promotes them instead of you re-keying a second profile by hand. It carries their identity, payment details, documents, affiliate referrals, and ArunaPay registration onto a new employee record.
Converting cannot be undone
There is no "convert back" button. The conversion creates a real employee — with a staff code, a payroll record, and an invitation email already on its way — and marks the contractor inactive permanently. Reversing it means offboarding the employee and building a fresh contractor by hand, and the person will already have received their invitation.
A contractor can only be converted once. Afterwards they disappear from the picker and their page links to the employee instead.
Check the payment details on the form before you submit. They're the account payroll will pay into.
Internal staff and external contractors are separate kinds of record, not a status you flip — a contractor has no department, no login, no leave, and no tracked hours. So converting isn't an edit: it creates an employee and retires the contractor. That's why the form asks for employment data that a contractor record never held.
Starting a conversion¶
Two ways in. From the roster, Convert to employee opens the page with nobody chosen yet:
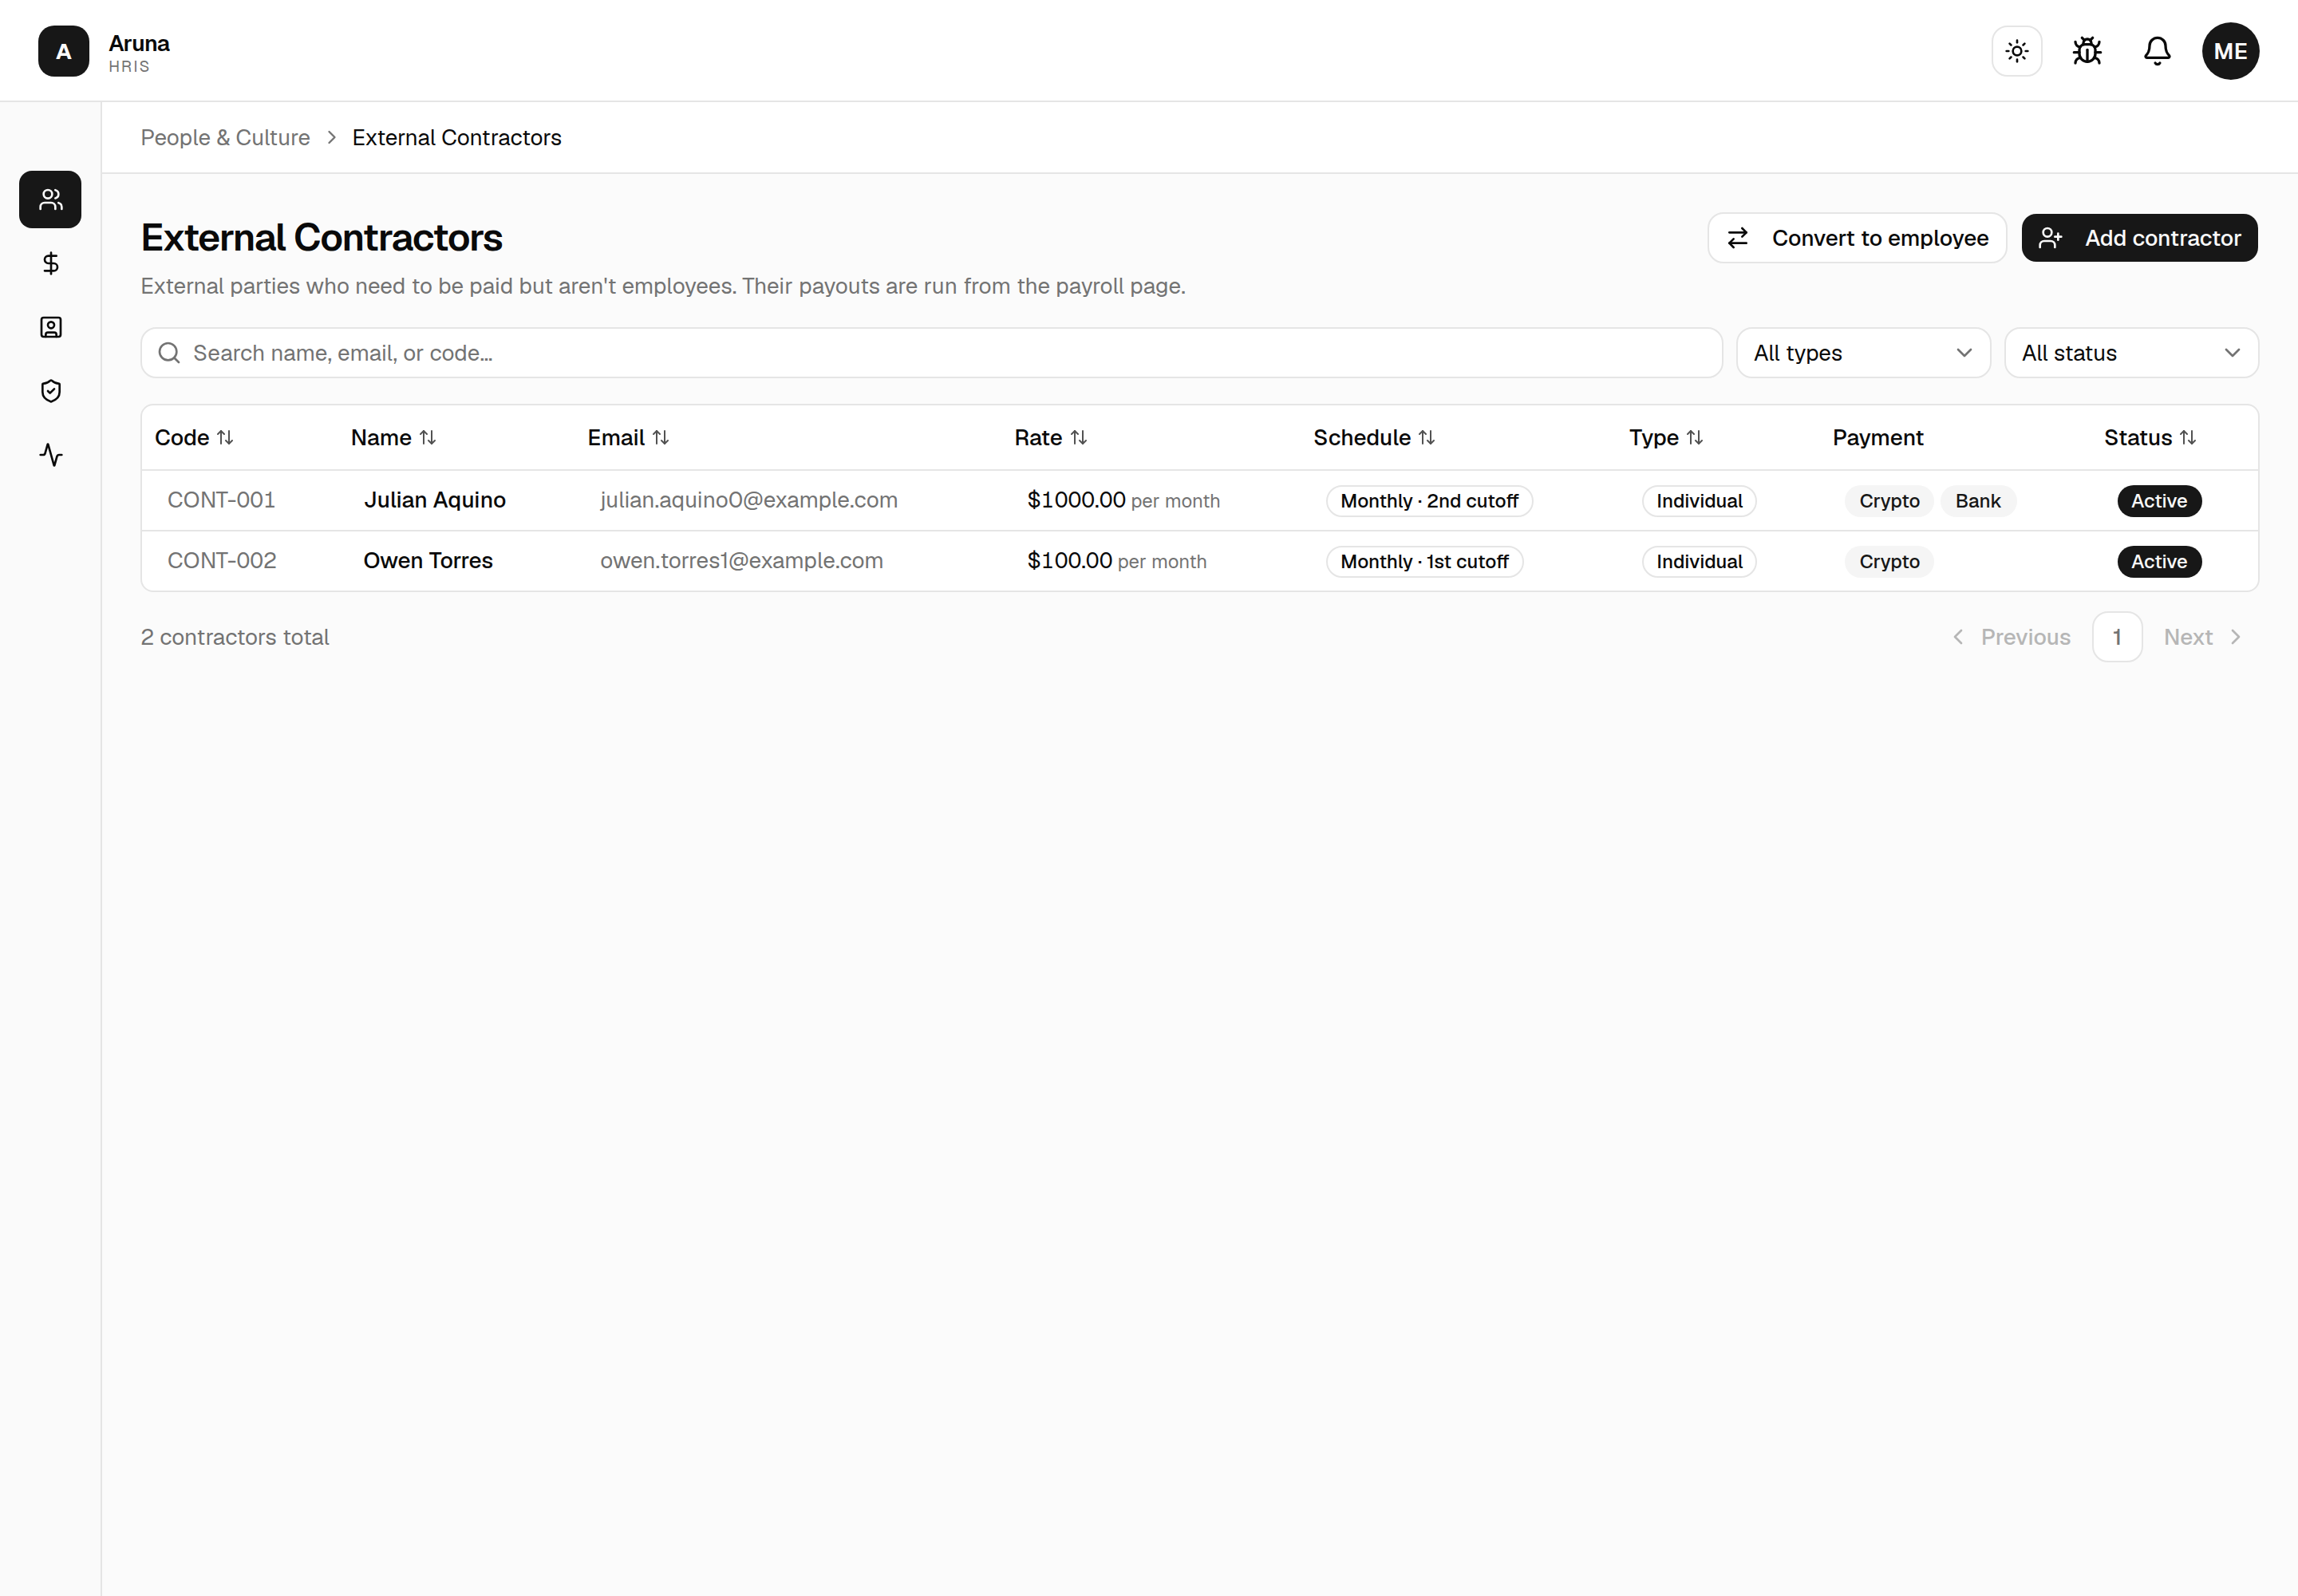
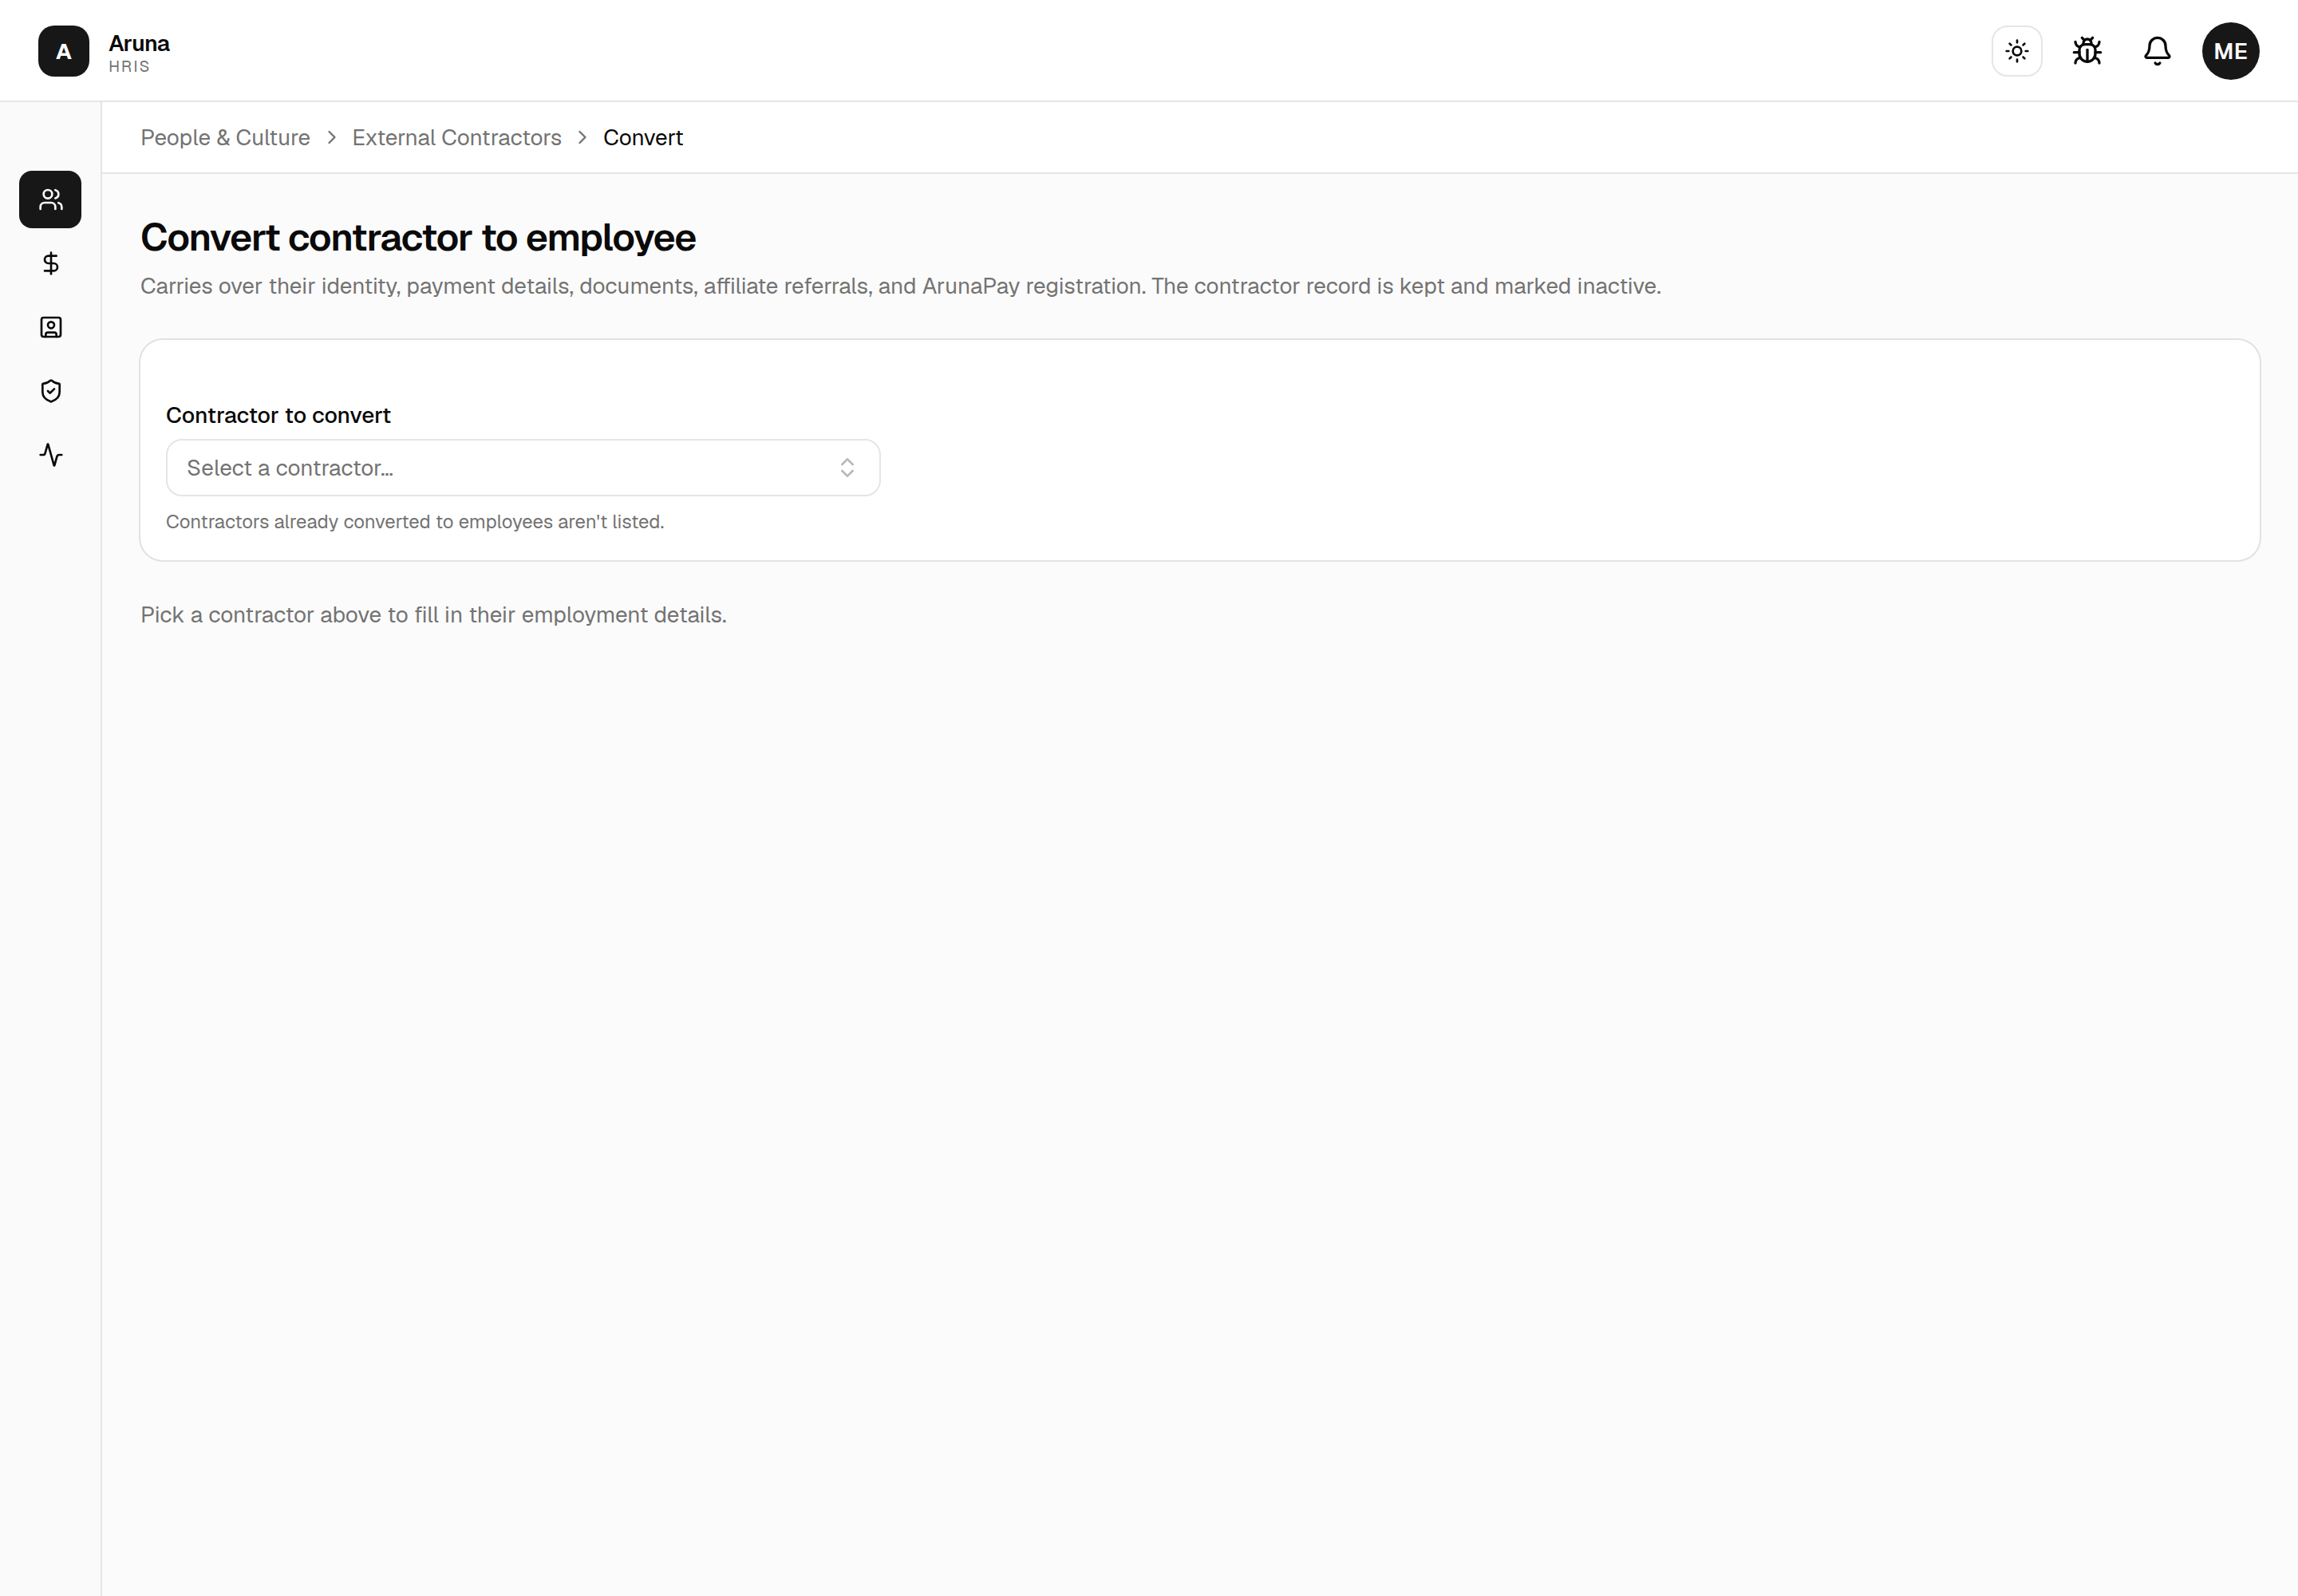
The picker searches by name, code, or email. Contractors who have already been converted are not listed — the conversion would be refused anyway.
The other way is from a contractor's own page, where Convert to Employee carries them straight through, already selected. The selected contractor is held in the page's address, so the link is shareable and survives a refresh.
Filling in the form¶
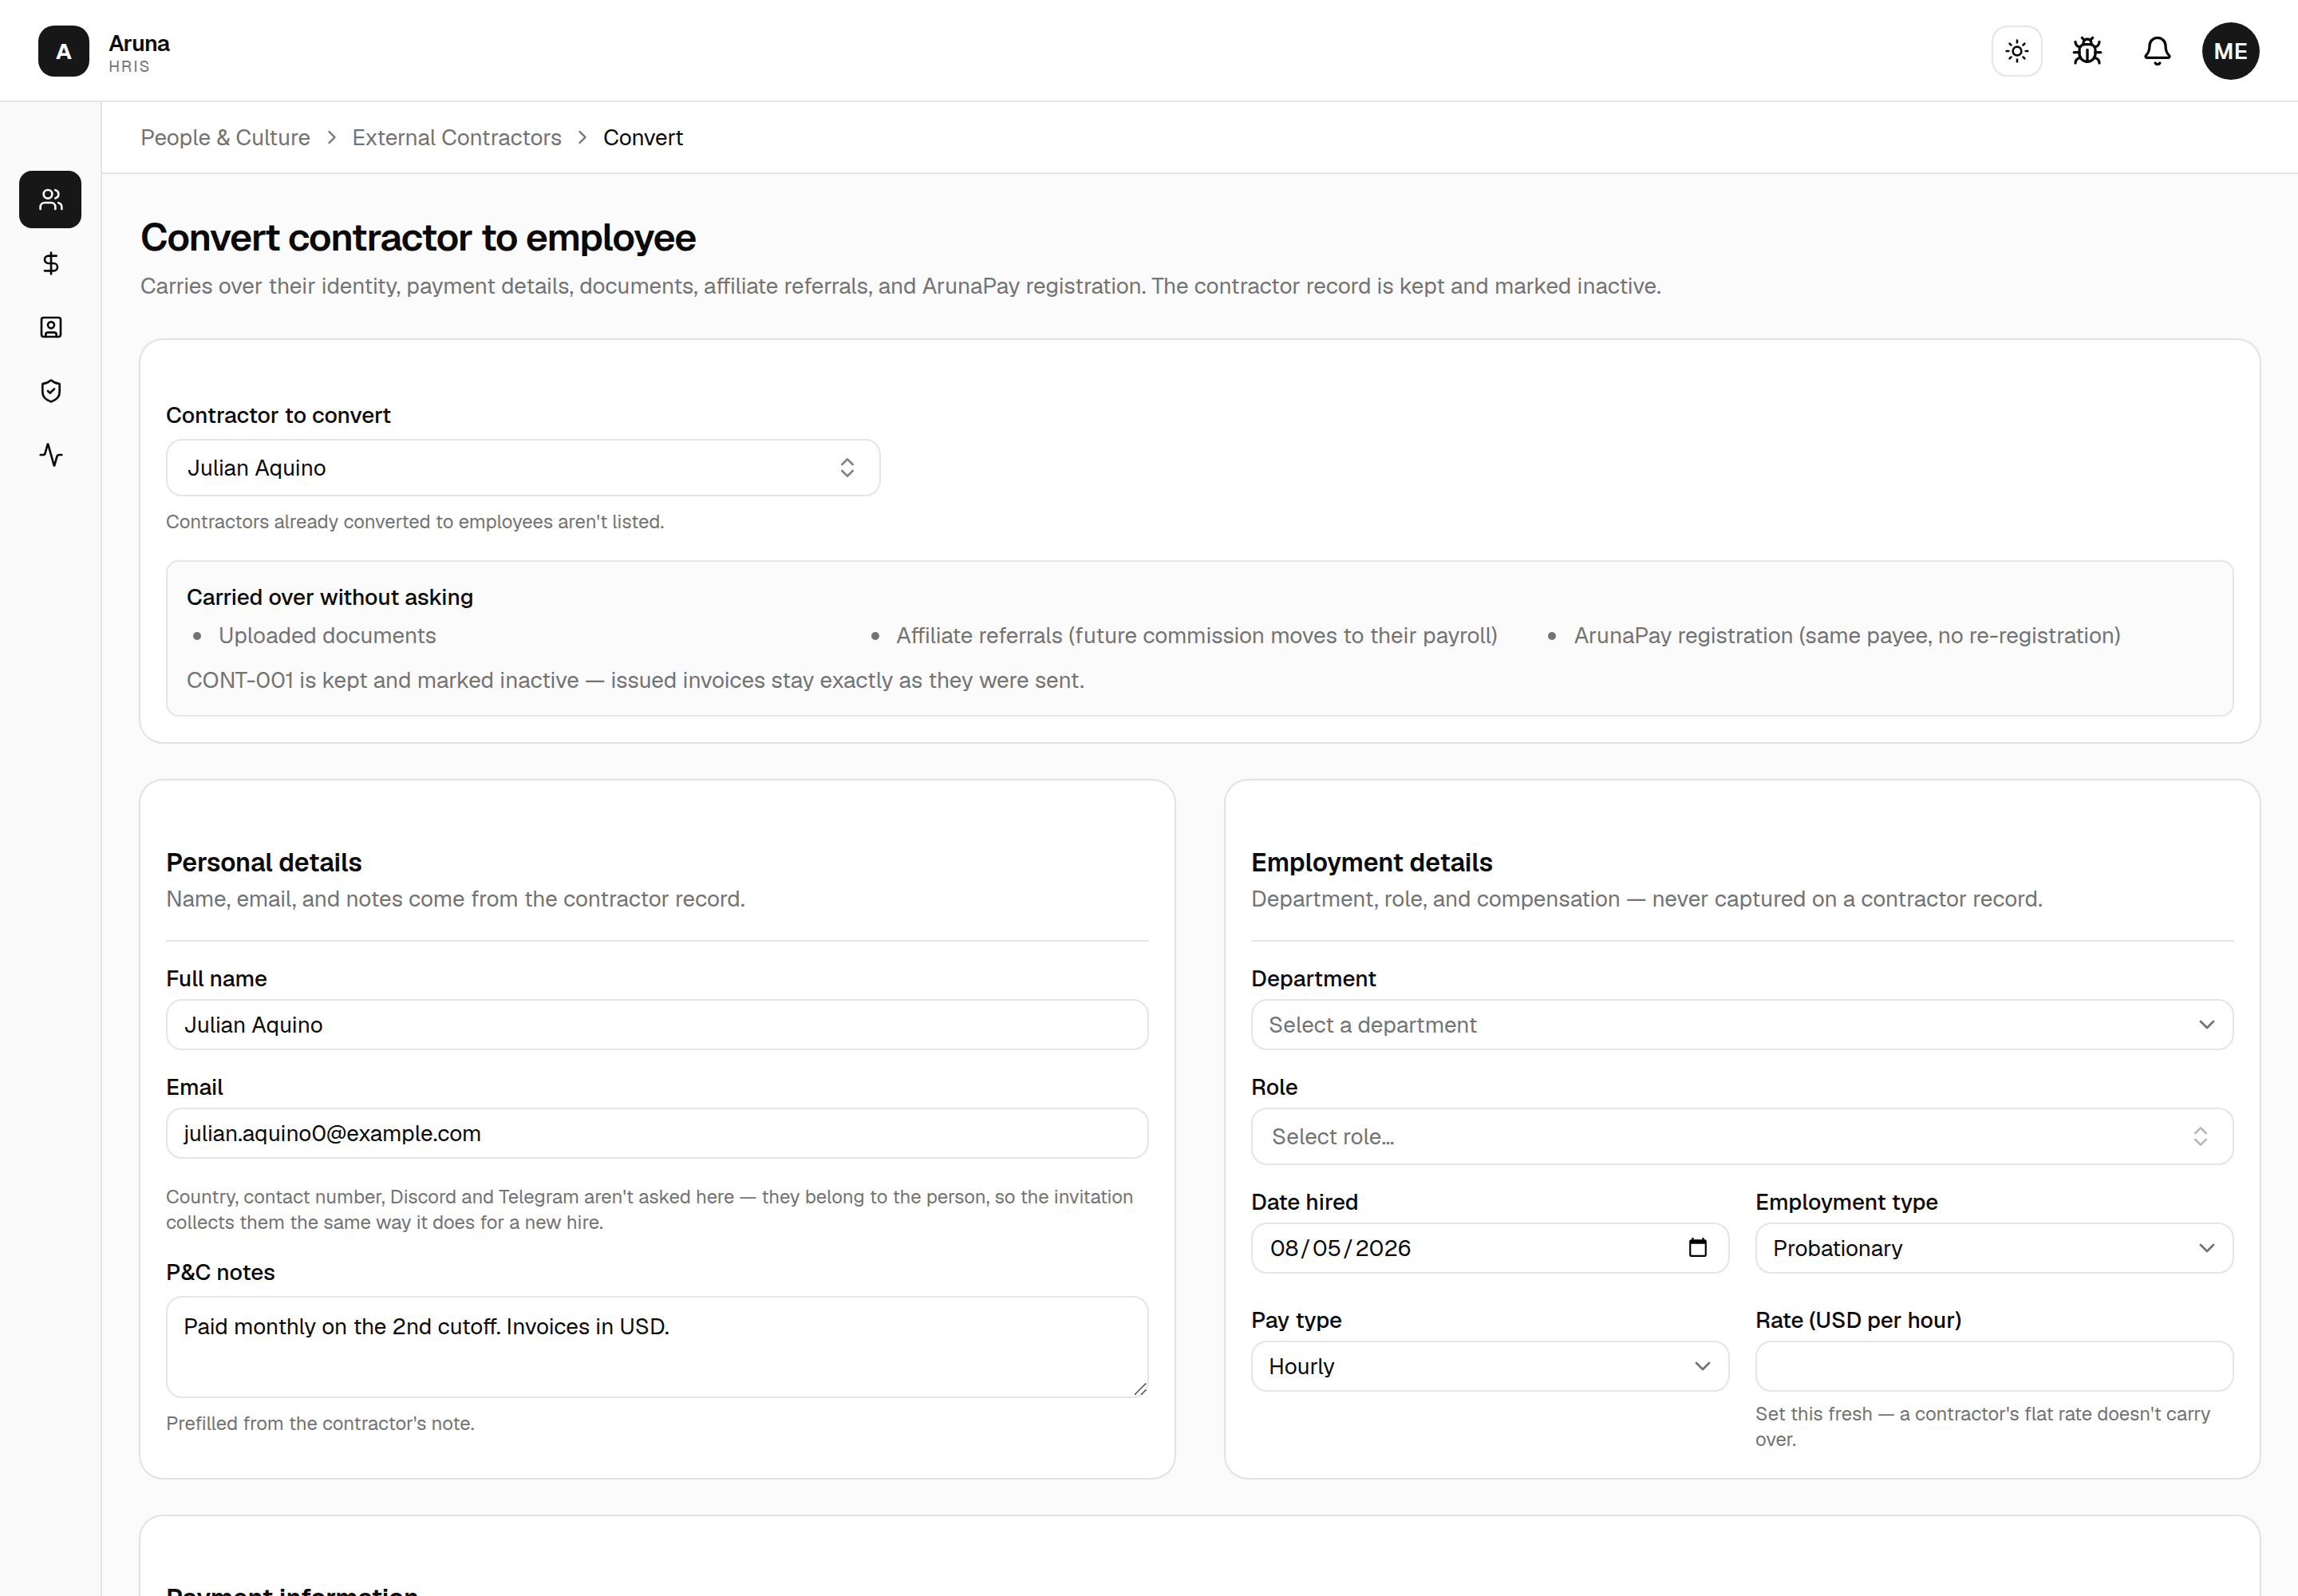
| Section | Where it comes from |
|---|---|
| Personal details | Name, email and P&C notes are prefilled from the contractor. Country, contact number, Discord and Telegram aren't asked here — see below. |
| Employment details | All new. Department, role, date hired, employment type, pay type, and rate. |
| Payment information | Prefilled from the contractor and editable — see below. |
| App account | Which modules the new employee gets. They receive an invitation and pick their own username and password; you never set a password for them. |
You don't fill in their personal details¶
Country, contact number, Discord and Telegram belong to the person, so the invitation collects them — exactly as it does for a brand-new hire. You're never typing someone's phone number on their behalf.
That means the employee record exists straight away with those fields blank, and fills in when they accept. Their name and payment details are prefilled on the invitation from what the contractor record held, so they're editing rather than starting from scratch:
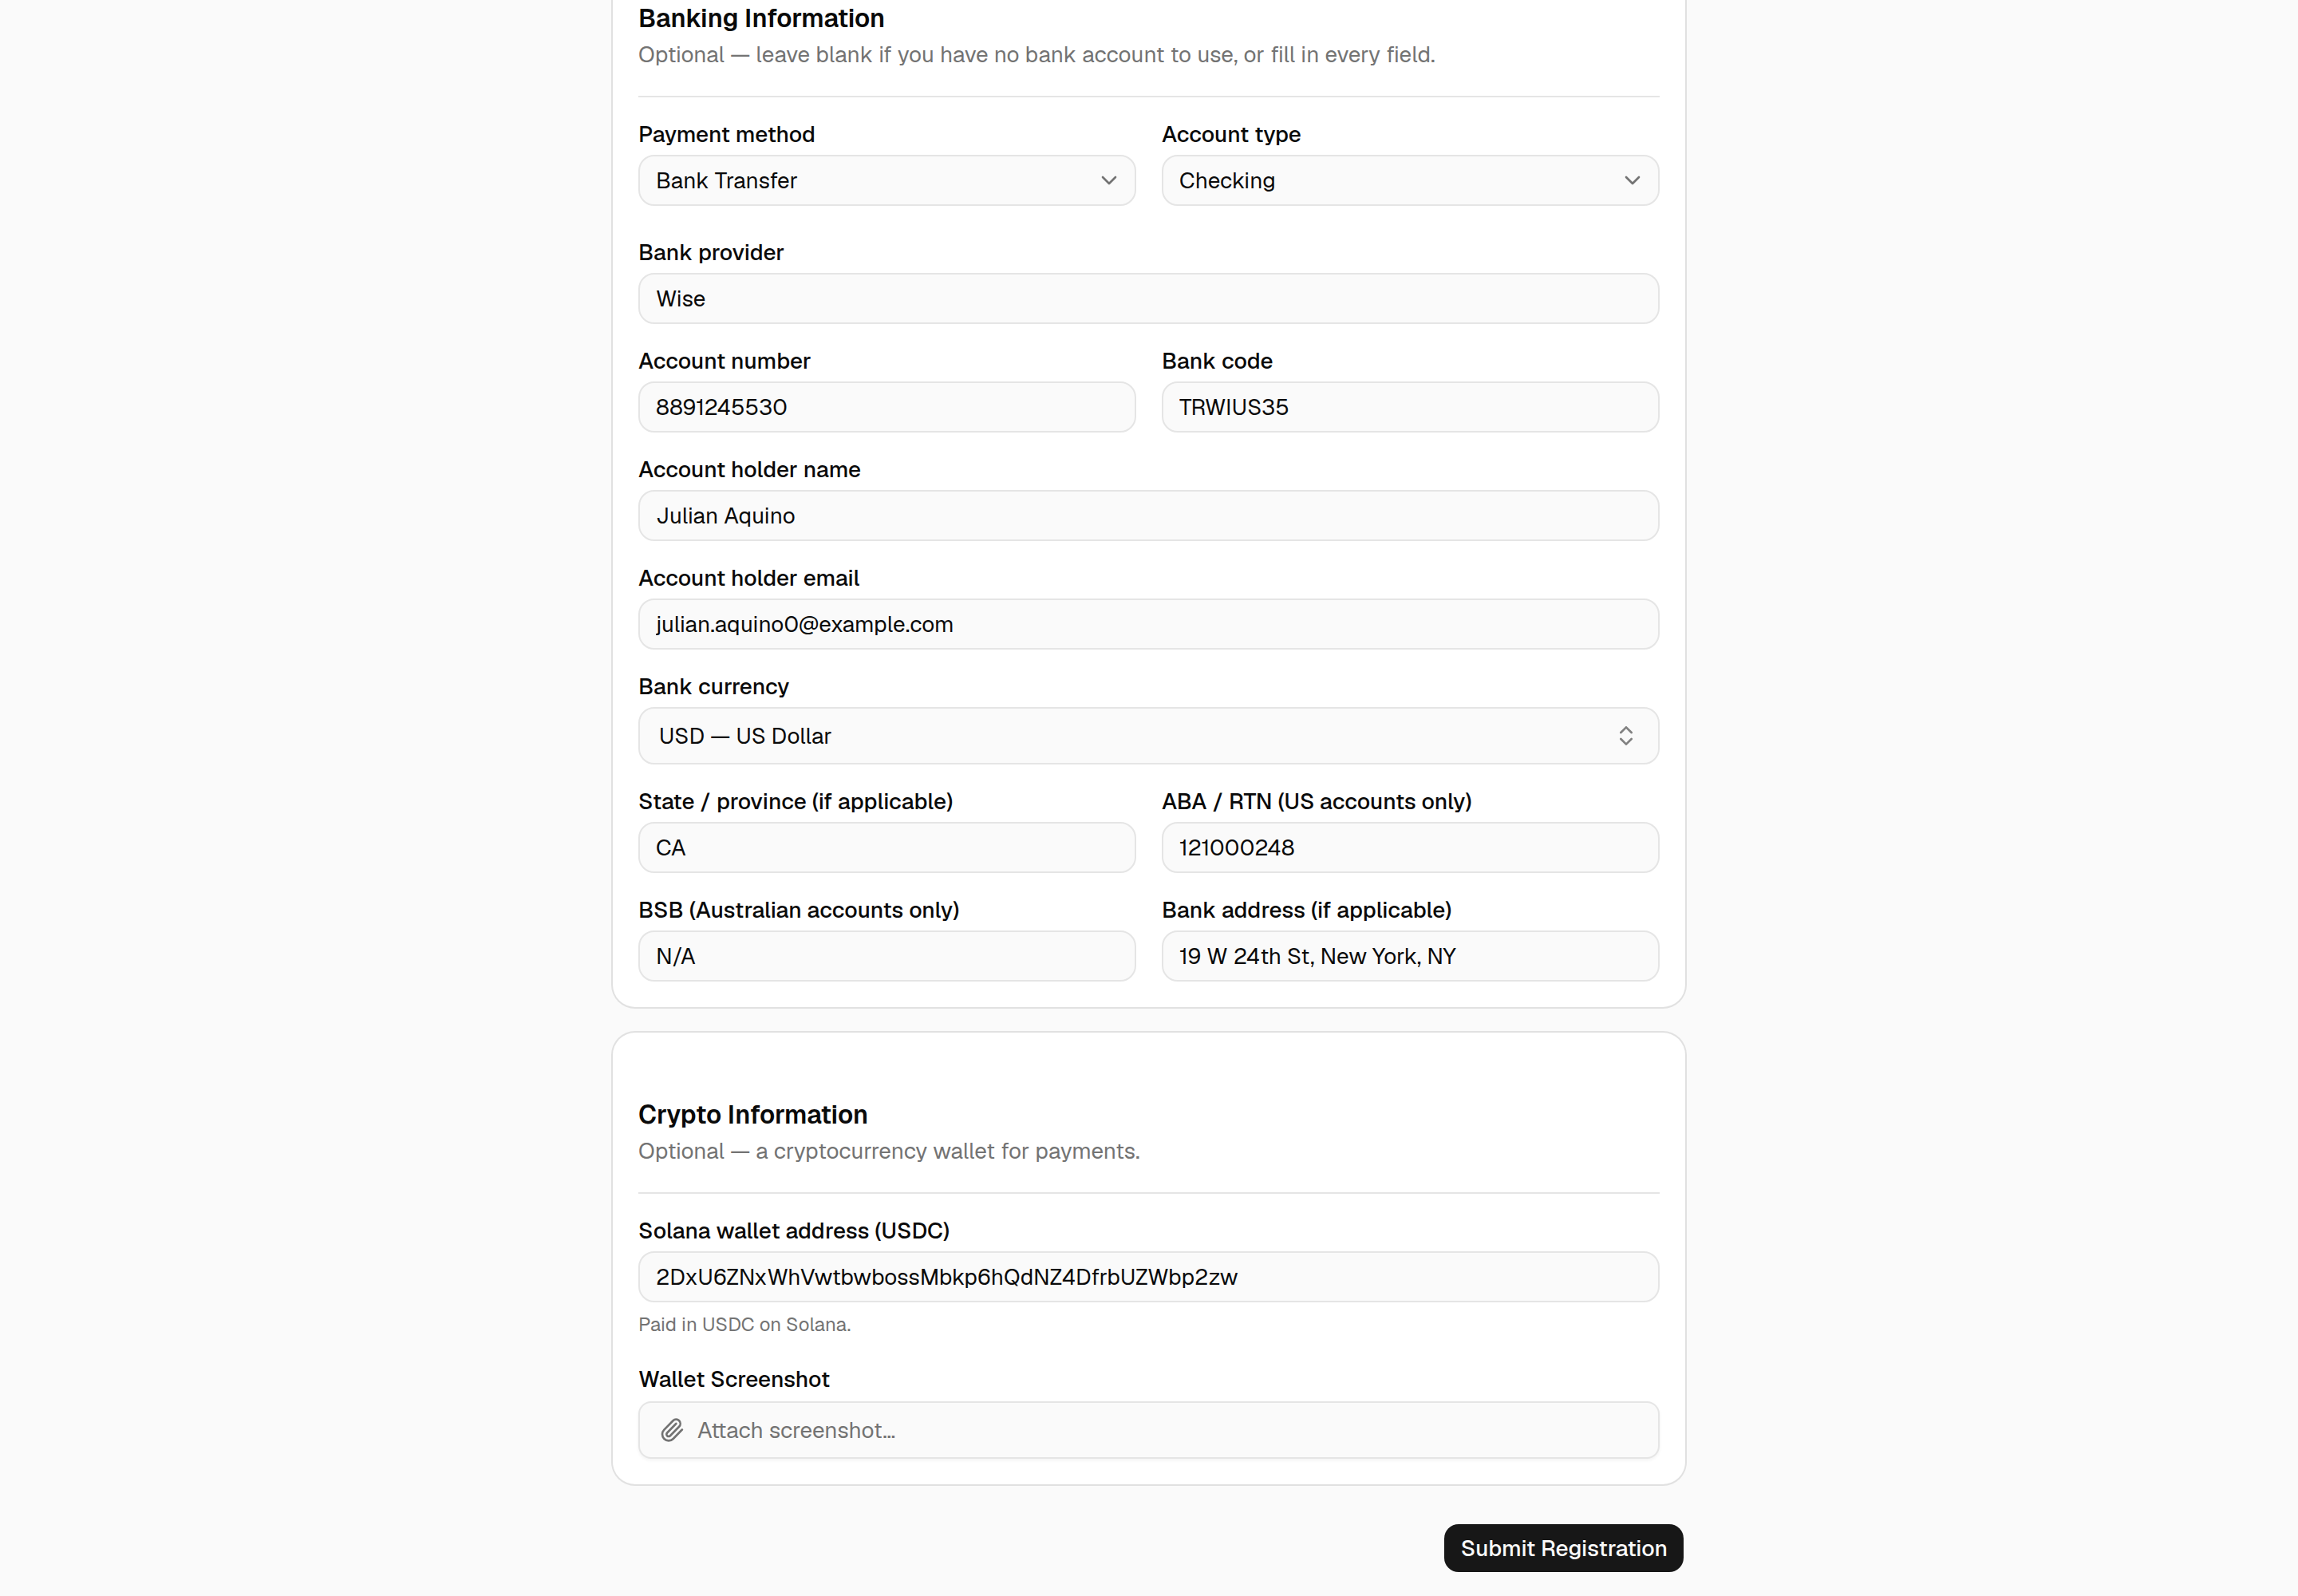
Both payment sections are optional — a new hire with no bank account can leave that one empty. They can correct anything there, including the payment details. A wallet screenshot isn't required in this case, because the wallet came across unchanged from their contractor record.
The rate is deliberately not carried over. A contractor's rate is a flat per-cutoff or monthly figure, which means something different under an hourly or fixed employee pay type — copying it across would quietly create a wrong salary. Enter it fresh.
Nor is it prefilled: the field starts empty so there's nothing to mistake for a checked value.
Three things move across without appearing on the form, because they're records and relationships rather than values: uploaded documents, affiliate referrals, and the ArunaPay registration. The ArunaPay one matters — the person keeps the same payee registration rather than being registered a second time, so their on-chain wallet entry stays intact.
Payment information¶
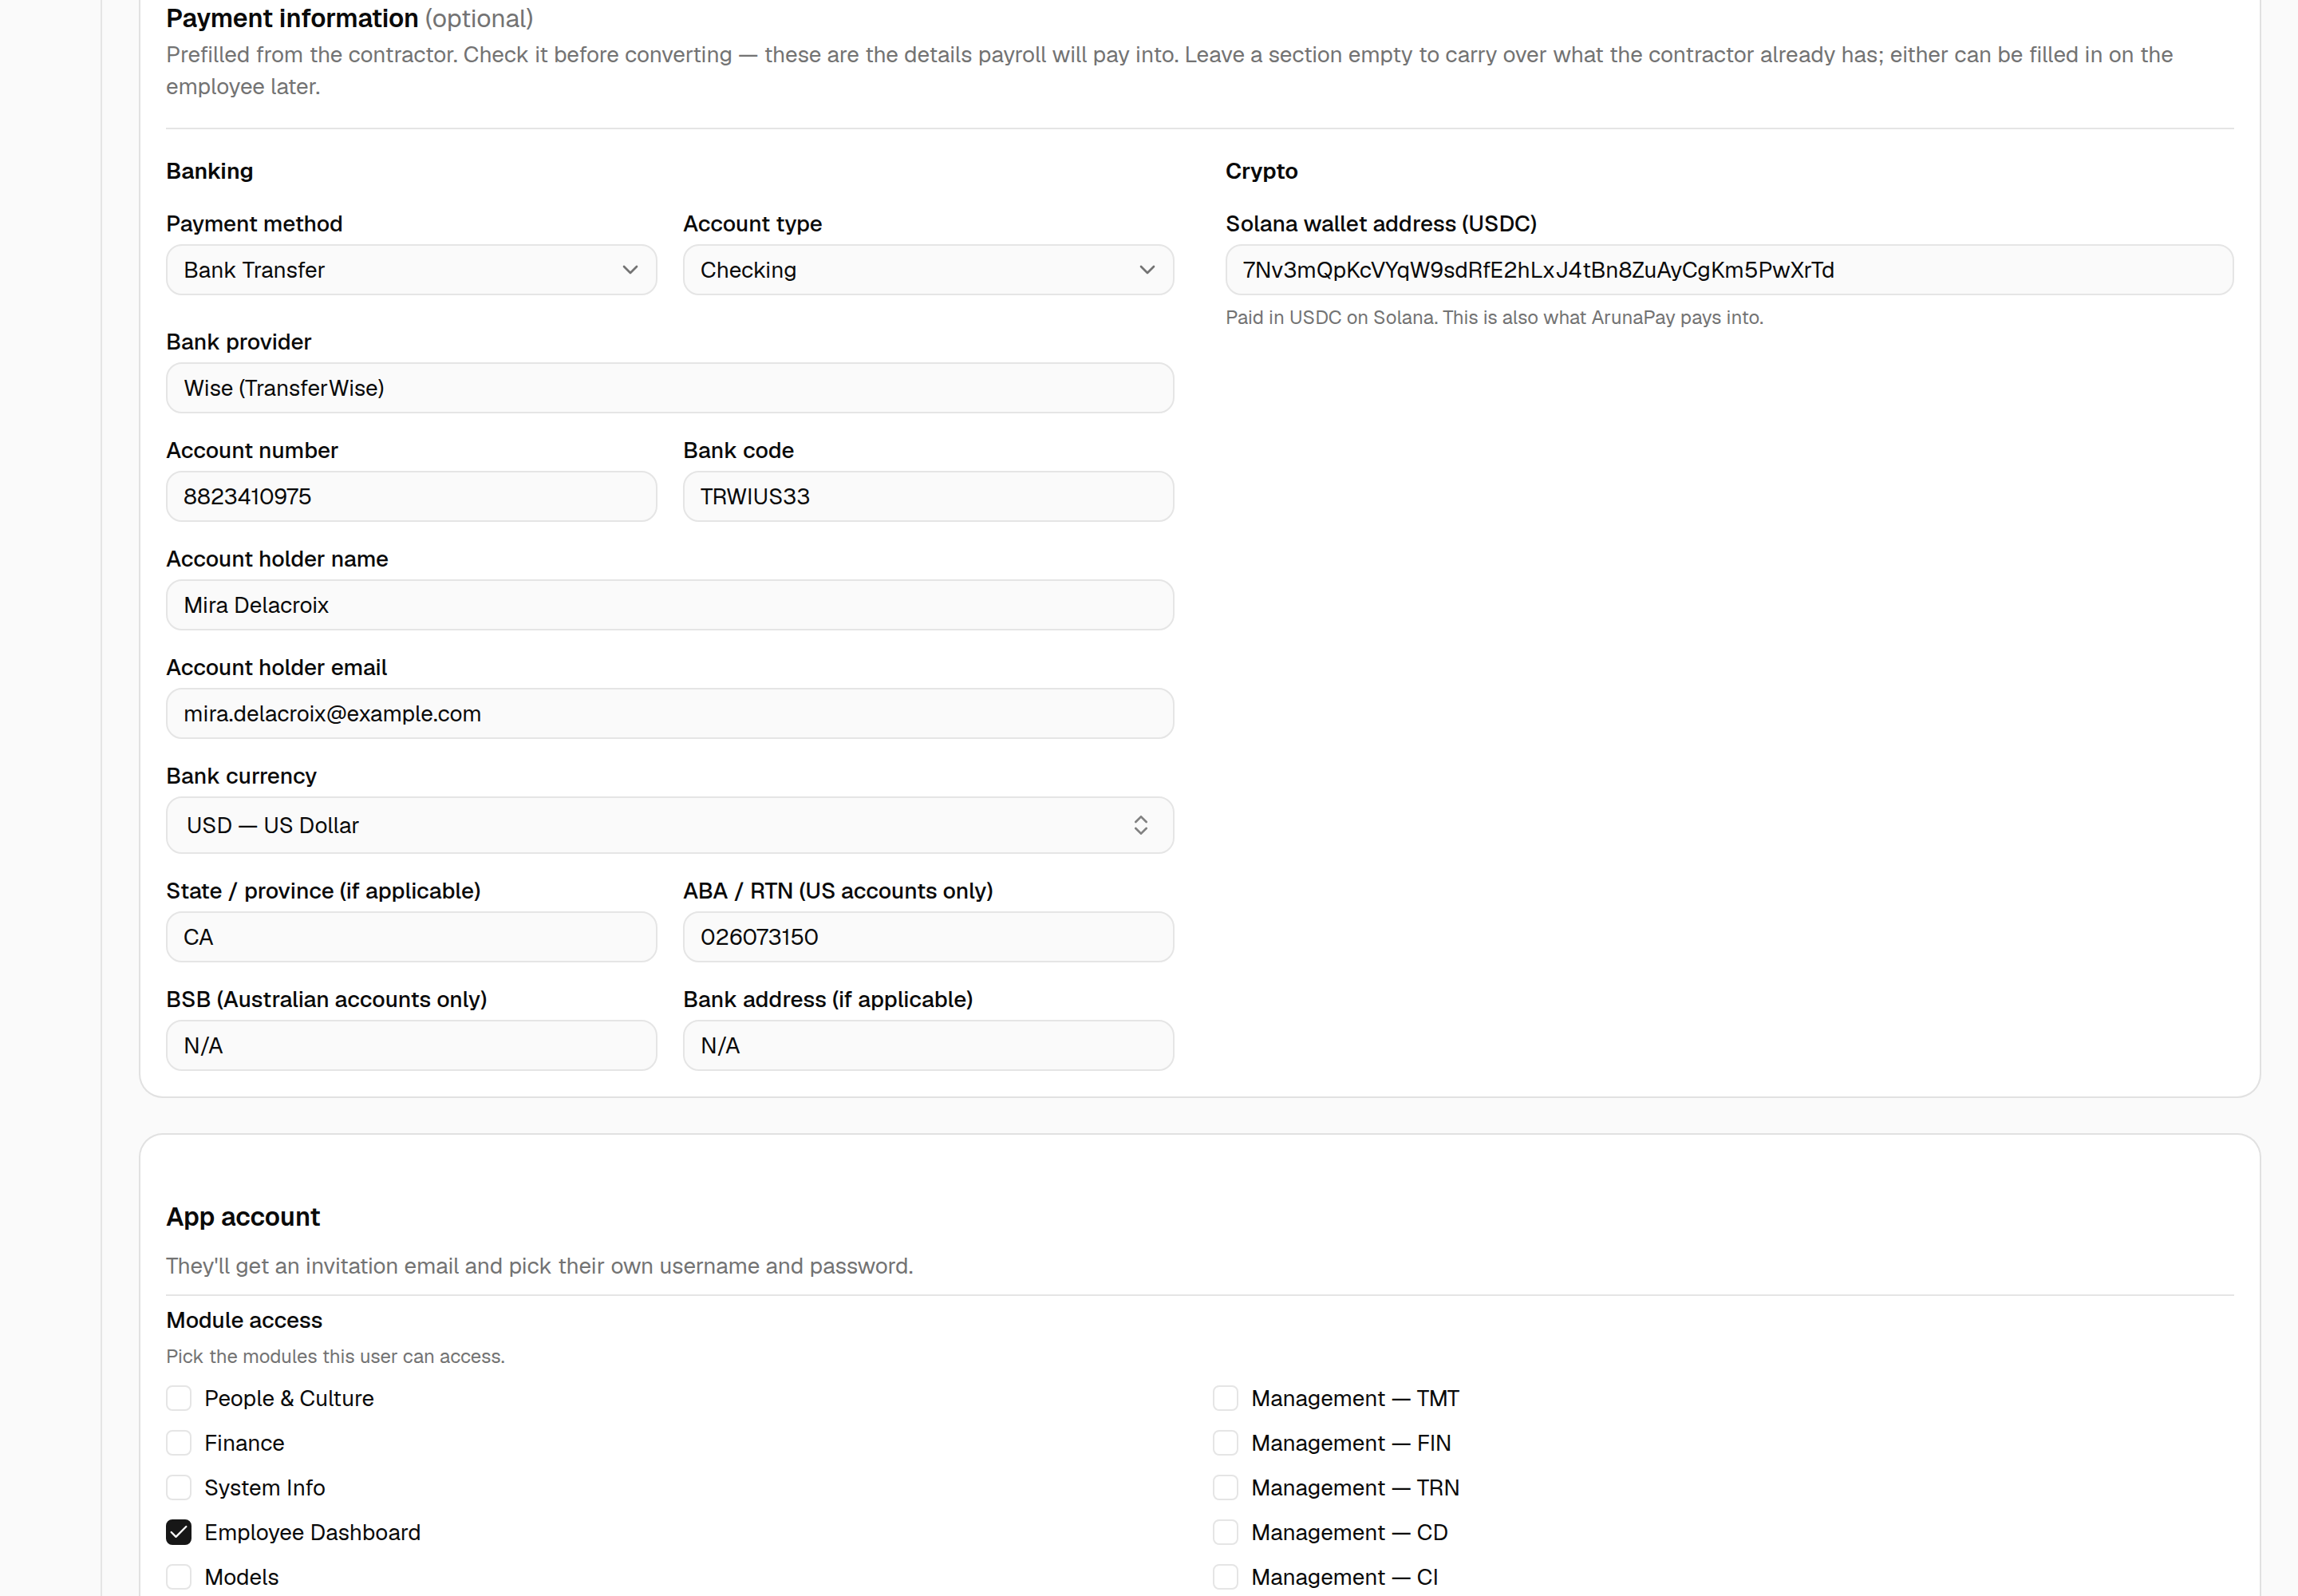
Every bank field is shown, each labelled with who it applies to — leave the ones that don't apply blank. Both blocks are optional here too: leave one empty to carry over whatever the contractor already has.
These are prefilled but shown on purpose, not copied silently — bank details are often stale by the time someone comes in-house, and this is the last moment to correct them before payroll uses them.
The regional bank fields follow the currency: State code and ABA / RTN
appear only for USD, BSB only for AUD. Anything else stores N/A.
What you might run into¶
| What happens | Why, and what to do |
|---|---|
| "CONT-001 has a processed invoice in the open cutoff — ask Finance to convert it to draft first." | Their invoice for the still-open cutoff has already been processed or sent. Affiliate commission would otherwise be paid on both the contractor invoice and the new employee payroll. Someone with Finance access converts that payout back to draft — then the conversion clears it automatically. |
| "…has already been paid on-chain…" | ArunaPay has already disbursed for that cutoff. The conversion is refused outright — reconcile the payment before trying again. |
| "…was already converted to an employee on …" | Conversions are one-way and one-time. Use the link on their page to open the employee record. |
| An email already used by an employee | Rejected. Every employee email is unique; sort out which record should own it first. |
| A bad BSB or ABA / RTN | Flagged on the field before anything is submitted. |
| Nothing at all is created after a failure | Intended. The whole conversion is one transaction, so a rejection leaves no half-built employee and no invitation sent. |
After converting¶
You land on the new employee's page, and their invitation email is on its way. Until they accept it, their country, contact number, Discord and Telegram are blank — that's expected, not a failed conversion.
The contractor record is kept, not deleted — issued invoices must keep the details they were sent with. It's marked inactive and its page links to the employee it became.
Their affiliate commission moves to the employee's payroll on the next payroll Sync; run a Pull for the open cutoff so the employee has a payroll row for it to land on. The retired contractor stops earning entirely — no fixed rate, no commission.
Troubleshooting¶
| Problem | What to do |
|---|---|
| Can't set someone's modules | They have no app account yet → Invite them first |
| Invite email bounced / wrong address | Revoke the invitation (frees the email), then re-invite the correct one |
| Contractor missing from the Convert to employee picker | They've already been converted — open their contractor page and follow the link to the employee record |
| Conversion blocked by a processed invoice | Finance converts that cutoff's contractor payout back to draft, then convert again |
| Converted someone by mistake | There's no undo — offboard the employee and re-create the contractor by hand. Flag it to Finance if a cutoff is open |
| Person says their link expired | Reinvite — it resets the 48-hour timer |
| Hours not showing on payroll | Check the employee is mapped to a Time Doctor user |
| Accidentally revoked an invite | Just Invite again — revoke only deletes the pending invite, not the person |